- The toolkit you create will be on a portable device. A laptop or portable workstation provides you with the best outcome.
- You need to connect to networks to conduct tests. Your network connections should be robust, and you should have a wired as well as a wireless network interface card (NIC) or antenna.
- It takes some time (and effort) to build a really good and high-quality toolkit. Be wise in selecting the operating system you will use. For example, there is a wide amount of support for Window and Apple OS, however, Linux allows for the greatest variety of tools used in their native environment. You can also set up a virtual machine to launch your tools.
- Make sure you keep your toolkit system secure. You don’t want your tools ever used for malicious activities.
- The tools you use and the kit you build need to be as dynamic as the attacks, threats, vulnerabilities, and issues you find along the way. There is nothing static about information technology and all of its moving parts. For example, code changes when it’s upgraded to newer versions, potentially introducing bugs. Your toolkit is no different. Keep your toolkit updated and free of issue.
- Download and set up your tools from reputable resources to avoid malware. As an example, you might use Google to find a tool such as Nmap, and it might take you to a place where you download and install a Trojan horse application instead.
- Look for software that has been around a long time and is owned by a reputable company. Ideally, you want software from a company that invests time and money into the operation and upkeep of the tool and also has a great support structure. Is the software supported? If something happens, can you get help?
Nessus
Let’s start with Nessus because it’s one of the most commonly used tools in penetration testing and you’ll definitely want to get familiar with it. This image shows a scan produced from Nessus.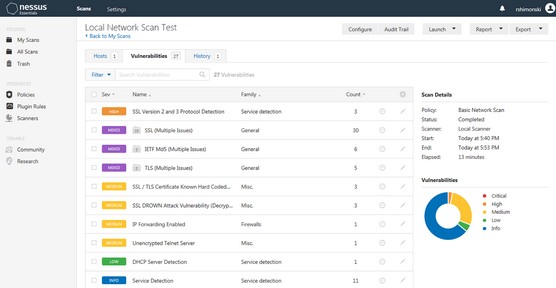 Nessus output
Nessus allows you to scan hosts on your network and the tool also lets you know whether there are concerns in the form of known risks, vulnerabilities, and exploits.
Nessus offers a free trial to try before you commit. Take advantage of that offer to see whether the tool suits you.
You can go to Tenable to sign up for an account and download Nessus. Be sure to select the Nessus professional executable and select either 32- or 64-bit, based on the hardware or software install you have. Tenable sends you an activation code.Once you register and have a key, insert the key and create a set of credentials to use with the tool. This is what you use to log into your Nessus console to run scans and get reports. If you install this on a local system (such as the one you run your toolkit on), it installs as part of localhost and be accessible at https://localhost:8834.
Here’s how to get started with Nessus:
- Open the Nessus console by going to the link provided or opening the Nessus Web Client.This image shows the output from a scan that was conducted against a network router on a local subnet.
 Using Nessus to scan a network router
 - To create a new scan, select My Scans from the navigation pane on the left side of the console, and then Basic Network Scan from the template selection.Over a dozen templates are available for advanced scans, cloud scans, and other types. But for now, you can stick with a Basic Network Scan.
 Select a scan template type.
 - Enter your information requested, such as name of scan and hosts to scan.
- Save your scan, close it, and retrieve it from My Scans to repeat the scan post remediation and/or when it's fixed as per the risk register.
 Create your first Nessus scan.
Wireshark
Wireshark is a tool that can look at data and show you the various communication paths that exist — including those that are not authorized. Wireshark is one of the most powerful penetration testing tools out there.You use the tool primarily to capture data from your network, so you can analyze it. You’ll need to be able to decode information that you capture with it. Wireshark is good for conducting vulnerability assessments and finding risks.
With this tool, your machine grabs packets promiscuously off the network where you review them. This information can be very valuable. Imagine being able to see what is traversing a network you’re responsible for. As you can imagine, hackers often use this information to exploit a network and its hosts.
Although labeled a protocol analyzer, Wireshark functions as a vulnerability scanner. Its primary functions are to capture and filter traffic on a network and perform deep inspection of capture packets and protocol analysis.
The way it works is simple. It sets up your wired or wireless interface cards on your toolkit system to promiscuously sniff and capture network traffic. The following image shows simple output from Wireshark; it clearly shows a Secure Sockets Layer (SSL) in use that is protecting the traffic.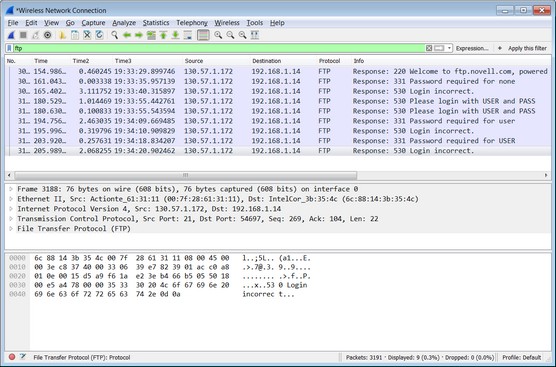 Using Wireshark Network Analyzer.
Download Wireshark from wireshark.org. Select which version you’d like based on your system architecture and then follow the installation instructions. Select all defaults to include WinPcap, which is the API (application programming interface) required to install Wireshark.
To use Wireshark to run a vulnerability scan, follow these steps:
- Launch the Wireshark tool from your start menu.The Wireshark Network Analyzer launch pad opens.
 Launching and using Wireshark to analyze traffic
 - Select the interface you want to use.
- Capture packets and then stop the capture and save it when you have collected enough information to run your review.Select Start Capture from the toolbar or the Capture menu. Run the capture briefly to find what data is traversing your network.You can select any packet captured and drill down into it.
 Drilling down into captured data
- Look at passwords and ports in use. With the data above, you can see whether any passwords were sent in cleartext. You can look at the hexadecimal output in the packet window and see it’s all encrypted, leaving passwords masked away from hackers.You can also see what ports are in use, what the source and destination IP and MAC addressing in use is, and many other details that provide clues on either a risk-free network or things you should be concerned with, such as passwords sent in cleartext. This is also known as a password capture hack that a Man in the Middle (MiTM) attack may produce.
- What hosts are communicating with other hosts: You can look at the endpoints communicating back and forth. You can see whether any hosts are more in use, which are vulnerable to hackers. You can then scan them with Nessus and secure them if needed.
 Examining the traffic between host endpoints with Wireshark
 - Test FTP access: An FTP to a remote host can very quickly expose cleartext passwords if you’re not careful. By conducting this test, you can quickly create a process in which all users must use Secure FTP (an encrypted FTP tool) to mitigate risk and secure your users and systems.
 Testing FTP access with Wireshark
Kali Linux
Kali Linux is a toolset, part of a Debian-based Linux distribution, purpose-made for pen testing, vulnerability scanning, and forensics. It includes security tools (such as Aircrack-ng, Armitage, Burp suite, Cisco Global Exploiter, Ettercap, John the Ripper, Kismet, Maltego, Metasploit framework, Nmap, OWASP ZAP), social engineering tools (Sqlmap, Wireshark, Hydra), and reverse engineering tools (Binwalk, Foremost, and Volatility).You can download it directly to your Linux install, or you can download it to a virtual machine (which is what I’m doing for the purpose of this book) from Offensive Security, which packages it with either VMware or VirtualBox software. There are directions to do either directly from kali.org, based on which one you’d like.
You can install many of the tools that come with Kali independently, but it's a good idea to install the complete toolset. You’ll use many of them.
Before you download Kali, make sure you have a system large enough to handle it and the required memory to run the applications. It generally takes more than three gigabytes to install. Kali.org recommends a minimum of 3.8GB hard disk and 2GB of RAM to install Kali.
The following image shows a console in Kali with the preloaded tools ready to go. For this example, a tool called tcdump was used to sniff the network traffic coming through the network to and from the source computer to multiple destinations.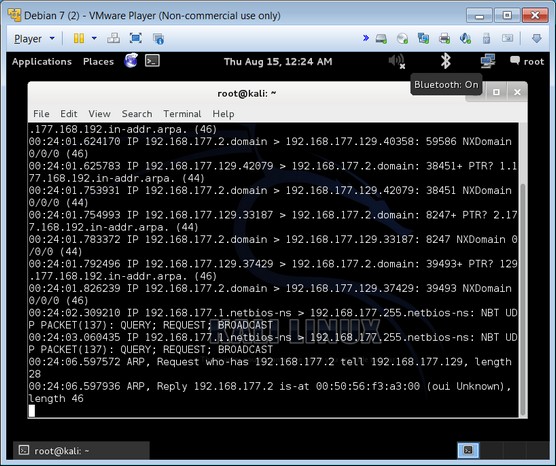 Using tcdump on Kali Linux
Kali is a Linux install, and it’s unforgiving. Everything is case sensitive; for example, nmap or tcpdump. Typing Nmap or TCPdump is incorrect.
To start using Kali, follow these steps:- Find your Kali install through the Applications menu.There are top ten tools, information gathering, and sniffing/spoofing tools (like Wireshark) all found within. When you have time, be sure to explore them all.
 Explore the Kali Linux toolset.
 - Choose the Vulnerability Analysis category and then nmap.Or you can open a console and type nmap. Nmap (short for network mapper) is a pen testing tool that allows you to find and discover hosts on the network or if you know about one, point Nmap to it so it can scan it for vulnerabilities.
- After you run a scan of the network, examine the output.Nmap lists the various open ports found on various hosts, as shown below. An attacker can gain access to these ports. You can track down which should be open and which shouldn’t.
 Loading and using Nmap in Kali Linux
To learn more about ports and see which ones are configured by default visit the iana.org website.
Nmap
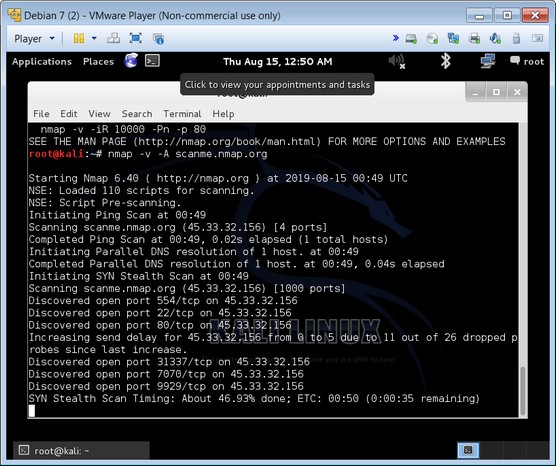
Nmap is a network mapper that’s used to discover hosts and services on a computer network. It does so by sending packets and analyzing the responses. (You can download and install Nmap for Windows.) In the image below, one pen tester used an example of a possible SYN stealth scan to probe TCP ports for them to answer, thus proving a map of the network within the tool.When you finish mapping the network, you can study the topology map to find places you might want to secure from hackers who are looking for jump-off points to get around your network and into other areas or secure hosts.
Hackers don’t always come in from the outside through your firewall, sometimes they’re sitting in cubicles inside your network running a tool just like this, looking for holes.
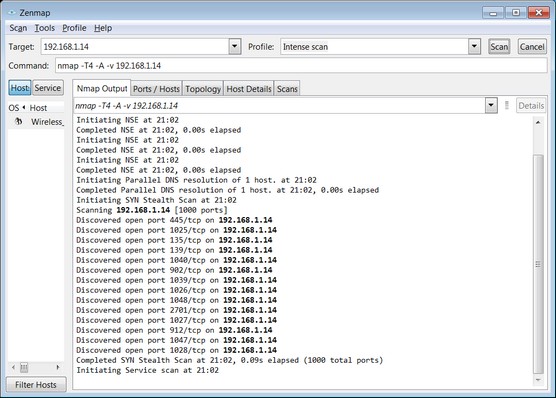 Creating a network map with Nmap.
Zenmap is Nmap — just the front-end shell to a console-based tool (as found in Kali) — to manipulate the GUI, and uses Nmap on a Windows desktop. On the Nmap Output tab is the syntax used by the GUI, which you can use in the console-based Kali version to get the same effect. It’s a way to dummy-proof yourself in learning the many, many ways to get Nmap to work, especially in a Linux system.