


- Extending/retracting the lens: If you have a retractable lens like the AF-P kit lens, press the retractable-lens barrel button while rotating the lens barrel to extend and retract the lens. The camera won't take a picture with your Nikon’s lens in the retracted position.
 Here are a few features found on certain AF-P lenses.
 - Zooming: If you bought a zoom lens, it has a movable zoom ring. The location of the zoom ring on the kit lens. To zoom in or out on this lens, rotate the ring. (Some lenses instead use a push/pull setup, where you push and pull the lens away from you or toward you to zoom.)
You can determine the current focal length of the lens by looking at the number that’s aligned with the white dot that’s labeled focal-length indicator above.
- Setting the focus method (manual focusing or autofocusing): How you switch between autofocusing and manual focusing depends on whether you’re using an AF-P lens or an AF-S lens, which is the other type of lens that works with your Nikon camera. Here’s the scoop:
- AF-P lens: Change the focusing method via the Focus Mode setting. The fastest method is to use the control strip, but you also can access the option from the second page of the Shooting menu, as shown on the right. Either way, to switch from automatic to manual focusing, select the MF (Manual Focus) option.
 With an AF-P lens, set the lens to automatic or manual focusing by way of the Focus mode setting.
To go back to autofocusing, revisit the Focus mode setting and choose one of the AF (autofocus) options. How many AF settings are available depend on your exposure mode and whether you’re working in Live View mode or using the viewfinder to frame your images. The default settings are AF-A (Autofocus Auto) for viewfinder photography and AF-S (single-servo autofocus) for Live View and movie photography.
- AF-S lens: These lenses for your Nikon typically offer an exterior switch for shifting from automatic to manual focusing. You move the switch to the A position for autofocusing and to M for manual focusing. On some lenses for Nikon camera, the switches may instead be marked AF and MF; some lenses have a switch position labeled AF/M, which means that you can use autofocusing to set initial focus and then fine-tune focus manually without changing the position of the switch.
 On this AF-S lens, as on many lenses, you set the lens to automatic or manual focusing via an external switch.
- AF-P lens: Change the focusing method via the Focus Mode setting. The fastest method is to use the control strip, but you also can access the option from the second page of the Shooting menu, as shown on the right. Either way, to switch from automatic to manual focusing, select the MF (Manual Focus) option.
Even though you set the basic focus method via the switch, you control the behavior of the autofocusing system via the Focus mode option described in the preceding paragraph.
AF-P lenses also offer the option of autofocusing with manual override. But instead of moving a lens switch to activate or disable the feature, you use the Setup menu option. By default, this option (Manual Focus Ring in AF Mode) is enabled, so you can tweak focus manually after autofocusing. The only potential problem with the feature is that you can accidentally move the focusing ring, changing the focus point without realizing that you did so. It’s up to you to decide which setting you prefer. If the menu option is dimmed, your Nikon’s lens doesn’t support this feature.
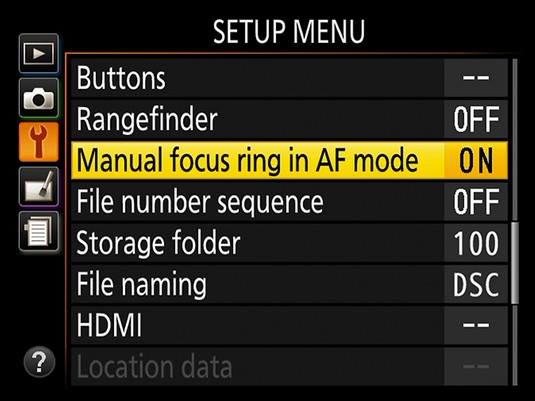 When this feature is enabled, you can set an AF-P lens to use autofocusing with manual focus override.
- Focusing: With either type of lens, use these techniques to set focus:
- Autofocusing: Frame your shot and press and hold the shutter button halfway down to establish the focusing distance.
- Manual focusing: Rotate the focusing ring on the lens barrel. The position of the focusing ring varies depending on the Nikon lens you choose.
- Enabling Vibration Reduction: Many Nikon lenses, including the kit lens, offer Vibration Reduction, which compensates for small amounts of camera shake that can occur when you handhold the camera. Camera movement during the exposure can produce blurry images, so turning on Vibration Reduction can help you get sharper handheld shots. When you use a tripod, however, check the lens instruction manual to find out whether you should turn off the feature. With some lenses for you Nikon, you need to disable VR so that the camera doesn’t try to compensate for movement that isn’t occurring.
On an AF-S lens, turn Vibration Reduction on or off by using the VR switch, found near the focusing-method switch. The available VR settings vary depending on the lens, so see the lens manual for details. (Some lenses for Nikons offer one setting for normal shooting and one for situations in which you anticipate lots of camera movement, such as when photographing from a speed boat.)
 Some AF-P lenses offer Vibration Reduction.
With an AF-P lens, turning Vibration Reduction on and off is a menu-based affair. Enable the feature via the last page of the Shooting menu, as shown on the left below. After you do so, you see a shaking hand symbol in the Information screen and Live View displays. Look for the symbol on the left side of the Live View display.
Vibration Reduction is initiated when you depress the shutter button halfway. If you pay close attention, the image in the viewfinder may appear to be a little blurry immediately after you take the picture. That’s a normal result of the Vibration Reduction operation on some lenses and doesn’t indicate a problem.
- Removing a lens: After turning off the camera, press the lens-release button on the Nikon camera and turn the lens toward that button until it detaches from the lens mount. Put the rear protective cap onto the back of the lens and, if you aren’t putting another lens on the camera, cover the lens mount with its cap, too.
Always switch lenses in a clean environment to reduce the risk of getting dust, dirt, and other contaminants inside the camera or lens. Changing lenses on a sandy beach, for example, isn’t a good idea. For added safety, point the camera body slightly down when performing this maneuver; doing so helps prevent any flotsam in the air from being drawn into the camera by gravity.
Focal length and the crop factor on your Nikon D3500
The angle of view that a lens can capture is determined by its focal length, or in the case of a zoom lens, the range of focal lengths it offers. Focal length is measured in millimeters.According to photography tradition, a focal length of 50mm is described as a “normal” lens because it works well for the type of snapshots that users of those kinds of cameras are likely to shoot. A lens with a focal length under 35mm is characterized as a wide-angle lens because at that focal length, the camera has a wide-angle view, making it good for landscape photography. A short focal length also has the effect of making objects seem smaller and farther away. At the other end of the spectrum, a lens with a focal length longer than 80mm is considered a telephoto lens and is often referred to as a long lens. With a long lens, the angle of view narrows and faraway subjects appear closer and larger, which is ideal for wildlife and sports photographers.
Note, however, that the focal lengths stated here are 35mm equivalent focal lengths. Here’s the deal: For reasons that aren’t important, when you put a standard lens on most digital cameras, including the D3500, the available frame area is reduced, as if you took a picture on a camera that uses 35mm film negatives and cropped it.
This crop factor varies depending on the camera, which is why the photo industry adopted the 35mm-equivalent measuring stick as a standard. With the D3500, the crop factor is roughly 1.5x. Here, the red line indicates the image area that results from the 1.5 crop factor.
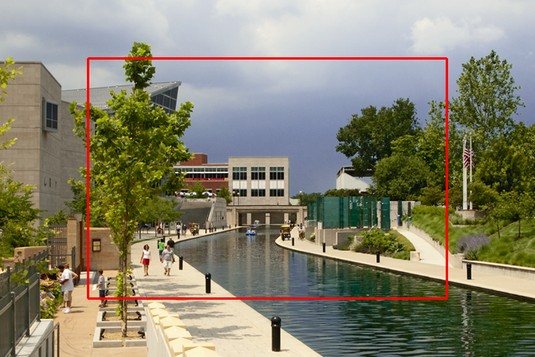 Nikon lens 1.5 crop factor.
When shopping for a lens, it’s important to Remember this crop factor to make sure that you get the focal length designed for the type of pictures you want to take. Just multiply the lens focal length by 1.5 to determine the actual angle of view. Not sure which focal length to choose? Nikon offers a Lens Simulator tool that shows exactly how different focal length lenses capture the same scene. (If the link doesn’t take you to the simulator, just enter the term Nikon Lens Simulator in your browser’s search engine. Nikon has a way of moving things around on its websites.


