


Your digital camera does a great job of capturing your nature and landscape images. But digital images generally need a bit of work. Photoshop Elements is your digital darkroom. This application can do marvelous things for images that aren't quite up to snuff. You can also use the application to enhance images and add special effects using filters.
When you need a quick, cursory edit, the place to take your images is the Edit Quick workspace. In this workspace, you can use automatic adjustments and then tweak them manually.
Launch the Photoshop Elements Organizer.
Your most recent import is displayed. To find other images, switch the Date view by choosing Date View from the Display drop-down menu in the upper-right corner of the Organize workspace, and then find the shoot you want to edit by navigating the calendars. In Date View, you can view in Date, Month, or Year calendar format.
Select the image you want to edit.
If you ranked your images earlier, you can easily see the ones you want to edit.
Choose Edit Quick from the Fix drop-down menu.
If you’re opening an image that was captured using your camera’s native RAW format, the Adobe Camera Raw dialog appears.
Choose an option from the View drop-down menu.
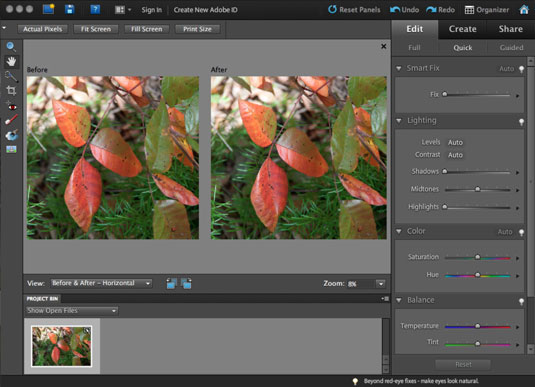
The Before and After (Horizontal) view mode is best for a landscape format image. This provides an accurate representation of the changes being applied to an image.
The Edit Quick workspace is similar to the Full Edit workspace, but you have fewer tools with which to work. Many of the menu commands are dimmed out, which means you can access them only in Full Edit mode. The panel on the right side of the interface is the home for the Edit Quick options.
Implement one or all of the following quick fixes:
The Smart Fix (Auto button) applies general corrections for color balance. This fix also enhances shadows and highlights, if needed. You can also drag the slider to manually apply Smart Fix.
The Lighting (Levels Auto button) automatically adjusts the shadows and highlights to improve the image. Click the Contrast Auto button to automatically improve image contrast. If the changes are not to your liking, you can manually adjust the lighting by dragging the Shadows, Highlights, or Midtone sliders. Click the check mark to apply your edits.
Click the Color Auto button to automatically adjust the color tones in the image. If you aren’t happy with the results, drag the Saturation slider to the right to increase image saturation, or drag it to the left to decrease saturation. However, when you change saturation, you change all colors and hues. If you increase saturation, you end up with unrealistic skin tones if there are any people in the image you’re editing.
The Balance setting adjusts the white balance of the image. Drag the temperature slider left to cool the colors in the image, or drag it right to warm the colors. When you cool the colors, they have more of a bluish cast; when you warm the colors in the image, they have an orange cast. Drag the Tint slider left to add more magenta to the colors or right to add more cyan to the colors. Click the check mark to apply your edits.
Drag the Sharpness slider to the right to sharpen the image. Don’t overdo sharpening. If you start to see artifacts around the edges, you’ve gone too far. In most instances, clicking Auto does a fine job of sharpening images.
If you’re new to image editing, choose Guided Photo Edit from the Fix drop-down menu. This opens the image in the Guided Photo Edit workspace, where you can choose the task you want to complete from a list.
If you need to perform only a simple edit, click the Fix button to reveal buttons that perform tasks such as Auto Smart Fix, Auto Color, and so on.

