Normally, the Nikon D5300 automatically adjusts exposure during movie recording. Exposure is calculated using Matrix (whole frame) metering, regardless of which Metering mode setting is selected. But in a few exposure modes, you can adjust exposure by changing the following settings:
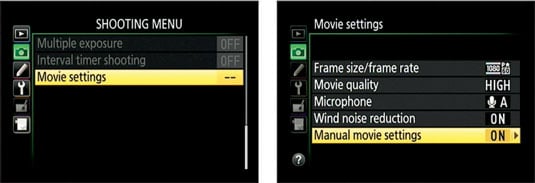
Shutter speed and ISO: Both options are set by the camera by default. But if you enable the Manual Movie Settings option on the Movie Settings menu, you can control both settings. This path is one for experienced videographers, however. If you fit that category, here are a few things you need to know:
Exposure mode: You must set the Mode dial to M (manual exposure), and you must set the aperture (f-stop setting) as well as the shutter speed and ISO to dial in the correct exposure.
To set the f-stop in M mode while the Manual Movie Settings option is enabled, you must exit Live View mode. Then press the Exposure Compensation button while rotating the Command dial. Rotate the Live View switch to return to Live View mode.
Shutter speed: You can select shutter speeds as high as 1/4000 second. The slowest shutter speed depends on your chosen frame rate. For 24p, 25p, and 30p, you can drop as low as 1/30 second; for 50p, 1/50 second; and for 60p, 1/60 second. To set the shutter speed in M mode, rotate the Command dial—you don't have to shift out of Live View mode for this one.
ISO: You can set the ISO value as low as 100 or as high as Hi 1. Note that Auto ISO Sensitivity control doesn't work when the Manual Movie Settings option is enabled; the camera sticks with your selected setting regardless of the available light.
To adjust ISO quickly, press the Fn button while rotating the Command dial. You can also select the ISO value via the ISO Sensitivity settings option on the Shooting menu.
Camera override: If you choose a shutter speed or ISO setting outside the stated ranges, the camera slaps your hand and chooses the closest in-range setting automatically.
Aperture (f-stop): You can adjust the f-stop before (but not during) recording if you set the Mode dial to A (aperture-priority autoexposure) or M (manual exposure). This option enables you to control depth of field in your movies.
In A mode, rotate the Command dial to change the f-stop; again, in M mode, first exit Live View mode and then press and hold the Exposure Compensation button while rotating the dial. In either case, remember that the live preview doesn't indicate the depth of field that your f-stop setting will produce—the camera can't provide this feedback because the aperture doesn't actually open until you start recording.
Exposure Compensation: Exposure Compensation enables you to override the camera's autoexposure decisions, asking for a brighter or darker picture. You can apply this adjustment for movies when the Mode dial is set to P, S, A, or M or you use Night Vision Effects mode.
However, you're limited to an adjustment range of EV +3.0 to –3.0 rather than the usual five steps that are possible during normal photography. Note that the display shows the plus/minus symbol only when Exposure Compensation is in force.
To adjust the setting, press and hold the Exposure Compensation button while rotating the Command dial unless you're using Manual (M) exposure mode. In that mode, you must use the Information display control strip to apply Exposure Compensation. (Press the i button to access the control strip; the Exposure Compensation option is the setting in the lower-right corner of the strip.)
Just to head off any possible confusion: For viewfinder photography, Exposure Compensation isn't needed in M exposure mode; if you want a brighter or darker exposure, you just change the aperture, shutter speed, or ISO Sensitivity settings.
But because the camera doesn't give you control over shutter speed or ISO during movie recording—unless you enable Manual Movie Settings—you need some way to tell the camera that you want a brighter or darker picture in M mode, and Exposure Compensation is it.
Autoexposure lock: In any exposure mode except Auto or Auto Flash Off, you can lock exposure at the current settings by pressing and holding the AE-L/AF-L button.