Before you try it, here are the rules:
- Both devices (Mac and iDevice) must be logged into the same Apple ID.
- Both devices must be connected to the same Wi-Fi network.
- Both devices must have Bluetooth enabled.
To make the magic happen, just right- or Control-click anywhere an image or scan can be used (Notes, Stickies, TextEdit or Pages documents, and the Finder, to name a few).
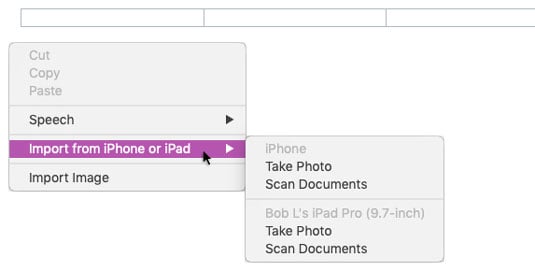
Not every app or document supports Continuity Camera, but if it’s available when you right- or Control-click, you’ll see an item called Import from iPhone or iPad in your shortcut menu, as shown.
 If the app supports Continuity Camera, the Import from iPhone or iPad item will appear in the shortcut menu.
Choose the device you want to use if you have more than one nearby. Now choose Take Photo or Scan Documents.
If you choose Take Photo, the Camera app on your iDevice will launch automatically and you’ll see one of two things on your Mac. If you right- or Control-clicked in a document, you’ll see an overlay below the insertion point, as shown here, left. Or if you right- or Control-clicked in the Finder, you’ll see a dialog, as shown here, right.
 What you see after choosing Take Photo in a document (left) and the Finder (right).
Take the photo on your iDevice by tapping the shutter release button in the usual fashion. After you snap a shot, a preview appears offering two options: Retake or Use Photo. Tap Retake if you’re dissatisfied with the image and want to try again. When you get a shot you’re happy with, tap Use Photo and the shot appears in the document at the insertion point or on the desktop almost immediately.
Choosing Scan Documents is similar to taking a photo, with some minor differences. You’ll still see an overlay or a dialog on your Mac, but this time it says Scan a Document rather than Take a Photo.
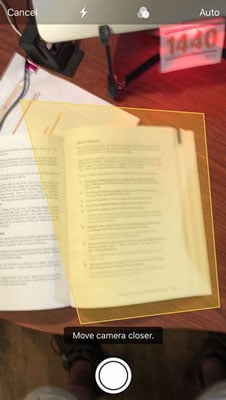
On your iDevice, however, the Camera app works differently. At the top-right corner is a button that toggles between Auto and Manual. In Auto mode, you move the camera up, down, and all around until the yellow box contains the text you want to scan, as shown here.
 When the yellow box is just right, your iDevice will capture the page automatically.
Or if you tap Auto (which switches the camera to Manual mode), you tap the shutter release button to capture text.
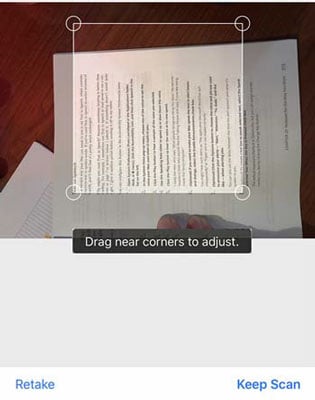
After you’ve captured a page, a preview of it appears, but in addition to the two buttons at the bottom of the screen — Retake or Keep Scan — a box appears with circles at each of its four corners, as shown here. Drag the circles until the box contains all the text you want to scan, and then tap Keep Scan.
 Drag the circles to contain the text you want to scan, and then tap Keep Scan.
After you tap Keep Scan, the camera reappears with a message: Ready for Next Scan. If you have additional pages to scan, continue capturing them as described; when you’re finished, tap Save in the lower-right corner.
And that’s all there is to using Continuity Camera to take pictures or scan documents with your Mac!

