

The makers of Pro Tools only offer one host-based interface, the Eleven Rack. Built for guitarists, the Eleven Rack is both a recording interface and a standalone live unit. The Eleven Rack interface has a limited number of inputs and outputs, but it makes up for this deficit by including serious power for guitar-amp modeling and effects.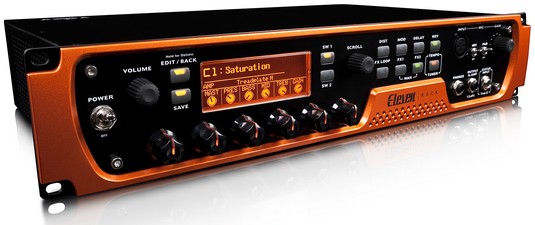 The Eleven Rack is USB interface designed for guitar players.
The Eleven Rack is USB interface designed for guitar players.
You may want to stick with the standard rate for CD audio: 44.1 kHz.
Discovering the Eleven Rack input and outputs
The Eleven Rack has the following input and output configurations:- XLR analog input: This input includes a preamp and phantom power for your microphone.
- Analog inputs: You get two 1/4-inch analog inputs for your instruments.
- Analog outputs: There are two XLR outputs and two 1/4-inch outputs for connecting to an amplifier.
- FX Sends and Returns: The Eleven Rack comes with two 1/4-inch sends/returns to be able to connect an external effects unit.
- Alt In: These alternate input jacks are handy for connecting a CD player or tape deck and listening to it without having to turn on the software or listening to reference CDs from an external player while you mix.
- Digital In and Out channels: These channels comprise two channels of AES-EBU digital and two channels of S/PDIF coax (RCA), which you use to send and receive up to four simultaneous digital channels to and from the Eleven Rack. This is handy if you have external A/D and D/A converters.
- Headphone jack: You get one headphone jack.
- MIDI In and Out: The Eleven Rack has one MIDI In port and one MIDI Out port.
- Footswitch input: You can connect a footswitch to control the transport of Pro Tools, which can be handy when recording yourself — you can start and stop the session hands-free.
Connecting your gear to an Eleven Rack
Connecting audio and MIDI gear is much the same process for the Eleven Rack as for the Mbox Pro, with just minor variations on inputs and outputs. Here’s a rundown of them all:- Volume dial: This dial controls the volume of both the headphone and main outputs for the Eleven Rack.
- Power Switch: As you may guess, this turns the Eleven Rack on and off. Expect it to take a few seconds to boot up after you hit the switch. Also, make sure that you have volume down or monitors off when you turn this puppy on, lest you hear a big pop.
- Mic Input: Use this input to connect a microphone or other instrument that utilizes an XLR connector. This input is controlled by the Gain dial on the front of the unit. With this input you have three parameters to adjust:
- Gain: This set the volume level of your input signal. You set this in conjunction with the level meter in Pro Tools software for the channel you have it routed to.
- 48v: This switch turns phantom power on and off for your mic.
- Pad: Engaging this switch drops your input level by some unstated amount (10–20dB is typical but Avid doesn’t say). This is handy for very hot (loud) microphone signals.
- Guitar Input: This is where you plug in your guitar. Avid calls this a “True Z” input because it has a variable-impedance circuit that accommodates a range of instruments such as electric and acoustic-pickup-appointed guitars, electric basses, and electric pianos. This circuit adjusts dynamically; all you need to do is plug in your instrument and start playing.
- Footswitch: Labeled Foot SW, use this jack to connect a footswitch or an expression pedal to control a host of parameters such as Wah, volume, and effects and patch settings.
- USB: This is where you connect your USB cable to go to your computer.
- Main Outputs: The mains out have a 1/4-inch TRS jack (stereo) and XLR left and right jacks. These are for connecting to an amp or powered speakers. These outputs don’t have a volume control. The channel faders of your session control the signal level going to these outputs. If you want to be able to adjust the volume to a set of speakers, you need a mixer or an external volume controller.
- FX Loop: The FX Loop is for you to connect external effect units. You can use a TRS insert cable or separate TS cables (the TRS cable connects to the left/stereo jacks). There is also a “grid” switch that lifts the ground to reduce hum if line noise is a problem.
- AES/EBU: Here you can connect your professional-level digital devices by using an AES/EBU connection. This jack can either pass two channels’ data at a bit depth of up to 24 bits at 96 kHz.
- S/PDIF: Here you can connect your digital devices with a coaxial cable (RCA). This S/PDIF connection is enabled whenever you have cords connected to these jacks and when you don’t have the Optical jacks assigned for S/PDIF signals. There are no controls you have to worry about in the front.
- MIDI: You can connect your MIDI keyboard, MIDI controller, or other device to these. MIDI In is connected to the MIDI Out of your device, and MIDI Out goes to the MIDI In of the other device. There are no controls to worry about on the front panel for MIDI.
- Headphones: The 1/4-inch jack on the front of the unit is where you plug in your headphones.
Examining Eleven Rack’s guitar-processing features
The features that make the Eleven Rack special are amp modeling and effects processing. This information gives you an overview of the various buttons and dials that control this power.- Edit/Back Button: Click this button to gain access to the setting for your guitar rigs (Avid’s name for your saved settings for processing and modeling). When you’re in the Rig view, you use this button to go back to a previous screen. You can also hold this button in for a few seconds to enter the user-options mode so you can tweak your settings at will. Here are the controls:
- Save Button: This saves your new settings.
- SW1 and SW2 Buttons: These buttons allow you to access a variety of menus and functions in the edit views. When a switch is active, it will be lit.
- Scroll: The scroll wheel makes windows and the sections easy to scroll through in the edit views.
- Control Button: These buttons (located above the Eleven Rack logo) toggle the associated effect on and off, and provide access to additional controls for the effect (simply push and hold).
- Tap Tempo/Tuner Button: This button lets you set the tempo for an effect (just tap quarter notes) or access the internal guitar tuner (press and hold for a second).
- Control Dials: You can use these knobs to access various controls for the amp and effects. You’ll quickly notice that these dials glow in different colors, depending on their function:
- Unlit: When a dial is unlit, it’s not actively assigned to any setting. As you may have guessed, turning it does nothing.
- Amber: This dial is currently assigned to an amp, cab, or FX-loop parameter.
- Green: In this case, the dial controls an effects parameter.
- Red: This tells you that the setting for this dial has changed from the saved setting. You can adjust it until it turns amber or green again to get back to the saved setting — or you can hit the Save button to save it. Once saved it will turn back to amber or green.


