


The best way to add a table in your Word 2016 document is to use one of Word's table creation commands. The commands build a custom grid of rows and columns. To begin your table-making journey, click the Ribbon's Insert tab. In the Tablets group, the only item is the Table button. Click that button to see the Table menu, as illustrated here.
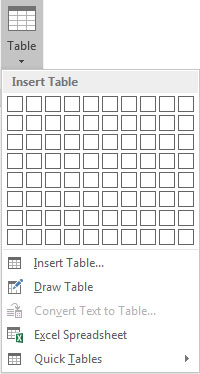
The Table menu features multiple ways to slap down a table in your document. Once the table is created, start filling it in.
When a table is selected, or the toothpick cursor blinks inside the table, two new tabs appear on the Ribbon: Table Tools Design and Table Tools Layout. These tabs contain the specific commands to format and modify the table.
The best way to make a table in Word is to use the grid on the Table button's menu, as shown in the figure. Follow these steps:
Click where you want the table in your document.
Click the Insert tab.
Click the Table button.
Drag through the grid to set the desired number of rows and columns.
You don't need to be precise; you can always add or remove rows or columns later.
In this figure, a four-column-by-three-row table is created. As you drag the mouse pointer on the menu, the table's grid magically appears in the document.
 Creating a four-by-three table.
Release the mouse button to begin working on the table.


