


Creating a table in Word 2019
Tables organize text into rows and columns, which can make the text easy to type, edit, and format while spacing it correctly in your document. Tables organize text into cells, where a cell is the intersection of a row and a column.Word provides four ways to create a table:
- Click the Insert tab, click the Table icon, and then highlight the number of rows and columns for your table (up to a maximum of eight rows and ten columns).
- Use the Insert Table dialog box.
- Draw the size and position of the table with the mouse.
- Convert existing text (divided by a delimiter character such as a tab or a comma).
Creating a table by highlighting rows and columns in Word 2019
Creating a table by highlighting rows and columns can be fast, but it limits the size of your table to a maximum of eight rows and ten columns. To create a table by highlighting rows and columns, follow these steps:- Click the Insert tab.
- Move the cursor where you want to insert a table in your document.
- Click the Table icon.A pull-down menu appears.
 The Table pull-down menu displays squares that represent the number of rows and columns for your table.
 - Move the mouse pointer to highlight the number of rows and columns you want to create for your table.
When you highlight rows and columns, Word displays your table directly in your document so you can see exactly what your table will look like.
- Click the left mouse button when you’re happy with the size of your table.
Creating a table in Word 2019 with the Insert Table dialog box
Creating a table by highlighting the number of rows and columns can be fast, but it limits the size of your table to a maximum of eight rows and ten columns. To create a table by defining a specific number of rows and columns (up to a maximum of 63 columns), follow these steps:- Click the Insert tab.
- Move the cursor where you want to insert a table.
- Click the Table icon.A pull-down menu appears.
- Click Insert Table.
The Insert Table dialog box appears.
 The Insert Table dialog box lets you specify an exact number of rows and columns.
 - Click in the Number of Columns text box and type a number between 1 and 63, or click the up or down arrow to define the number of columns.
- Click in the Number of Rows text box and type a number or click the up or down arrow to define the number of rows.
- In the AutoFit Behavior group, select one of the following radio buttons:
- Fixed Column Width: Defines a fixed size for the column widths, such as 0.3 inches
- AutoFit to Contents: Defines the width of a column based on the width of the largest item stored in that column
- AutoFit to Window: Expands (or shrinks) the table to fit within the current size of the document window
- Click OK.Word draws the table in your document.
- Creating a table in Word with the mouse
Drawing a table can be especially useful when you want to place a table in the middle of a page and create rows and columns of different sizes.
 Drawing a table with the mouse lets you create odd-shaped cells within a table.
- Click the Insert tab.
- Click the Table icon.A pull-down menu appears.
- Click Draw Table.The mouse pointer turns into a Pencil icon.
- Move the mouse pointer where you want to draw your table, hold down the left mouse button, and drag the mouse to draw your table.Word draws a rectangular dotted box to show where your table will appear.
- Release the left mouse button when you’re happy with the size and position of your table.
- Draw the boundaries for your table’s rows and columns:
- To draw vertical lines in your table, move the mouse pointer to the top or bottom of the table, hold down the left mouse button, and drag the mouse up and down.
- To draw horizontal lines in your table, move the mouse pointer to the left or right side of the table, hold down the left mouse button, and drag the mouse right and left to draw.
- Press Esc or double-click to turn the mouse pointer from a Pencil icon back to an I-beam pointer.
If you need to draw new lines on a table later, click anywhere inside that table, and the Table Tools Layout tab appears. Then click the Draw Table icon to turn the mouse pointer into a Pencil icon. Now you can draw new lines in your table.
Creating a table in Word from existing text
If you have existing text that you’d like to turn into a table, you need to first separate it into chunks so Word knows how to place the text in individual cells in a table. To separate text, you need to use a unique character such as- Return (paragraph mark)
- Tab
- Comma.
- Other characters, such as the # or @ characters
To convert existing text into a table, follow these steps:
- Click the Insert tab.
- Select the text that you want to convert into a table.
- Click the Table icon. A pull-down menu appears.
- Click the Convert Text to Table command.The Convert Text to Table dialog box appears.
 The Convert Text to Table dialog box defines how to convert your text into a table.
 - Select a radio button in the Separate Text At group.Choose the option that corresponds to the way you divided your text. So if you divided your text by tabs, you would select the Tabs radio button.
- Click OK.
Word converts your text into a table.
- Click anywhere inside the table you want to convert into text.The Layout tab appears under the Table Tools heading on the far right of the Ribbon.
- Click the Layout tab under the Table Tools heading.
- Click Convert to Text.The Convert Table to Text dialog box appears.
 The Convert Table to Text dialog box lets you specify how to divide a table.
 - Select a radio button to define how you want to divide your table into text.
- Click OK.
Formatting and Coloring a Table in Word 2019
After you create a table, you can format individual cells (spaces formed by the intersection of a row and a column) — or entire rows and columns — by aligning text in cells, resizing columns and rows, and adding borders, shading, or colors. All these changes can make the text inside the cells easier to read.Selecting all or part of a table in Word 2019
To format and color a table, you must first select the table, row, column, or cell that you want to modify. To select all or part of a table, follow these steps:- Click in the table, row, column, or cell you want to modify.The Table Tools tab appears.
- Click the Layout tab under the Table Tools heading.
- In the Table group, click Select.
A pull-down menu appears.
 The Select icon displays a pull-down menu.
 - Choose an option, such as Select Row or Select Column.Word highlights your chosen item in the table. At this point, you can choose a command to modify the selected row or column (as when you choose a color or alignment).
Aligning text in a Word table cell
You can align text in a table cell in nine ways: top left (the default alignment), top center, top right, center left, center, center right, bottom left, bottom center, and bottom right.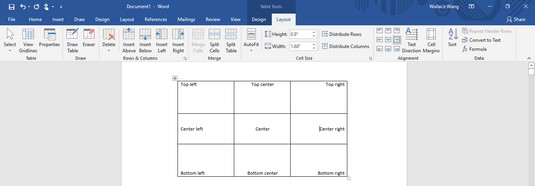 Tables can align text within cells in nine ways.
To align one or more cells, follow these steps:
- Click in the cell (or select multiple cells) that contains text you want to align.The Table Tools tab appears.
- Click the Layout tab under the Table Tools heading.
- In the Alignment group, click an alignment icon such as Top Right or Bottom Center.Word aligns your text. If you change the alignment of blank cells, any new text you type in those blank cells will appear according to the alignment you choose.
Choosing a table style in Word 2019
By coloring rows or columns and adding borders, you can customize the appearance of your tables. However, it can be much faster to use a predesigned table style instead, which can automatically format your text, color rows, and add borders to your tables.To choose a table style, follow these steps:
- Move the cursor inside the table you want to modify.
- Click the Design tab under the Table Tools tab.
- In the Table Style Options group, select or clear check boxes, such as the Header Row or Last Column check box.
- In the Table Styles group, click the More button.
A pull-down menu of styles appears. As you move the mouse pointer over a table style, Word displays a live preview of your table formatted in the selected style.
 The Table Styles group displays different ways to format your table.
 - Click a table style.Word formats your table according to the style you chose.
Resizing columns and rows in Word tables
You may need to resize a column or row in your table to expand or shrink it so your text doesn’t appear crowded or surrounded by empty space. You can resize a column or row by using the mouse or by defining row heights and column widths.To resize a row or column with the mouse, follow these steps:
- Click anywhere inside the table you want to adjust, then move the mouse pointer over the row or column border that you want to resize.The mouse pointer turns into a two-way pointing arrow.
- Hold the left mouse button down and drag the mouse to resize the row or column.
Release the left mouse button when you’re happy with the size of the row or column.
- Select the row, column, or table that you want to modify.
If you select the entire table, you can adjust the width or height of rows and columns for the entire table.
- Click the Layout tab under the Table Tools tab.
- Click the Width text box and type a value (or click the up or down arrow to choose a value).
- Click the Height text box and type a value (or click the up or down arrow to choose a value).
- (Optional) Click the AutoFit icon and choose one of the following:
- AutoFit Contents: Shrinks your columns or rows to largest cell
- AutoFit Window: Expands the table to fit the width of the current document window
- Fixed Column Width: Defines a fixed width for all columns
 The AutoFit menu.

