


The hierarchical SmartArt diagrams are ideal for creating organization charts in PowerPoint 2016. Organization charts — you know, those box-and-line charts that show who reports to whom, where the buck stops, and who got the lateral arabesque — are an essential part of many presentations.
You can create diagrams that show bosses, subordinates, co-workers, and assistants. You can easily rearrange the chain of command, add new boxes or delete boxes, and apply fancy 3-D effects. This figure shows a finished organization chart.
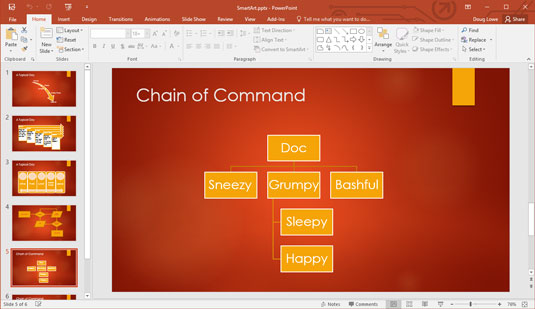
The bullet list used to create this chart looked like this before being converted to SmartArt:
Doc
Sneezy
Grumpy
Sleepy
Happy
Bashful
Notice that Dopey isn't in this list. That's because Dopey is in a special kind of box on the chart, called an Assistant.
Keep in mind that organization charts are useful for more than showing employee relationships. You also can use them to show any kind of hierarchical structure. For example, organization charts can be used to plan the structure of a computer program. They're also great for recording family genealogies, although they don't have any way to indicate that Aunt Millie hasn't spoken to Aunt Beatrice in 30 years.
Adding boxes to a chart
You can add a box to an organization chart by calling up the Text pane and editing the text.
Alternatively, you can use the controls in the SmartArt Tools tab on the Ribbon to add boxes. One nice feature that these controls provide is the capability to add an Assistant, which is a box that appears outside of the hierarchical chain of command. Here are the steps:
Click the box you want the new box to be below or next to.
Open the SmartArt Tools tab on the Ribbon.
Click the Add Shape button to reveal a menu of choices. Then select one of the following options:
Add Shape Before: Inserts a new box at the same level as the selected box, immediately to its left.
Add Shape After: Inserts a new box at the same level as the selected box, immediately to its right.
Add Shape Above: Inserts a new box above the selected box.
Add Shape Below: Inserts a new box beneath the selected box.
Add Assistant: Inserts a new box beneath the selected box, but the new box is connected with a special elbow connector to indicate that the box is an Assistant, not a subordinate.
Click the new box and then type whatever text you want to appear in the box.
If necessary, drag the box to adjust its location.
Deleting chart boxes
To delete a box from an organization chart, select the box and press Delete. PowerPoint automatically adjusts the chart to compensate for the lost box.
When you delete a box from an organization chart, you should observe a moment of somber silence — or throw a party. It all depends on whose name was in the box.
Changing the chart layout
PowerPoint lets you choose from four methods of arranging subordinates in an organization chart branch:
Standard: Subordinate shapes are placed at the same level beneath the superior shape.
Both Hanging: Subordinates are placed two per level beneath the superior with the connecting line between them.
Left Hanging: Subordinates are stacked vertically beneath the superior, to the left of the connecting line.
Right Hanging: Subordinates are stacked vertically beneath the superior, to the right of the connecting line.
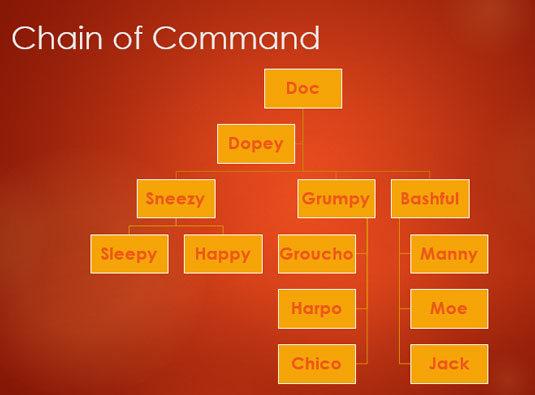
This figure shows an organization chart that uses all four of these layouts. Sneezy, Grumpy, and Bashful use Standard layout. Sleepy and Happy use Both Hanging layout. Groucho, Harpo, and Chico use Left Hanging layout, and Manny, Moe, and Jack use Right Hanging layout.
To change the layout of a branch of your chart, first click the shape at the top of the branch, and then click the SmartArt Tools Design tab on the Ribbon. Then click the Layout button in the Create Graphic group and choose the layout type you want to use.


