


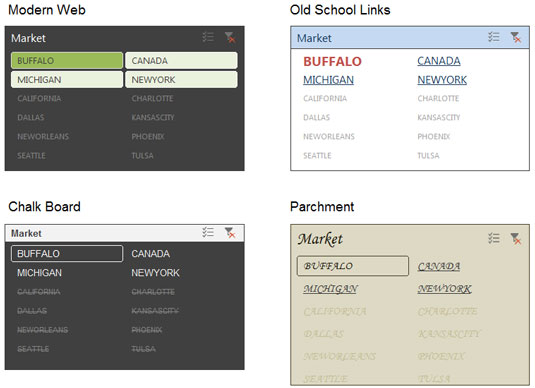
The default Excel slicer styles are a bit of a drag. Oftentimes, the look and feel of slicers don't match the aesthetic of your dashboard. Luckily, Excel provides a way for you to customize your slicers to fit into any reporting theme. With minimal effort, your slicers can be integrated nicely into your dashboard layout.
This figure illustrates a few examples of how slicers can be customized to almost any style you can think of.
To change the look and feel of your slicer, you have to get into some style customizations. The following steps show you how:
Click the slicer to reveal the Slicer Tools Options tab on the Ribbon and then expand the tab's Slicer Styles gallery.
Click the New Slicer Style button at the bottom of the gallery, as shown here.
 The Slicer Styles gallery has an option for you to create your own new style.
Doing so brings up the New Slicer Style dialog box, shown here.
 The New Slicer Style dialog box.
Using the New Slicer Style dialog box, customize any (or all) of the following slicer elements:
Whole Slicer
Header
Selected Item with Data
Selected Item with no Data
Unselected Item with Data
Unselected Item with no Data
Hovered Selected Item with Data
Hovered Selected Item with no Data
Hovered Unselected Item with Data
Hovered Unselected Item with no Data
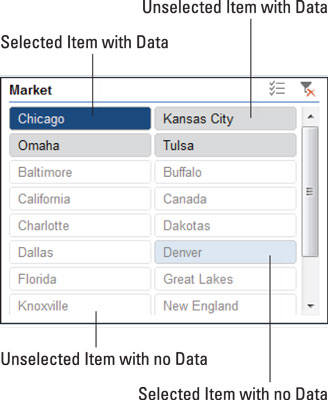
The idea here is to select each slicer element and then format that element by clicking the format button. Sound easy enough, but it can be a bit difficult to know exactly which part of the slicer you are formatting.
Whole Slicer and Header are fairly self-explanatory, but what does the other junk mean?
Well, the other options refer to the values within the slicer. Some values have data associated with them, and others do not. The elements that are listed let you define what each value (values "with Data" and values "with no Data") look like when selected, unselected, and hovered over. This figure offers a visual map to help understand how each kind of value is typically represented in the slicer.
After you finish making the needed customizations to all the elements, you can apply your newly created style by clicking the slicer and then selecting your custom style in the Slicer Styles Gallery.
You can also right-click on your custom style to modify, duplicate, and delete it (see the following figure), using the contextual menu that appears.

Custom styles are saved at the workbook level, so your custom style is saved and travels with your workbook. However, other workbooks will not have your styles included.


