


Excel’s AutoFill feature makes short work of this kind of repetitive task. All you have to enter is the initial value in that series. In most cases, AutoFill is smart enough to figure out how to fill out the series for you when you drag the fill handle to the right (to take the series across columns to the right) or down (to extend the series to the rows below).
The AutoFill (or fill) handle looks like this — + — and appears only when you position the mouse on the lower-right corner of the active cell (or the last cell, when you’ve selected a block of cells). If you drag a cell selection with the white-cross mouse pointer rather than the AutoFill handle, Excel simply extends the cell selection to those cells you drag through. If you drag a cell selection with the arrowhead pointer, Excel moves the cell selection.
On a touchscreen device, you make the Excel fill handle appear by tapping the active cell’s lower selection handle (indicated by a circle) and then tapping the AutoFill item on the mini-toolbar that then appears. You can then fill a series by dragging this fill handle with your finger or a stylus.
When creating a series with the fill handle, you can drag in only one direction at a time. For example, you can fill the series or copy the entry to the range to the left or right of the cell that contains the initial values, or you can fill the series or copy to the range above or below the cell containing the initial values. You can’t, however, fill or copy the series to two directions at the same time (such as down and to the right by dragging the fill handle diagonally).As you drag the fill handle, the program keeps you informed of whatever entry will be entered into the last cell selected in the range by displaying that entry next to the mouse pointer (a kind of AutoFill tips, if you will). After extending the range with the fill handle, Excel either creates a series in all of the cells that you select or copies the entire range with the initial value. To the right of the last entry in the filled or copied series, Excel also displays a drop-down button that contains a shortcut menu of options. You can use this shortcut menu to override Excel’s default filling or copying.
For example, when you use the fill handle, Excel copies an initial value (such as 10) into every cell in the range. But, if you wanted a sequential series (such as 10, 11, 12, and so on), you do this by selecting the Fill Series command on the AutoFill Options shortcut menu.
The images below illustrate how to use AutoFill to enter a row of months, starting with January in cell B2 and ending with June in cell G2. To do this, you simply enter Jan in cell B2 and then position the mouse pointer (or your finger or stylus) on the fill handle in the lower-right corner of this cell before you drag through to cell G2 on the right.
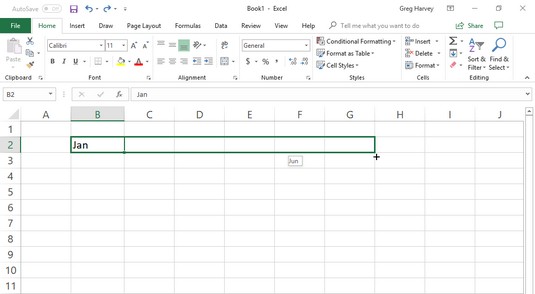 To enter a series of months, enter the first month and then drag the fill handle in a direction to add sequential months.
When you release the mouse button or remove your finger or stylus from the touchscreen, Excel fills in the names of the rest of the months (Feb through Jun) in the selected cells.
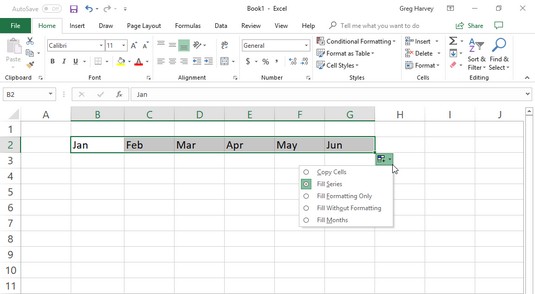 Release the mouse button, and Excel fills the cell selection with the missing months.
Excel keeps the cells with the series of months selected, giving you another chance to modify the series. (If you went too far, you can drag the fill handle to the left to cut back on the list of months; if you didn’t go far enough, you can drag it to the right to extend the list of months farther.)
Also, you can use the options on the AutoFill Options drop-down menu. To display this menu, you click the drop-down button that appears on the fill handle (to the right of Jun) to override the series created by default. To have Excel copy Jan into each of the selected cells, select Copy Cells on this menu. To have the program fill the selected cells with the formatting used in cell B2 (in this case, the cell has had bold applied to it), you select Fill Formatting Only on this menu. To have Excel fill in the series of months in the selected cells without copying the formatting used in cell B2, you select the Fill Without Formatting command from this shortcut menu.
Check out the table below to see different initial values that AutoFill can use and the types of series that Excel can create from them.
| Value Entered in First Cell | Extended Series Created by AutoFill in the Next Three Cells |
| June | July, August, September |
| Jun | Jul, Aug, Sep |
| Tuesday | Wednesday, Thursday, Friday |
| Tue | Wed, Thu, Fri |
| 4/1/99 | 4/2/99, 4/3/99, 4/4/99 |
| Jan-00 | Feb-00, Mar-00, Apr-00 |
| 15-Feb | 16-Feb, 17-Feb, 18-Feb |
| 10:00 PM | 11:00 PM, 12:00 AM, 1:00 AM |
| 8:01 | 9:01, 10:01, 11:01 |
| Quarter 1 | Quarter 2, Quarter 3, Quarter 4 |
| Qtr2 | Qtr3, Qtr4, Qtr1 |
| Q3 | Q4, Q1, Q2 |
| Product 1 | Product 2, Product 3, Product 4 |
Working with a spaced series in Excel 2019
AutoFill uses the initial value that you select (date, time, day, year, and so on) to design the series. All the sample series shown above change by a factor of one (one day, one month, or one number). You can tell AutoFill to create a series that changes by some other value: Enter two sample values in neighboring cells that describe the amount of change you want between each value in the series. Make these two values the initial selection that you extend with the fill handle.For example, to start a series with Saturday and enter every other day across a row, enter Saturday in the first cell and Monday in the cell next door. After selecting both cells, drag the fill handle across the cells to the right as far as you need to fill out a series based on these two initial values. When you release the mouse button or remove your finger or stylus from the screen, Excel follows the example set in the first two cells by entering every other day (Wednesday to the right of Monday, Friday to the right of Wednesday, and so on).
Copying with AutoFill in Excel 2019
You can use AutoFill to copy a text entry throughout a cell range (rather than fill in a series of related entries). To copy a text entry to a cell range, engage the Ctrl key while you click and drag the fill handle. When you do, a plus sign appears to the right of the fill handle — your sign that AutoFill will copy the entry in the active cell instead of creating a series using it.You can also tell because the entry that appears as the AutoFill tip next to the fill handle while you drag contains the same text as the original cell. If you decide after copying an initial label or value to a range that you should have used it to fill in a series, click the drop-down button that appears on the fill handle at the cell with the last copied entry and then select the Fill Series command on the AutoFill Options shortcut menu that appears.
Although holding down Ctrl while you drag the fill handle copies a text entry, just the opposite is true when it comes to values! Suppose that you enter the number 17 in a cell and then drag the fill handle across the row — Excel just copies the number 17 in all the cells that you select. If, however, you hold down Ctrl while you drag the fill handle, Excel then fills out the series (17, 18, 19, and so on). If you forget and create a series of numbers when you only need the value copied, rectify this situation by selecting the Copy Cells command on the AutoFill Options shortcut menu.
Creating custom lists for AutoFill in Excel 2019
In addition to varying the increment in a series created with AutoFill, you can also create your own custom series. For example, say your company has offices in the following locations and you get tired of typing the sequence in each new spreadsheet that requires them:- New York
- Chicago
- Atlanta
- New Orleans
- San Francisco
- Los Angeles
To create this kind of custom series using Excel's AutoFill feature, follow these steps:
- Click File → Options → Advanced or press Alt+FTA and then scroll down and click the Edit Custom Lists button in the General section to open the Custom Lists dialog box.
 Creating a custom company location list from a range of existing cell entries.
If you’ve already gone to the time and trouble of typing the custom list in a range of cells, go to Step 2. If you haven’t yet typed the series in an open worksheet, go to Step 4.
- Click in the Import List from Cells text box and then select the range of cells in the worksheet containing the custom list.
As soon as you start selecting the cells in the worksheet by dragging your mouse or Touch pointer, Excel automatically collapses the Options dialog box to the minimum to get out of the way. The moment you release the mouse button or remove your finger or stylus from the screen, Excel automatically restores the Options dialog box to its normal size.
- Click the Import button to copy this list into the List Entries list box.Skip to Step 6.
- Select the List Entries list box and then type each entry (in the desired order), being sure to press Enter after typing each one.
When all the entries in the custom list appear in the List Entries list box in the order you want them, proceed to Step 5.
- Click the Add button to add the list of entries to the Custom Lists list box.
Finish creating all the custom lists you need, using the preceding steps. When you’re done, move to Step 6.
- Click OK twice, the first time to close the Custom Lists dialog box and the second to close the Excel Options dialog box and return to the current worksheet in the active workbook.
After adding a custom list to Excel, from then on you need only enter the first entry in a cell and then use the fill handle to extend it to the cells below or to the right.
If you don’t even want to bother with typing the first entry, use the AutoCorrect feature to create an entry that fills in as soon as you type your favorite acronym for it (such as ny for New York).
Excel 2019: Doing AutoFill on a touchscreen
To fill out a data series using your finger or stylus when using Excel on a touchscreen tablet without access to a mouse or touchpad, you use the AutoFill button that appears on the mini-toolbar as the fill handle as follows:- Tap the cell containing the initial value in the series you want AutoFill to extend.Excel selects the cell and displays selection handles (with circles) in the upper-left and lower-right corners.
- Tap and hold the cell until the mini-toolbar appears.When summoned by touch, the mini-toolbar appears as a single row of command buttons, from Paste to AutoFill, terminated by a Show Context Menu button (with a black triangle pointing downward).
- Tap the AutoFill button on the mini-toolbar.Excel closes the mini-toolbar and adds an AutoFill button to the currently selected cell (the blue downward-pointing arrow in the square that appears in the lower-right corner of the cell).
- Drag the AutoFill button through the blank cells in the same column or row into which the data series sequence is to be filled.
As you drag your finger or stylus through blank cells, the Name box on the Formula bar keeps informed of the next entry in the data series. When you release your finger or stylus from the touchscreen after selecting the last blank cell to be filled, Excel fills out the data series in the selected range.
Excel 2019: Using AutoFill with the Fill button on the Home tab
If you’re using Excel 2019 on a touchscreen tablet without the benefit of a mouse or touchpad, you can do AutoFill from the Ribbon (you may also want to use this method if you find that using the fill handle to create a series of data entries with AutoFill is too taxing even with a physical mouse).You simply use the Fill button on the Home tab of the Ribbon to accomplish your AutoFill operations in Excel 2019 as follows:
- Enter the first entry (or entries) upon which the series is to be based in the first cell(s) to hold the new data series in your worksheet.
- Select the cell range where the series is to be created, across a row or down a column, being sure to include the cell with the initial entry or entries in this range.
- Click the Fill button on the Home tab followed by Series on its drop-down menu or press Alt+HFIS.
The Fill button is located in the Editing group right below the AutoSum button (the one with the Greek sigma). When you select the Series option, Excel opens the Series dialog box.
- Click the AutoFill option button in the Type column followed by the OK button in the Series dialog box.Excel enters a series of data based on the initial value(s) in your selected cell range just as though you’d selected the range with the fill handle.
When you’re entering a series of dates with AutoFill that increment on anything other than the day, remember the Date Unit options in the Series dialog box enable you to specify other parts of the initial date to increment in the series. Your choices include Weekday, Month, or Year.


