

Get a better microphone
If you record acoustic instruments or vocals, an easy way to make your recordings sound better is to use a better microphone. Audio magazines and websites are also good sources of more detailed information about mics; these sources review recording equipment all the time, and they may be your best bet for learning more about specific mics and models.That said, here are a few general tips about microphones:
- You don’t have to spend a lot of money to get a decent mic. Don’t spend more than $200 on a mic unless you're extremely serious about recording. Many excellent microphones are available for $200 or less.
- AKG, Audio-Technica, Blue, Rode, Sennheiser, and Shure have been in the microphone business for as long as I’ve been recording. And all of them have products at a wide variety of prices.
- Wind screens and pop filters can make a big difference in your vocals. If you don’t own one of these screens, consider buying one or both of them.
- Good recordings require proper microphone placement, which is hard to do without good mic stands. Boom-style stands are more flexible than the pole-type units, but the boom types are inherently less stable — particularly cheap ones. If you use boom mic stands, be careful not to knock them over to avoid damage to the microphone, stand, or both.
Making sure your speakers reproduce sound decently
Nothing compares to hearing music that’s reproduced accurately. Unfortunately, the speakers built into computers are mostly junk — they don’t even come close to producing sound accurately.Most multimedia computer speakers—especially ones with subwoofers— will work in a pinch, but if you’re serious about hearing every little nuance, you should buy a set of good desktop speakers. Such speaker systems, called reference monitors, can cost anywhere from a few hundred dollars a set to thousands of dollars per speaker.
I have two pairs of speakers on my desk with an A/B switch, so when I’m mixing or mastering, I can listen on consumer speakers or reference monitors with a flick of the A/B switch.
The consumer speakers are Audioengine A2+ speakers. For around $250 a pair, they sound great. They're crisp and crystal clear with a surprisingly tight and punchy bottom end for such small speakers. I recommended them highly.
Better still, spend a bit more for some reference monitors such as the (now discontinued) Tapco’s S-5 Active Studio Monitors.
One last thing: If you’re going to get only one pair of speakers, think long and hard about whether you’d be happier with speakers that sound great or that reproduce sound accurately. Reference monitors generally reproduce music more accurately than regular speakers, but that doesn’t mean they sound better for everyday listening. I prefer the smaller Audioengine A2+ speakers for almost everything I do at my Mac except mixing and mastering. On the other hand, switching between two sets of speakers — even if neither pair are reference monitors — almost always highlights a flaw I might not have noticed with one set of speakers.
As always, your mileage may vary. You need to listen to your almost-finished songs on as many different devices and through as many types of speakers as possible. I consider this step one of the most important in creating great-sounding songs. After you’re happy with what you’re hearing at your desk, export (share) the song and listen to it in your car, on your home stereo, on a boom box, in the shower, on Bluetooth speakers, on an iDevice — with and without earphones — and on every other device you can find.
I always carry a notebook to write down anything that sounds funky as well as the audio system I was listening to. After listening to a semi-finished track on five or six different sound systems, I go back to GarageBand and try to fix the funkiness. Then I export a new version and listen on five or six different devices again. If I still hear flaws, I repeat the process until all the funkiness has been removed and I don’t have notes from any of the sound systems. When that happens, the last version I exported becomes the golden master and is the version I share with the world.
Get better headphones
You should use sealed headphones — ones that leak as little sound as possible — when you record. If you’re using cheap headphones with porous foam ear cups when you sing, some of the music you’re hearing in the headphones is likely to bleed onto your track.Good sealed headphones not only prevent such noises from leaking onto your track but also reproduce sound more accurately than cheaper models.
Don’t underestimate the importance of a good set of cans. You’ll almost certainly improve your vocal and acoustic instrument tracks when you can hear the other instruments and voices clearly. And you’ll have fewer takes spoiled by sound leaking from your cans.
Fine-tune mic placement
The location of your microphone makes all the difference when you’re recording. I’ve heard many recording engineers tell me that setting up mics correctly can take longer than the actual recording.Don’t be afraid to experiment. If that acoustic guitar isn’t sounding quite right, move the mic to the left or the right, or point it up or down a bit, or move it farther from the sound hole.
Each small move changes the sound that ends up on your track. If you take the time to discover the mic placement that sounds best to you, the resulting tracks will sound that much better.
Improve room acoustics
Also consider the room you’re recording in. Hard surfaces and parallel walls in your studio can resonate, reflect, and reverberate sounds; these issues are undesirable when you’re recording. The more hard surfaces (and parallel walls) in the room, the more reflected yuck you hear on the track.If you’re not getting the sound you want from a mic, try throwing some blankets or pillows over hard surfaces, or moving the mic to a different part of the room (or a different room) with fewer reflective surfaces.
I’ve been known to make a tent out of old quilts and record hand-held percussion instruments by holding the instrument (usually a tambourine or maracas) and the mic under the quilt tent. It may not be pretty, but it's cheap and it works.
Use quality cables
Most computer peripherals and audio devices include a cable or two. Isn’t that nice? The problem is, many manufacturers throw in the cheapest, crummiest cable they can buy. As a result, the quality may be lacking, and the cable may become nonfunctional sooner than you expect.I’m not suggesting that you replace your existing cables with high-end cables, but if you’re buying cables, it’s best to avoid the cheapest ones. They won’t last as long, and because they use the cheapest available components, they may introduce unwanted noise and interference.
I get most of my cables at Amazon.com and Monoprice.com, reading the reviews and ratings before I click Buy. For what it's worth, I like Monoprice a lot. It specializes in cables, and engineers and manufactures most of its offerings. Monoprice often has cables in more lengths, colors, thicknesses, and qualities than Amazon. Monoprice is often a little more expensive than Amazon, but I know I’m getting the exact cable I need, and it’s likely to last longer than a cheapie on Amazon.
Add an audio interface (and, optionally, a mixing board)
Sometimes you’ll need to record more than one track at a time. For example, a standard drum set needs as many as seven microphones to be recorded well. This requirement is a no-brainer for big-time audio recordings. Simply set up the microphones and then record each one on a different track. But unless you have an audio interface with at least seven microphone inputs, you’re out of luck.Another example: You’re recording a large vocal group, and the group is too large to all sing into a single microphone.
In these cases, the answer is a multi-input audio interface or a small mixing board (which includes an audio interface). Like an audio interface, mixing boards have inputs and outputs so you can connect as many mics as the board has inputs. Then you can adjust their level, equalization, tone, pan, effects, and so on from a physical device with knobs and faders, all before it’s passed to GarageBand and recorded on its own track.
You know the big sound board you see in the middle of the floor at a rock concert? That’s a big, expensive mixing board that obtains input from all the microphones on stage and then sends the output to the giant speakers facing the audience.
Guitar Center and Sweetwater sell a wide variety of mixing boards compatible with GarageBand. Search for USB mixer for GarageBand and you’ll find mixers ranging from 4-channel mixers under $100 to 24-channel mixers that cost thousands.
I don’t have any room for a mixing board, so I bought a Korg nanoKONTROL2 ($75), as shown.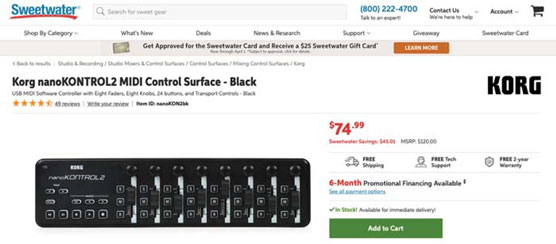 It is cheaply made but does what it’s supposed to and takes up little space.
With nanoKontrol2, I can tap a physical button to start or stop recording, slide a physical fader to raise or lower levels, or press physical buttons to solo, mute, or record.
Switch to more powerful software
If the preceding section sounded good to you — and you’re interested in recording multiple instruments or vocals on multiple tracks, all at the same time — you might be happier with more powerful software than GarageBand.Pro audio-recording applications include GarageBand’s sibling from Apple, Logic Pro ($299), and DigiDesign Pro Tools.
The software expense will be the least of your worries if you decide to assemble a semipro or pro-quality home studio. For starters, you’ll need a multichannel audio interface or mixing board. Then you’ll want at least one microphone for each channel on your interface or board. You’ll also need a very fast Mac with very fast drives used only for recording.
Logic Pro
In addition to GarageBand, Apple makes an excellent professional-quality music creation program called Logic Pro. When I got it, it cost $999, but it is now available for a much more reasonable $199.Logic Pro has two big advantages over other professional audio editors. One, it will open GarageBand files. Sadly, it’s one-way, and you can’t (easily) open a Logic Pro file in GarageBand. The second advantage is that unlike most other DAW (digital audio workstations) such as Pro Tools, Logic Pro includes free upgrades for life.
The interfaces are quite similar, as shown. And most of GarageBand’s features work the same way in Logic Pro. Because you already know how to use GarageBand, it won’t be long before you’re comfortable with Logic Pro.
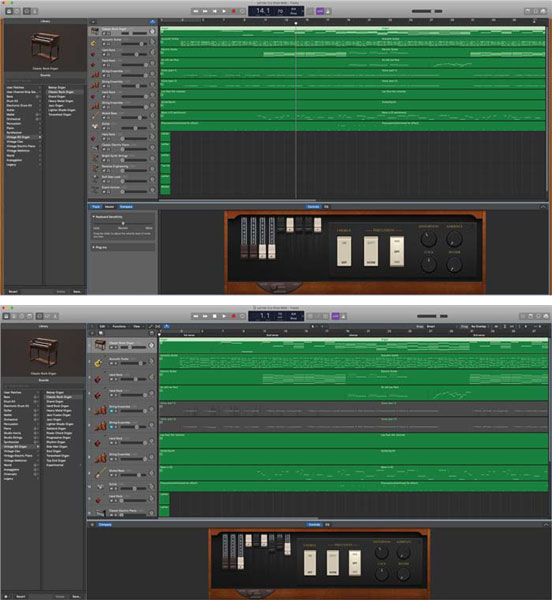 If you don’t look closely it’s hard to tell GarageBand (top) and Logic Pro (bottom) apart.
There are many reasons why you might want (or need) to use Logic Pro to finish a project you started in GarageBand, such as the following:
- Your project has more tracks than GarageBand can handle. Logic Pro is more efficient and uses less of the processor and memory than GarageBand. Because Logic Pro is designed for pros, it supports projects with track and effects counts that would bring GarageBand to its knees.
- You want to use a Logic Pro instrument or effect not included in GarageBand. Logic Pro has more of almost everything GarageBand has, including more instruments (1,000+), more instrument and effect patches (2,800+), more drummers (28), as well as more guitar and bass amps, stompboxes, custom pedalboards, and more.
- You want to create a project in the 5.1 or 7.1 surround sound format. GarageBand does not support either surround sound format.
Pro Tools
Pro Tools from Avid is worthy of consideration, primarily because there are so many different versions of it at a bewildering array of price points, as shown.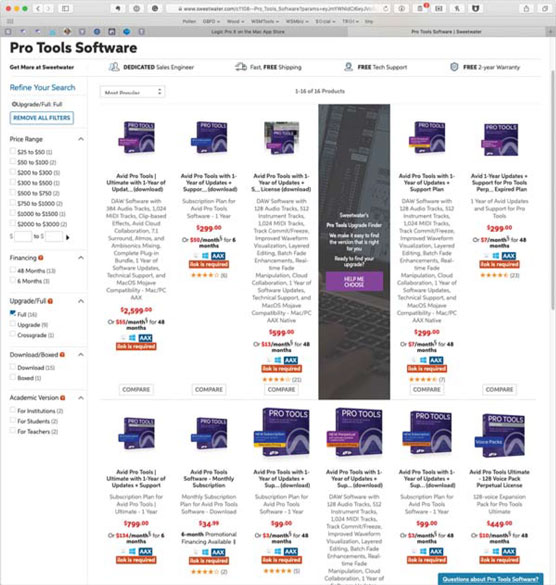 With prices from $299 ($99 for students) to $2,599, there’s a version of Pro Tools to fit every budget.
The good news is that all versions are compatible with each other and you can work on the same file with any version.
Pro Tools is the most common software you’ll find in commercial recording studios. That point is worth considering if you intend to record in a studio. With Pro Tools, you can take the project file you recorded with a $100,000+ Pro Tools hardware/software system and later work on that file with the $299 version of Pro Tools on your MacBook Pro.
One last thing: Pro Tools is more difficult to learn and master than either GarageBand or Logic Pro. If you decide Pro Tools is the right tool for you, block out a big chunk of time before your first session to become familiar with the software.

