

In general, the older your Mac or iDevice (which is to say, the slower its processor), the more likely you’ll encounter performance issues. That said, no device is truly immune. If you add enough tracks to your project and add enough effects to your tracks, you’ll bring your Mac (or iDevice) to its knees.
If you 've never (or almost never) seen the ugly warning dialog box in the following figure, you're either lucky or fortunate to use a Mac booting from an SSD (and not an old-school hard disk) and with a fast multicore processor and 8GB of RAM (or preferably more).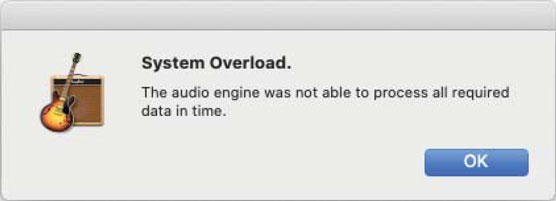 No! I hate when it says that!
In the next few pages, I show you tips, techniques, and workarounds to help you keep making music based on my nearly 20 years of infatuation with digital recording.
Start with the basics
Here's a quick set of things to try before you try anything more drastic:- Close every open application except GarageBand.
If you have other applications open while you’re using GarageBand, they’re using up RAM and processing power that can be put to better use. It’s a good idea to close all other programs to give GarageBand more RAM and processor time to work with.
- Check all your cable connections.
- Save your file, Quit GarageBand, and then reopen it.
- Delete the GarageBand preference file (com.apple.garageband.plist) from your Home/Library/Preferences folder.
- Log out of your macOS user account and then log back in.
- Restart your Mac.
If you’ve deleted your GarageBand preferences, every setting you modified in GarageBand Preferences has been reset to the defaults — as they were the first time you ever used GarageBand. Open GarageBand Preferences (choose GarageBand→Preferences or press Command+?) to reset the preferences to the way they were.
Check on FileVault
Another possible performance-robber is macOS FileVault, which can cause excessive reading and writing to your hard drive. If your startup disk is an SSD, FileVault probably isn’t a problem for you. But for those who boot from a hard disk (and not a solid-state drive), FileVault may be the cause of performance hiccups and slowdowns.To turn off FileVault (or determine if it’s enabled), follow these steps:
- Launch the System Preferences application.
- Click the Security & Privacy icon.
- Click the FileVault tab.
- Do one of the following:
- If the text reads, “FileVault is turned on for the disk” followed by your disk’s name, and the button to the right of the text says Turn Off FileVault, click the Lock icon in the lower left and provide your user account password, and then click the button to turn off FileVault.
- If the text reads, “FileVault is turned off for the disk” followed by your disk’s name, and the button to the right of the text says Turn On FileVault, you’re golden.
- Quit System Preferences and continue your recording session.
If you can’t live without FileVault (and you’re certain FileVault is responsible for your issue), store your project files on an external disk: hard or solid-state (though an SSD will deliver better performance when recording).
Okay, now let’s get serious. The following sections give you some other things to try when GarageBand goes sour.Pay attention to CPU and RAM usage
Keep an eye on your Mac’s CPU load and memory usage if GarageBand is throwing up error messages or complaining it can’t do something. Chances are your processor is being swamped by requests from GarageBand, or GarageBand (or something else) is chewing up all memory (RAM).Adding tracks and effects increases the load on your Mac’s processor, and some complex effects, such as the Amp models, use more processor time than others. So, I recommend turning off effects or muting some of your tracks if you need to reduce the strain on your processor.
If you don’t fix a heavy processor load or an out-of-memory condition before it happens, a dialog box or an audio dropout will likely wreck the take. So, try the techniques that follow if GarageBand is acting wonky and your processor load or memory is in the danger zone.
What’s that you say? How do you determine that your Mac’s processor (CPU) load or memory (RAM) is in the danger zone?Glad you asked. Apple provides a handy tool for just such determinations. It’s called Activity Monitor and it’s in your Utilities folder (which is inside your Applications folder).
If I have a project with a lot of software instruments, amp models, or effects laid onto tracks and GarageBand bogs down, the first thing I do is launch Activity Monitor and arrange its windows on my screen so I can see it alongside my project, as shown.
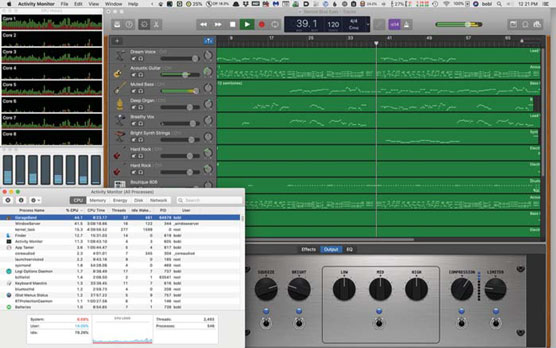 GarageBand is consuming roughly 44 percent of my CPU’s cycles.
Check out Activity Monitor’s CPU and Memory tabs
With your project playing in GarageBand, take a look at Activity Monitor’s main window and its CPU tab (bottom left in the preceding figure) and Memory tab (see the following figure).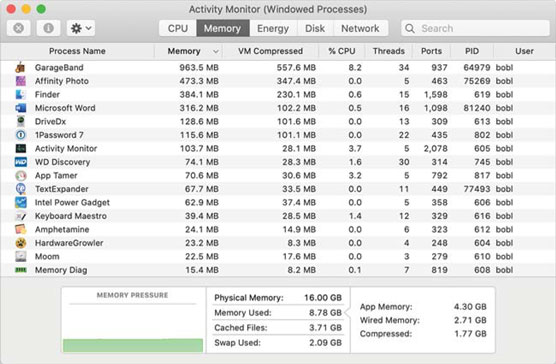 Do the math: 16.00GB minus 8.78GB equals 7.22GB. (7.22GB available RAM is more than enough to complete most GarageBand projects.)
The first thing you’re interested in is the % CPU column. If GarageBand is using more than 70 to 80 percent of your CPU cycles and GarageBand is stuttering or throwing up error messages, try muting some tracks and turning off effects.
This is probably the quickest, easiest fix for performance problems: If you don’t need the track or effect for whatever you’re doing right now, mute tracks or disable effects or both.
The same issues can arise if another app is consuming a large percentage of CPU cycles, which can leave too few cycles for GarageBand. In that case, quit the other program (or programs).Activity Monitor displays All Process by default. So, you’ll see items such as kernel_task or launchserviced, which are part of the system software and can’t be quit. I like to see them, so if anything—including system software—is chewing up a ton of my CPU, I will see which app or process is responsible. If you don’t care about such minutiae, choose View→Windowed Processes and you’ll see only applications that are currently open and can be quit in the usual fashion.
The other thing of interest is the Memory tab at the top of the main Activity Monitor window. The thing you're most interested in is how much of your total RAM (memory) is free. The closer the available RAM gets to 0, the more things—including GarageBand—will slow to a crawl.
This time you’re not as concerned with GarageBand’s stats as you are with your Mac’s overall RAM use. You want to determine three things:
- How much RAM this Mac has
- How much of that RAM is available (or, conversely, how much of that RAM is currently in use)
- How much swap memory is used for virtual memory (VM)
The key things to watch for are 1GB or less available RAM, or a huge swap file or both.
The first—less than a gigabyte of free RAM—is easy. Just do the math: physical memory minus memory used equals available memory.
The second—a huge swap file—is a little mushier. The Swap Used amount is how much of your SSD (or hard disk) is being used (swapped) for RAM (known as virtual memory) because not enough physical RAM is available.
If your RAM isn’t all being used, the swap file will vary from 0 to a few gigabytes; the more RAM you have installed, the bigger your normal swap file. Take a look at the Memory tab occasionally and note what Swap Used looks like when things are going well on your Mac. Then, if you notice the swap file swelling beyond what is normal on your Mac, quit one or more apps to free up memory.
When do you need to worry? After you know what normal looks like on your Mac, any time you see your swap file grow by 3 times or more, your Mac is likely to run sluggishly. On my MacBook Pro, with 16GB of RAM and a normal swap size of around 2GB, I start getting concerned if I see my Swap Used grow beyond 8GB.
Note that the Swap Used is dynamic. If you free up some memory by quitting one or more apps, the swap size should go down (although not instantly).
Finally, restarting your Mac often cleans up memory-related issues and speeds things back up without doing anything else.
Alas, at certain times, most notably mixing or mastering, muting tracks, disabling effects, or reducing RAM usage isn’t possible. Keep reading for more tricks to try if things bog down.
Recording: 16-bits vs. 24-bits
One thing that can affect performance is the resolution you’re using for recording. GarageBand records at 16 bits by default, but you have the option of recording at 24 bits.The good news is that 24-bit recordings are higher quality because you’re capturing roughly 33 percent more data than a 16-bit recording. The bad news is that GarageBand is working with 33 percent more data, which uses more CPU cycles and memory.
So, if you’re having performance issues, check the resolution at which you’re recording by choosing GarageBand→Preferences (or pressing its shortcut, Command+comma) and then clicking the Advanced icon.
If the 24-bit Audio Recording Resolution check box is selected, deselect it and then close the Preferences window.
With the recording resolution reduced to 16 bits, GarageBand will be more responsive and less prone to errors.
Minimize the GarageBand window while playing or recording
Minimizing the GarageBand window—by choosing Window→Minimize, pressing Command+M, or clicking the yellow gumdrop in the upper-left corner of the GarageBand window—provides some respite for your processor.When you minimize the window, GarageBand doesn't have to draw to the screen, reducing the demand on the processor. It is, alas, somewhat less convenient than some of the other remedies.
Why is it less convenient? First, you have to remember to begin your recording (or playback) and then minimize the window. Then, before you can stop recording (or do anything else), you have to maximize the window again by clicking its icon in the dock.
The Count In feature (Record→Count In) gives you four beats before recording begins, which should be plenty of time to minimize the window.
The bottom line is that this solution might provide some relief if your Mac is bogging down, and it’s easy. And you don’t need to see the window while you record as long as you’ve adjusted the track level properly before you started recording.If you’re still having trouble building the kind of songs that you want to build because your processor or hard drive is too slow or you keep getting error messages, check out the following sections to find some more things that can help.
Get more RAM
Most Macs today ship with 8GB of RAM, which is enough to run GarageBand acceptably but may not be enough to record the kinds of songs you want to record. Even if your Mac has 8GB of RAM, GarageBand will almost certainly perform better after you add more.Some Macs have their Mac soldered in so it can’t be replaced or upgraded. Other Macs make it easy to install additional RAM— anyone can do it in 15 minutes or less. For under $100, you can buy a 16GB upgrade kit for many Mac models. (RAM prices are volatile. That was the price as of spring 2020. By the time you read this, prices might be noticeably higher or lower. I’m just sayin’.)
If you bump up your RAM to 16 gigabytes or more, GarageBand will run even better — and allow you to have more tracks, instruments, effects, and notes in your songs before those dreaded warning dialog boxes start to appear.
Get faster storage
Your internal disk drive may not be fast enough for GarageBand, especially if it’s an old-school rotational hard drive or even a hybrid drive. When it comes to recording music, nothing comes close to using a solid-state drive.Most USB 3 external hard drives (and all external SSDs) run at higher speeds than internal hard drives or hybrid drives from Apple. If you have a USB 3 external hard drive, it’s faster than the internal disk or hybrid drive in your Mac. If your Mac has a hard or hybrid drive inside it, and you have a faster external drive available, it would behoove you to save your projects on the faster external drive instead of your slower boot disk.
For years, pro audio programs recommended saving your projects on any hard drive except the boot disk (that is, the disk with macOS and GarageBand on it). If you save your projects on the fastest drive you have, you are likely to see fewer error messages.If you’re considering an external drive, look for hard drives that run at 7,200 rpm or higher rather than the cheaper — and easier to find— 5,400-rpm drives. Most drive vendors display the speed of a drive in the product description; if you don’t see it, ask about it.
If your Mac has Thunderbolt, as many do today, a Thunderbolt disk drive running at 7,200 rpm moves data faster than a USB 3 drive at 7,200. But Thunderbolt drives are less common and cost significantly more than USB 3 drives. Still, Thunderbolt may be worthwhile if you record multiple tracks at once or create complex projects with dozens and dozens of tracks and effects.
Finally, if your boot disk is a hard or hybrid disk, you may be able to replace it with an SSD. This option will be more expensive than buying an external SSD but may be more convenient if you have a laptop.
Reset MIDI drivers
I saved this tip for last because it’s only likely to cure a single symptom—a MIDI device that doesn’t become available in GarageBand when you connect it to your Mac. If this happens (and it does every so often), open GarageBand Preferences (GarageBand→Preferences), click the Audio/MIDI tab, and then click the Reset MIDI Drivers button.If that didn’t fix it, make sure the cable you’re using is good. If it is and the problem persists, try restarting your Mac.
Turn off Wi-Fi before recording or performing
If you’re still having performance issues after trying other suggestions in this list, you can try one more thing: Turn off Wi-Fi. Doing so will reduce the load on your processor and free up a bit of memory, which should improve GarageBand's performance.And, although I’ve mentioned it before, I'll say it again here: Don’t forget to quit all other applications before you begin recording or performing with GarageBand.

