

How to configure the Fitbit app dashboard
When you’re using the Fitbit app, you’ll spend the bulk of your time obsessing over — er, I mean, studying — the metrics to track your progress today and to compare your recent data with past achievements. However, right out of the box, the Dashboard is set up with a generic collection of tiles, some of which might not interest you. If that’s the case, it makes sense to simplify your life by customizing your Dashboard to show only the tiles you want to see and to rearrange the tiles to put the most important ones at the top for easy viewing. Just follow these steps:1. Select the Dashboard.
2. Open the Dashboard for editing:
-
- Android: Scroll down to the bottom of the Dashboard screen and tap Edit. The Fitbit app displays a Remove (–) icon in the upper-left corner of each displayed tile and an Add (+) icon in the upper-left corner of each hidden tile.
- iOS: Scroll down to the bottom of the Dashboard screen and tap Edit. The Fitbit app displays a Remove icon (X) icon in the upper-left corner of each displayed tile and an Add (+) icon in the upper-left corner of each hidden tile.
- Windows 10: Select the Edit icon (pencil. The Fitbit app displays a Remove (X) icon in the upper-left corner of each displayed tile and an Add (+) icon in the upper-left corner of each hidden tile.
4. Select the Add icon for each hidden tile you want to display.
5. To move a tile, drag it to the position you prefer.
6. When you’re finished, turn off Dashboard editing:
-
- Android or iOS: Tap Done at the bottom of the screen.
- Windows 10: Select the Edit icon to turn it off.
How to configure your online Fitbit Dashboard
The Fitbit app’s Dashboard is the handiest way to monitor your health and fitness metrics, but what’s a numbers nerd to do if she doesn’t have the app handy? First, don’t panic! Second, calmly check to see if you have a web browser nearby. You do? Good. Now you can get your Fitbit fix by using the online version of the Dashboard.Surf to www.fitbit.com and then log in to your Fitbit account. You see your Dashboard, which will look similar to the one shown.

Here are the techniques you can use to configure this Dashboard to suit your style:
- To rearrange the tiles, drag any part of a tile to the position you prefer.
- To hide a tile, hover the mouse cursor over the tile, select the Settings icon (gear) that appears just below the tile, select the Remove Tile button (or the trash can icon, if you don’t see the button), and then select Remove when Fitbit asks you to confirm.
- To display a hidden tile, first make sure that you’re displaying today’s metrics. Select the Menu icon (labeled in the figure), select the check box beside the tile you want to add, and then select Done.
How to customize your Fitbit profile
When you first signed up for a Fitbit account, the setup program asked you for some personal info, such as your birthday, weight, and height. Together, these and a few other stats and settings make up your Fitbit profile. To make changes to your existing profile data and to add personal info such as a flattering picture, your home country, and a short description of yourself, follow these steps:1. In the Fitbit app, select Dashboard→Account.
2. Select View Your Profile.
In the Android app, you don’t see the View Your Profile command, so instead tap your name near the top of the Account screen.
3. Select the camera icon that appears beside the default profile picture, give the app permission to use your device’s photos and camera, and then either take a new picture or select an existing picture.You can also choose an image that appears in the header at the top of your profile page by selecting the camera icon that appears beside the default header image.
4. Select Personal.The app displays the Personal screen, which contains your profile data.
5. For each piece of info you want to edit, select the info and then make your changes. If you see a Save button, be sure to select it to save your changes.To customize your profile online instead of in the app, point your trusty web browser to www.fitbit.com and log in to your account to display the Dashboard. Select View Settings, and then select Settings. You should now see the Personal Info page; if you don’t, select Personal Info.
How to adjust Fitbit app settings
As a final configuration chore before getting to the good stuff, you should adjust a few settings for the Fitbit app itself. These settings include the measurement units you prefer (such as miles or kilometers), your time zone, and on what day your week begins.1. In the Fitbit app, select Dashboard→Account.
2. Select Advanced Settings.
The Advanced Settings screen appears. The figure shows the Android version.
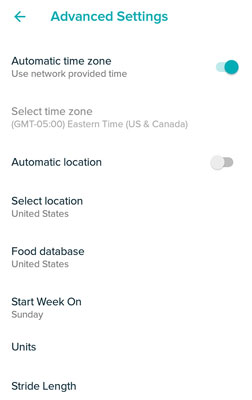 The Android version of the Advanced Settings screen.
3. To set the time zone:
Don’t adjust the time zone unless you really have to, especially if the new time zone would roll back the time because you’ll lose all generated data between now and the new earlier time. A new time zone that rolls the time forward is problematic as well because it creates a gap in your data between now and the new later time.
-
- Android: Tap the Automatic Time Zone switch to Off, tap Select Time Zone, and then tap the time zone you want to use.
- iOS: Tap the Set Automatically switch to Off, tap Time Zone, and then tap the time zone you want to use.
- Windows 10: Select Time Zone, select the Auto switch to Off, tap Time Zone, and then tap the time zone you want to use.
-
- Android: Tap the Automatic Location switch to Off, tap Select Location, and then tap your country.
- iOS: Tap Location, tap the Automatic switch to Off, and then tap your country.
- Windows 10: Select Country, select the Auto switch to Off, and then tap your country.
In the Android and iOS version of the Fitbit app, you can also select a measurement unit for swimming.
6. To set the start of the week, select Start Week On and then select either Sunday or Monday.The Advanced Settings screen has quite a few other app settings.


