


- USB drive: You can plug a USB drive that stores your movies or music directly into your Pi or its USB hub. A message appears in the top right, confirming that the USB device is being mounted, which means it’s being prepared so that you can use it.
- Networked media: You can connect your Pi to your home network and then access other devices on the same network. Sean, for example, was able to connect his Pi to his Windows PC over the network and use Kodi on the Pi to play back the music and movies stored there. You might have a router with a built-in media server, so it can share any files on USB devices you connect to it. These networked devices most likely use the UPnP (Universal Plug and Play) standard.
Adding music
To add music to your library, follow these steps:- Hover over Music in the menu on the left.If you've already added music, you'll see options to browse it by artist, album, and year, among other categories.
- Choose Files from the Categories menu at the top of the screen. (Use the scroll wheel to scroll this menu horizontally until you find it.)This will show you the folders you have added to your library already, and any connected storage devices.
- Choose Add Music.
- Choose Browse in the Add Music Source dialog box that opens and use the options to find where your music is stored.
If you’ve connected a USB drive to your Pi, you can find it by clicking Root filesystem, media, and then the name of your USB device. To find media connected on your network, try the Windows Network (SMB) or Network File System options.
You may need to enter your username and password, and you should enable the option to remember them for this path if you don't want to have to enter them whenever you access your media. Click folders to open them. The .. (two dots) option at the top takes you up a level in the folder structure.
- Click OK when you have navigated to the folder that contains all the music folders or files you want to add.
- In the Add Music Source dialog box enter a name for the media source, if you want.This will help you to identify the source on the menus.
- Click OK.
- When prompted, confirm that you'd like to add the media to your library.
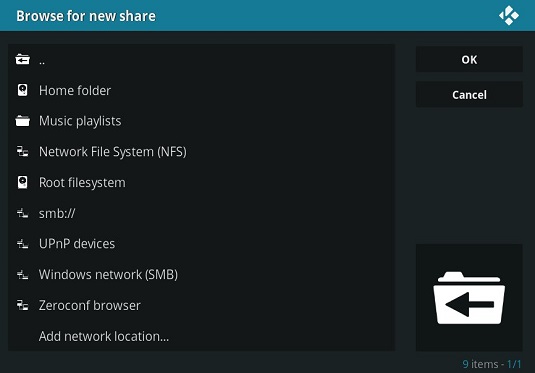 The browsing options for adding media to your Kodi installation.
Content that Kodi doesn't recognize, including home recordings, won't be added to the library, but you can still view them in the folder you added by using the browser. Start by choosing Music from the menu on the left, choose Files (as you did when adding media), and then select the folder that contains your added media. From there, you can open the folders and select the music files to play them.
Adding videos
To add movies to your library, follow these steps:- Click Movies from the menu on the left.If you can't see it, it's probably off the top of the screen. Hover the mouse cursor over the menu and use the scroll wheel to bring the Movies option back again.
If you've already added some films, you'll see a list of them with .. (two dots) at the top of the list. In that case, click .. twice to go up a level and then choose Files. This will show you the folders you have added to your library already.
- Choose Add Videos at the bottom of the folder list.
- Choose Browse and use the options to find where your films are stored.
If you’ve connected a USB drive to your Pi, you can find it by clicking Root filesystem, media, and then clicking the name of your USB device. To find media connected on your network, try the Windows Network (SMB) or Network File System options. Click folders to open them. The .. option at the top takes you up a level in the folder structure.
- Click OK when you have navigated to the folder that contains all the video folders or files you want to add.
- In the Set Content options that open, click where it says This directory contains and select Movies.
- (Optional) If your movies are stored in separate folders that match the movie title — a common way of organizing them — turn that option on.
- Click OK.If prompted, confirm that you'd like to refresh items in this path.
Content that Kodi doesn't recognize, such as your home movies, won't be added to the library, but you can still view them in the folder you added by using the browser. Start by clicking Movies on the left, clicking .. twice, choosing Files, and then selecting the folder that contains your added media. From there, you can open the folders and select the movie files to play them.
You can add TV shows or music videos using a similar process — just change the media type to TV Shows or Music Videos in Step 5.Adding pictures
To add photos, you follow a similar process to adding music and movies. Start by clicking Pictures from the main menu on the left, and then choose Add Pictures from the menu that appears. You can then add a folder of photos.To view the folder, hover over Pictures on the main menu on the left and then select the folder name. You can use the left- and right-arrow keys to navigate your photos and hover over options in the bottom left to open a menu that enables you to display a slide show.
If you're in a folder and you want to view a different folder or add more pictures, click .. at the start of the photo folder.
Streaming media
Streaming media means that the content flows into your Raspberry Pi over the Internet as you watch it or listen to it. As a result, streaming services only work when you have a good Internet connection.To enable streaming, you use add-ons, which are third-party applications that access sources of content online. Music add-ons, for example, enable you to listen to Internet radio stations and access some online music services. Video add-ons can give you access to online TV stations. The availability of add-ons varies over time as new services launch and older services disappear. The music and video add-ons can be particularly short-lived and unreliable because broadcasters are often keen to keep viewers using their own software and gateways.
To install an add-on, hover over Add-ons on the main menu on the left, and then choose Install from Repository from the menu at the top of the screen. From the new menu that appears, choose Kodi Add-On Repository to find add-ons from the official Kodi repository, which offers a range of add-ons that have undergone basic testing.As well as music and video add-ons, there are options for a weather forecast provider, screensavers (in the Look and Feel category), and picture add-ons. Note that if you add a screensaver, you'll also need to enable it in the Interface settings.


