Crossing to different strings on the violin with your left-hand fingers is a bit like steering a boat, because your left arm works like a rudder to bring your fingers over the relevant string. The movement, called arm steering, or elbow steering, is very subtle and keeps your left hand working well when you need to cross strings.
Below, you see some examples of string-crossing movements for your left hand. At first, just use your violin for these exercises, no bow necessary. When your finger movements feel smooth, you can go back through the exercises, adding the bow.

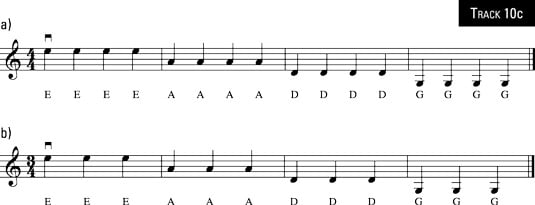
For the exercise below, which shows you how arm steering works, get into playing position and then follow these steps, using finger 4. Because finger 4 is your shortest finger, you can be sure that when finger 4 reaches the correct spot on any string by moving your elbow to the right, your other three fingers can easily reach their notes too. And of course, a slight swing of the elbow to the left brings your hand back across the D, A, and E strings.

Here are the moves, step by step:
Get your left hand ready in playing position, with your fingers nicely rounded and ready to land on the E string.
Tap finger 4 four times on the E string.
Check that the alignment from your elbow through to the back of your hand is fairly straight.
Swing your left elbow about an inch to the right.
You’re steering your hand over the A string.
Try tapping finger 4 four times on the A string.
Swing your elbow another inch or so to the right, and then tap finger 4 four times on the D string.
Swing your elbow one last time, another inch or so to the right, and then tap finger 4 four times on the G string.
When you return to this workout later to try it with your bow, you don’t need to tap finger 4 four times on each string. Finger 4 can settle down and stay quietly on the string until the bow finishes the four bow strokes and then make a quick hop over to its next target string. But the first time you do the exercise, when you’re practicing without the bow, tapping gives you a feel for the elastic action of the finger and allows you to practice landing on target.
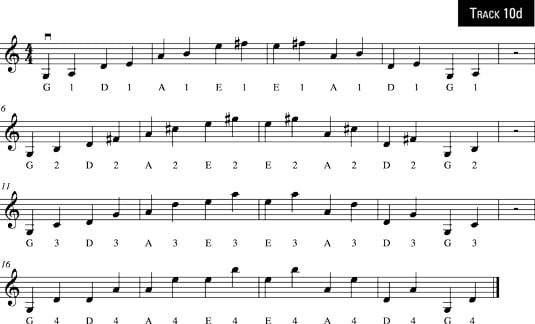
Doing the exercises below makes you feel as if you have a table tennis ball on each fingertip. Just tap finger 1 on the G string and then lift it as if it has bounced off the fingerboard and hopped onto the D string. Use the most basic finger pattern for these workouts, with fingers 1 and 3 on their tapes or dots, finger 2 close to 3, and finger 4 in its regular position, a healthy step above 3.
You use a very springy finger action when you aren’t bowing, because this type of exercise is for working your finger muscles. When you play the same exercises with the bow, each finger remains on the string until you bow the next note, at which moment your finger releases from the string.

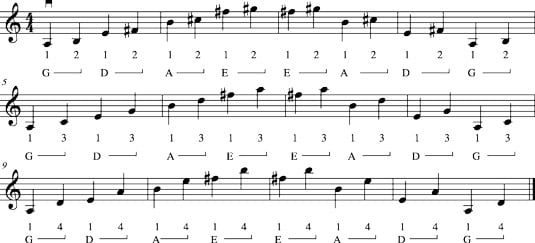
For the exercises below, the finger action is a lot like walking, so imagine each of your fingers as being a little foot. While you’re playing finger 2, lift finger 1 slightly and walk it to the next string.
Pop finger 2 off the original string only when finger 1 is safely in place on the next string — just like you lift your foot to take another step only when your other foot is safely on terra firma! Your elbow swing adjusts gently as the new finger plays on the new string.

After you’ve walked your fingers silently through this sequence and are comfortable with the moves, add the bow to sound out your notes.
Violinists are like scouts; they must always be prepared. One important fact you must know is that, when playing any piece of music, your next finger to play has to be ready with the next note by the time the bow finishes playing the previous note. The bow has to wait for the finger to be ready all the time — and usually it’s quite considerate. But having your next finger good and ready to play makes the bow’s job much easier, and of course, your music will sound better, too.
Getting the next finger ready is a bit like changing gears in a stick-shift car: You feel a moment of neutral readiness as you go from one setting to the next. So if your next note involves lifting a finger, you need to plan to lift the finger promptly to above its spot on the string so that it’s ready to play again at any time.
If your next note involves landing a finger on the string, you just hover over the spot a bit ahead of playing time (usually when the previous finger is playing) and then drop the fingertip at the right moment.
Your two hands often seem to be doing drastically different moves on the violin. But crossing strings is one important activity where your hands and arms are in excellent sympathy with one another. To get the gist of this comfortable fact, set your bow on the E string and then land finger 4 on E, too.
This is a silent exercise, so just roll the bow over to the A string at the same time as you hop finger 4 to the A string. Your elbows move in the same direction to make the necessary level changes. You can do the same moves all the way across all the strings and back again.

