


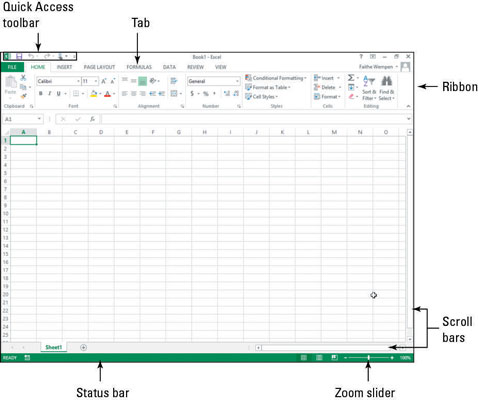
Excel 2013 is very much like Word and other Office applications. Excel has a File tab that opens a Backstage view, a Ribbon with multiple tabs that contain commands you can click to execute, a Quick Access toolbar, a status bar, scroll bars, and a Zoom slider. This figure provides a quick overview.
These instructions walk you through the Excel interface and show you how to move around. After you get your bearings in Excel, you’re ready to start creating worksheets. The best way to learn about a new application is to jump in and start exploring. Work through this exercise to see how Excel is set up.
Starting out with some basic terminology is a good idea. A spreadsheet is a grid composed of rows and columns. At the intersection of each row and column is a cell. You can type text, numbers, and formulas into cells to build your spreadsheet.
In Excel, spreadsheets are dubbed worksheets or just sheets. Worksheets are stored in data files, or workbooks, and each workbook can contain multiple worksheets. Worksheet tabs at the bottom of a workbook window enable you to switch quickly between worksheets.
Start Excel 2013 from the Start screen (Windows 8) or Start menu (Windows 7).
You might want to pin the Excel 2013 tile to the taskbar in Windows 8 to save yourself some time in opening it. Right-click the Excel 2013 tile on the Start screen and then click Pin to Taskbar in the command bar that appears at the bottom of the screen.
From that point on, you can start Excel by clicking the Excel icon on the taskbar from the desktop. This trick works with all the Office apps, by the way.
An opening screen appears, as shown, providing shortcuts to recently used workbook files and thumbnails of some available templates. One of the templates is Blank Workbook.

Click the Blank Workbook thumbnail image to start a new blank workbook.
Alternatively, you can also press the Esc key to go to a new blank workbook from the opening screen.
A new workbook appears.
Click the File tab to open Backstage view and then click Info.
Information about the active document appears, as shown in this figure.

Click the Back arrow, or press the Esc key, to return to the new blank workbook. (See this figure.)
The Back arrow is the left-pointing arrow in the upper-left corner.
This figure shows a basic worksheet in Excel. Notice that each row has a unique number, and each column has a unique letter. The combination of a letter and a number forms a cell address. The letter comes first.
For example, the cell in the upper-left corner is A1. When you type something in Excel, your typing is entered into the active cell, which features the cell cursor, or a thick green outline. The active cell’s name appears in the Name box.

Click the View tab on the Ribbon, and then click the Zoom button so that the Zoom dialog box opens. (See the figure.)

Select 200% and then click OK.
The dialog box closes, and the magnification changes to show each cell in a more close-up view.
At the bottom-right corner of the Excel window, drag the Zoom slider left to 100%, changing the zoom back to its original setting. (See the figure.)


