
Just as with any other physical activity, you need to prepare your body for the task of playing bass guitar. Without proper exercise, your hands simply won't be strong enough or coordinated enough to endure long hours of bass playing. A few minutes a day with the proper exercises go a long way.
Start the exercises in this article by positioning your right hand on the bass. The letters for the fingers of the right hand are as follows:
- Index finger = i
- Middle finger = m
For now, your left hand gets to take a break while your right hand is working out. Feel free to use it for scratching various body parts.
Right-hand same-string strokes
When you play notes on the same string, you need to be able to alternate between your index and middle fingers, so you can play notes in rapid succession and with an even tone. The following steps show you how to practice these same-string strokes.
1. Using the index finger (i) or middle finger (m) of your right hand, strike the lowest string.
Alternate between your i and m fingers (striking the string with one finger at a time) and keep the sound even.
2. Pull your fingertips across the string.
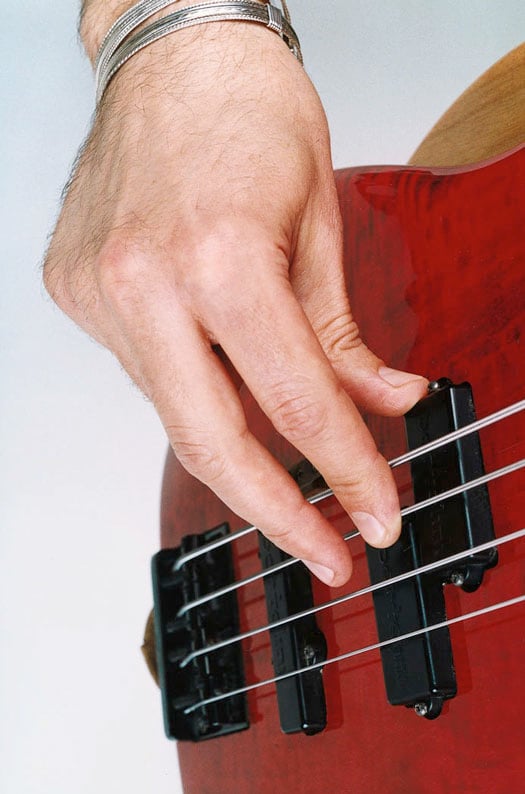
Don't lift your fingers really high and slap them down. When you slap the string, you create a lot of unwanted fret noise. Don't pluck the string up (like a classical guitar player), either. When you pluck the string up, it vibrates over the pickup in a way that produces a very thin sound. Your angle of attack (your strike) should be into the instrument, making the tone full and round.
Take a look at Figure 1 for the proper strike angle for the right hand. This technique gives you an authoritative sound, which is exactly what you want as a bass player.
Play evenly on each string, alternating between your i and m fingers. Aaaaaah, can you feel those calluses building up? You better make your fingers tough and hard so that you can strike the string all day long without any pain (or blisters).
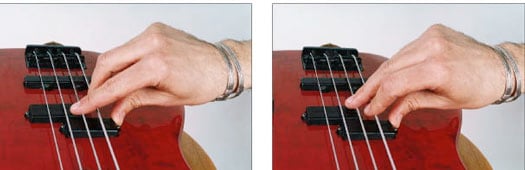
As you play, you probably realize that your striking fingers are coming to rest on the next lowest string when you play the adjacent higher string. This technique is correct; it helps mute the strings that are not being played. When you play the lowest string (the E string), your fingers should come to rest against your thumb (which, of course, is firmly anchored, right?). Check out Figure 2 for the proper striking sequence.
Right-hand accents: Getting control of the strength in your striking hand
This section takes you one step closer to creating music and introduces accents into your playing.
Accenting a note means making it slightly louder than the other notes. To accent a note, just strike the string slightly harder. Accenting allows you to control the volume of each note as you play it, which makes your bass line more interesting.
Don't accent a note too hard, though. If you strike a string too forcefully, the sound becomes distorted, and the tone leaves much to be desired. (It also tires out your hands very quickly.)
Follow these steps to accent a note correctly with either striking finger:
1. Start playing the E string with alternating i and m fingers of your right hand.
2. Accent (that is, play it louder) each note that you strike with your i finger.
3. After you get comfortable using your i finger, accent each note that you strike with your m finger.
4. Repeat this exercise on the A string, and then move on to the D string and G string.
You want to familiarize yourself with all the strings, because each string has a slightly different feel.
When you're comfortable accenting with either finger, put the previous instructions into exercise form.
1. Play evenly, alternating between your i and m fingers.
Think of this as a four-note sequence where you play i m i m.
2. Accent the first note of each sequence (the underlined i), making it i m i m, i m i m, i m i m, and so on.
3. When you have a handle on playing i m i m, start the sequence with m, making it m i m i.
4. Accent the first note again (this time, the underlined m), making the sequence m i m i, m i m i, m i m i, and so on.
5. Repeat this exercise on all the strings.
Right-hand string crossing: Getting across the strings smoothly
The final stage of the right-hand warm-up is called string crossing. How do you cross the strings? It's very straightforward. Just remember the following three rules:
- Alternate your middle and index fingers when you're striking the same string. (The "right-hand same-string strokes" exercises are covered in the previous section.)
- Alternate your middle and index fingers when you're crossing from a lower to a higher string.
- Rake with the same finger when you're crossing from a higher to a lower string. (Raking means striking a string with one finger and then striking the next lower string with the same finger.)
Take a look at your alternating fingers when you're crossing from a lower to a higher string. Remember, the lower string is the one on top (nearest your head). A regular four-string bass is tuned (from low to high) E, A, D, and G. Try the following exercise for right-hand coordination:
1. Strike the E string with i (the index finger).
2. Strike the A string with m (the middle finger).
3. Strike the D string with i.
4. Strike the G string with m.
Now strike the G string again, this time with i (alternating on the same string), and rake it all the way across the D, A, and E strings. Keep the rhythm and volume even.
After you play the E string with i, continue with the second half of the exercise:
1. Strike the E string with m (the middle finger).
2. Strike the A string with i (the index finger).
3. Strike the D string with m.
4. Strike the G string with i.
Now strike the G string again with m (alternating on the same string), and rake it all the way across the D, A, and E strings. Again, keep the rhythm and volume even in both directions.