This sounds complicated, but it’s really not. The business owner, for example, may have a password that allows her to do anything. But a new accounting clerk, for example, may have a password that allows him only to record bills in the system.
How to Add Users in QuickBooks Enterprise Solutions
To add users in QuickBooks Enterprise Solutions, follow these steps:1. Choose Company→Users→Set Up Users and Roles.
QuickBooks displays the User and Roles dialog box (not shown). This dialog box identifies any users for whom QuickBooks access has been set up and the roles QuickBooks can fill when using QuickBooks. The Users list, which appears on the User List tab of the dialog box, also identifies who is currently logged on to the system.
2. Tell QuickBooks that you want to add a user by clicking the New button.When you click this button, QuickBooks displays the New User dialog box.
3. Identify the user, and supply a password.You need to give each user for whom you’re setting up a username. You do this by entering a short name — perhaps the user’s first name — in the User Name box. After you identify the user, you enter the user’s password in both the Password text box and the Confirm Password text box.
4. Identify the user’s role(s).Use the Available Roles list box to select the roles (or duties) the user fills. Then add the selected role to the user’s list of assigned roles by clicking the Add button. To remove a role from a user, select the role in the Assigned Roles list box and then click Remove.
The Description box at the bottom of the New User dialog box allows you to describe the role in more detail. You might enter the type of QuickBooks user who might typically be assigned the selected role, for example.
5. (Optional) Modify roles as necessary.You can fine-tune the roles that you assign (with the help of QuickBooks). To do so, go back to the Users and Roles dialog box, select the Role List tab, click the role you want to change, and then click the Edit button. When QuickBooks displays the Edit Role dialog box (not shown), select an accounting activity or area in the Area and Activities list and then use the Area Access Level radio buttons to specify what a user with the selected role can do. You can indicate that the user should have no access by selecting the None radio button. You can indicate that the user should have full access by selecting the Full radio button. If the user should have partial access, you select the Partial button and then check or clear (as appropriate) the View, Create, Modify, Delete, Print, and View Balance check boxes. Click OK to save any changes to the roles and return to the Users and Roles dialog box.
You can see what access any role initially has by selecting one of the entries in the Area and Activities list. QuickBooks uses the Area Access Level buttons and boxes to show the current settings for the role.
As a general rule, when it comes to accounting controls, you want to provide a minimal amount of access. If someone doesn’t need access to the QuickBooks data file for day-to-day duties, you should select the None button. If someone needs a little bit of access — perhaps to prepare job estimates or invoices — you give just that access and nothing more. At the end of this chapter, in “Maintaining Good Accounting Controls,” I talk about why minimizing user rights and access is so important. But the bottom line is this: The more ability you give employees or subcontractors or accountants to noodle around in your small business accounting system, the greater the risk that someone will either inadvertently or intentionally introduce errors into the system. Also, the greater the rights and access you give, the easier you make it for someone to steal from you.
6. (Optional) Review your user permissions.After you set up a user, you should (to be careful) review the permissions you’ve given the user. To do this, click the User List tab of the Users and Roles dialog box, select the user, and then click the View Permissions button. When QuickBooks displays the View Permissions dialog box (not shown), select the user and then click the Display button to see the View Permissions window (not shown), which displays a very detailed list of what the user can and can’t do.
7. (Optional) Review your role modifications.If you change a role’s permissions, you probably also want to review those changes. To do that, click the Role List tab of the Users and Roles dialog box, select the role, and then click the View Permissions button. QuickBooks displays another version of the View Permissions window that lists the roles you and QuickBooks have set up. Select the role you want to review and then click the View Permissions button. QuickBooks displays another version of the View Permissions window, with a detailed list of what someone with the role can and can’t do.
8. After you finish reviewing user and role permissions, click Close to close any open windows and then click the Cancel or Close button to close any open dialog boxes.From this point forward, the new user can use QuickBooks; his or her rights are limited to what you specified.
It may be important to audit this section every few months or years, depending on your employment turnover and bookkeeping practices. Obviously, previous employees or bookkeepers should no longer have roles that permit them to make changes in your file. Heck, they probably shouldn’t have roles at all! QuickBooks’s View Permissions window is a slick way to see this data online, and if you want to print a copy of the permissions information, all you need to do is click the window’s Print button.
How to add users in QuickBooks Pro and Premier
To set up additional users in QuickBooks Pro and QuickBooks Premier, follow these steps:1. Choose Company→Set Up Users and Passwords→Set Up Users.
QuickBooks displays the User List dialog box, which identifies any users for whom QuickBooks access has been set up and who are currently logged on to the system.
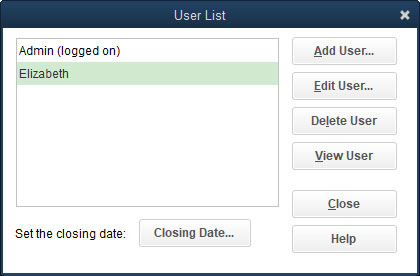 The Users dialog box
2. Tell QuickBooks that you want to add a user by clicking the Add User button.
QuickBooks displays the first Set Up User Password and Access dialog box, as shown.
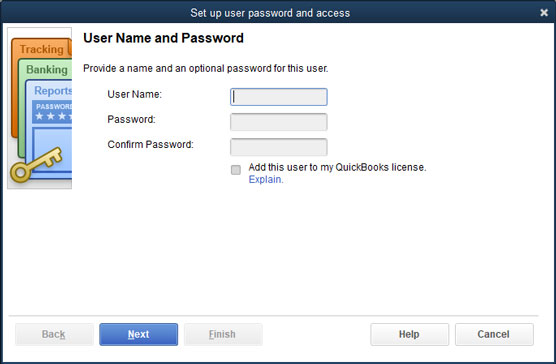 The Set Up User Password and Access dialog box
3. Identify the user, and supply a password.
Give each user for whom you’re setting up a password a username by entering a short name — perhaps the user’s first name — in the User Name box. After you identify the user, you enter the user’s password in both the Password text box and the Confirm Password text box.
4. Click Next to continue and then indicate whether you want to limit access for the new user.When QuickBooks displays the second Set Up User Password and Access dialog box, indicate whether you want to limit access and rights for the user, as shown. If you do want to limit access and rights (rights are simply the things that the user can do), select the Selected Areas of QuickBooks radio button. If you want the user to be able to do anything, select the All Areas of QuickBooks radio button. If you indicate that the new user should have access to all areas of QuickBooks, you’re done setting up the user password, and you can skip the remaining steps.
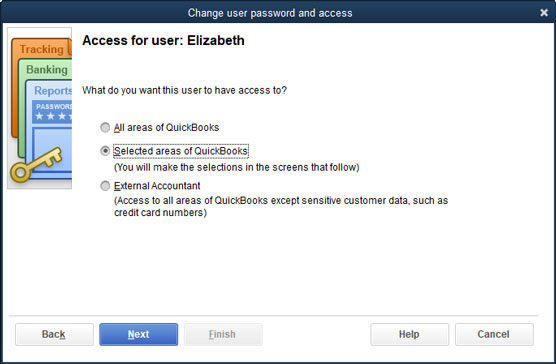 Setting the access for the user
5. Click Next to continue and then describe access to sales and accounts receivable information and tasks.
When you complete Step 4, QuickBooks displays the third Set Up User Password and Access dialog box — the first of a series of dialog boxes that walks you through an interview, asking detailed questions about what kind of access each user should have to a particular area. With regard to sales activity, for example, QuickBooks asks about access to transactions (such as invoices, credit memos, and accounts receivable information). You can indicate that the user should have no access by selecting the No Access radio button (see the following figure). You can indicate that the user should have full access by selecting the Full Access radio button. If the user should have partial access, you select the Selective Access radio button and then select one of the subsidiary buttons: Create Transactions Only, Create and Print Transactions, or Create Transactions and Create Reports.
 The Change user password and access dialog box
6. Click Next and then describe the purchases and accounts payable rights.
When you complete Step 5 by clicking Next, QuickBooks displays the fourth Set Up User Password and Access dialog box (not shown), which allows you to specify what access this new user has in the purchases and accounts payable areas. You can select the No Access radio button. You can select the Full Access radio button. Or you can select some middle ground by selecting the Selective Access radio button and one of the subsidiary buttons. The same rules for setting rights and access that apply to the purchases and accounts payable area apply to the sales and accounts receivable area.
7. Click Next and then describe the remaining user rights and access.When you click the Next button at the bottom of each version of the Set Up User Password and Access dialog box, QuickBooks displays several other versions of the dialog box that it uses to query you about user rights and access. After you describe what rights are appropriate for the user in the purchases and accounts payable area, for example, QuickBooks asks about the checking and credit card area. Then it asks about the inventory area. Next, it asks about payroll, followed by questions about general, sensitive accounting activities. Finally, QuickBooks asks about access to financial reporting capabilities.
You limit rights in each of these other areas the same way that you do for the sales and accounts receivable and for the purchases and accounts payable areas. Therefore, I’m not going to describe how you select the No Access option button, the Full Access option button, or the Selective Access button over and over again. Just be thoughtful as you go through the screens, limiting the user’s rights. You want users to have the rights necessary to do their job, but you don’t want to give them any more rights than they need.
8. Specify whether the user can change or delete transactions.After you’ve stepped through roughly a half-dozen versions of the Set Up User Password and Access dialog boxes that ask about specific areas of small business accounting, QuickBooks displays the Changing or Deleting Transactions page of the Set Up User Password and Access dialog box (not shown). The Changing or Deleting Transactions page lets you indicate whether a user can change transactions recorded before the closing date. In general, you want to limit a user’s ability to change or delete transactions.
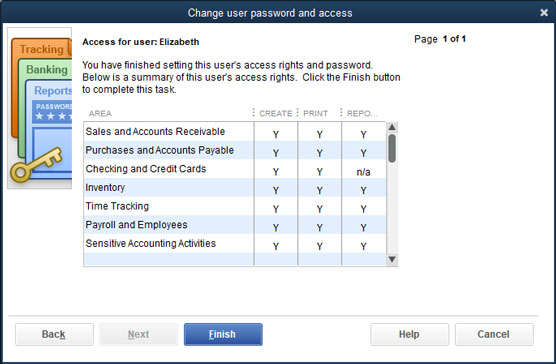
9. Click Next and then review your rights decisions.When you click Next, QuickBooks displays the final version of the Set Up User Password and Access dialog box (not shown), which identifies the user rights that you assigned or allowed. You can use this dialog box to review the rights that someone has. If you realize that you’ve incorrectly assigned rights, click the Back button to move back through the dialog boxes to the one where you made a mistake. Change the assignment of rights, and click the Next button to return to the final window of the Set Up User Password and Access dialog box.
10. When you finish with the review of user rights and access, click Finish.From this point forward, the new user will be able to use QuickBooks; his or her rights are limited to what you specified.
How to change user rights in Enterprise Solutions
You can modify the rights that you assign to a user. To do this in QuickBooks Enterprise Solutions, choose Company→Users→Set Up Users and Roles to display the Users and Roles dialog box (not shown).To change a user’s rights after reviewing them, select the user and click the Edit button. QuickBooks displays the Edit User dialog box (not shown), which closely resembles the New User dialog box that you use to set up the user and describe his or her rights. You use the User Name, Password, and Confirm Password text boxes to change the user information. You can use the Available Roles list, the Assigned Roles list, and Add and Remove buttons to change what the user can do within QuickBooks; then click Close when you are done.
To duplicate a user (you may want to add a second user with permissions that mirror some other user’s permissions), in the Users and Role dialog box, select the user you want to clone and then click Duplicate. When QuickBooks displays the Duplicate User dialog box (not shown), finish describing the new user, and click OK.
To remove a user, you also use the User and Roles dialog box. Simply select the user and then click the Delete button. QuickBooks asks you to confirm your deletion. When you click the Yes button for confirmation, QuickBooks removes the user.
How to change user rights in QuickBooks Pro and Premier
You can modify the rights that you assign to a user in QuickBooks Pro or Premier. To do this, choose Company→Set Up Users and Passwords→Set Up Users to display the User List dialog box (see figure). The User List dialog box
To look at the rights that a particular user has, select the user in the list and then click the View User button. When you do, QuickBooks displays the View User Access dialog box (see the following figure). This dialog box shows the same information as the final version of the Set Up User Access and Password dialog box, which is the dialog box that you use initially to specify what rights a user should have. Click the Leave button to close the View User Access dialog box.
 The View User Access dialog box
To change a user’s rights after reviewing them, select the user and then click the Edit User button. QuickBooks steps through the same set of dialog boxes that you use to set up the user and describe his rights. You use the Next and Back buttons to do things such as change the username or password, specify whether the user should be limited in his access, and — if necessary — to limit the user’s access to a particular activity within QuickBooks.
To remove a user, you also use the User List dialog box. Simply select the user and then click the Delete User button. QuickBooks asks you to confirm your deletion (see the following figure). When you click the Yes button for confirmation, QuickBooks removes the user.
 The Delete User dialog box