If you haven’t recently (or ever) backed up the QuickBooks data file, you’ll have to restore the QuickBooks data file, which means starting over. You’ll have to rerun QuickBooks Installation and Setup and reenter all the old data, for example. In short, restoring without a backup copy of the QuickBooks data file means that you go back to square one.
To restore the QuickBooks data file from the backup copy of the file, put the backup disc into the drive or plug in the USB flash drive and then follow these steps:1. Launch QuickBooks, and choose the File→Open or Restore Company command.
QuickBooks displays the Open or Restore Company dialog box, as shown here.
 The Open or Restore Company dialog box
2. Indicate what type of file you want to restore.
You can open a regular QuickBooks data file, restore a backup copy of the regular QuickBooks file or a portable version of the file, or convert an accountant’s copy transfer file. If you want to restore a backup copy, predictably, you select the radio button labeled Restore a Backup Copy.
3. Click Next.QuickBooks displays another version of the Open or Restore Company dialog box, as shown here.
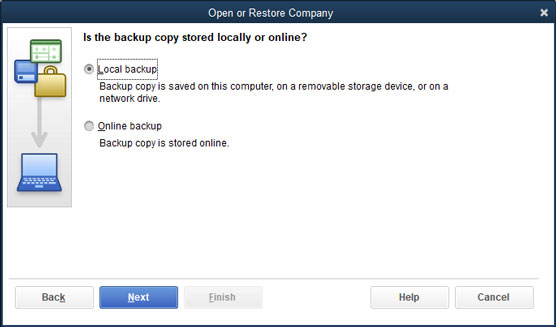 The Open or Restore Company dialog box that asks where you’ve backed up
4. Tell QuickBooks whether the backup copy is stored at your company or at QuickBooks’s offsite data center.
To do this, select the radio button that labels your backup copy file’s location.
5. Click Next.QuickBooks displays the Open Backup Copy dialog box, as shown here.
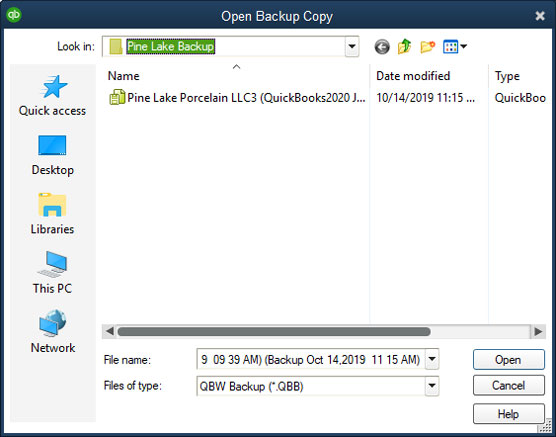 The Open Backup Copy dialog box
6. Double-click the backup file that you’ll use for the restoration.
Specify the location of and then the specific backup file that you’ll use for the restoration. You can use the Look In drop-down list to identify the drive and folder storing the backup file.
7. Click Open.QuickBooks displays yet another version of the Open or Restore Company dialog box (not shown), which simply tells you that QuickBooks is about to ask you where you want to store the newly restored file. (The fact that QuickBooks needs to tell you that it’s about to ask a question is a little strange, but let’s not get bogged down with that.)
When you restore the company data file by using the backup copy, you destroy the current working version of the file. In other words, QuickBooks takes the backup copy and copies it over the to-be-restored company data file. Therefore, before you restore company data files, make sure that you’re using the right backup copy and that you’re overwriting the corrupted, to-be-restored company file.
If you’re uncomfortable deleting or overwriting the old (possibly corrupted) QuickBooks data file, you can use a new filename for the restored file. You do this as part of Step 9.
8. Click Next.QuickBooks displays the Save Company File As dialog box, as shown here.
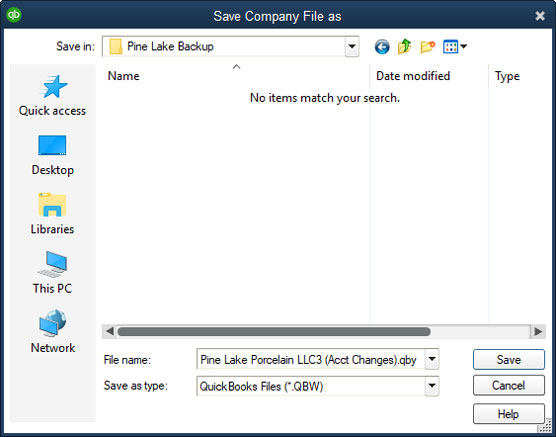 The Save Company File As dialog box
9. Tell QuickBooks where it should restore the backup copy and then click Save.
Use the Save Company File As dialog box to pick a location for the backed-up file. You’ll probably pick the same location as the existing file. If you do this and also use the same name for the QuickBooks file, QuickBooks displays a message asking you to confirm that you want to overwrite the existing file. Click Yes. Then QuickBooks displays another message box titled Delete Entire File. Confirm that you want to delete the existing (and presumably corrupt) company data file by typing the word yes in the message box. Then click OK. QuickBooks uses the backup copy to overwrite the to-be-restored company file. Again, however, note that you can also choose to use a new filename for the restored file.
You’re now free of the rather persistent dialog boxes. Whew.
Note: If you restore your QuickBooks data file in a newer version of QuickBooks than the version you used to create the backup copy, QuickBooks displays a dialog box that asks whether you’re okay with the fact that the company file will be updated for the new version. In this case, you confirm by checking a box that says (in essence), “Hey, man, I understand that my company file will be updated to the new version.”
10. Enter any transactions that took place since your last backup.If you entered transactions after you last backed up the QuickBooks company file, you now reenter those transactions in QuickBooks. If you last backed up QuickBooks on Friday of last week, for example, you need to reenter any transactions that you’ve created since last Friday.