

When you save, Adobe Photoshop Elements also enables you to take advantage of special features, such as saving different versions of a file or including your edited file in the Organizer as well as saving it to your hard drive.
This article is your guided tour of the Save/Save As dialog box (or Save As dialog box, if you’re saving a file for the first time) and the Save for Web dialog box.
How to use the Save/Save As dialog box
Before you save a file, Elements 2021 offers you a new option for where you want to save your file. Choose File→Save or File→Save As and the Save As dialog box opens, as shown.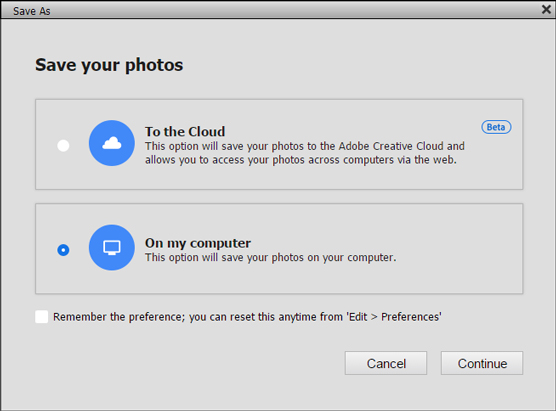 The Save As dialog box that appears on using your first Save/Save As
Choices offered in this dialog box include saving your files to the cloud. You can choose to save files on Adobe’s servers and access the file from any computer when you log on to Adobe Creative Cloud. Or you can choose to save files locally in your computer.
If you want to eliminate this dialog box from opening each time you save a file, click the check box at the bottom of the dialog box.
In almost any program, the Save (or Save As) dialog box is a familiar place where you make choices about the file to be saved. With Save As, you can save a duplicate copy of your image or save a modified copy and retain the original file. However, if you’re planning to upload your final image to the web, skip the familiar Save (or Save As) dialog box and see the next section, “Saving files for the web.”
To use the Save (or Save As) dialog box, choose File→ Save for files to be saved the first time, or choose File→ Save As when you want to make a copy of the open file, and a dialog box then opens.
As a matter of good practice, when you open an image, choose File→Save As for your first step in editing a photo. Save with a new filename to make a copy and then proceed to edit the photo. If you don’t like your editing results, you can return to the original, unedited photo and make another copy for editing.
The standard navigational tools that you find in any Save dialog box appear in the Elements Save/Save As dialog box. Here are two standard options in the Elements Save/Save As dialog box:- Filename: This item is common to all Save (Windows) or Save As (Mac) dialog boxes. Type a name for your file in the text box.
- Format: From the drop-down list, you choose file formats.
- Include in the Elements Organizer: If you want the file added to the Organizer, select this check box.
- Save in Version Set with Original: This choice is a bit odd. You won’t see Version Set available for any photo you open in either Quick or Expert mode by choosing File→Open. You must load the file in the Organizer and open from the Organizer in the Photo Editor; then, when you save the file in either mode, you see Version Set available. This option provides you with opportunities to make multiple edits on a file and save as different versions all within the same file.
- Layers: If your file has layers, selecting this check box preserves the layers.
- As a Copy: Use this option to save a copy without overwriting the original file.
- Color: Color profiles help you maintain accurate color, and this box controls your image’s color profile. Select the box for ICC (International Color Consortium) Profile. Depending on which profile you’re using, the option appears for sRGB or Adobe RGB (1998). When the check box is selected, the profile is embedded in the image.
- Thumbnail (Windows only): If you save a file with a thumbnail, you can see a miniature representation of your image when viewing it in folders or on the desktop. If you select Ask When Saving in the Saving Files preferences, the check box can be enabled or disabled. If you select an option for Never Save or Always Save in the Preferences dialog box, this box is enabled or disabled (grayed out) for you. You need to return to the Preferences dialog box if you want to change the option.
How to save files for the web
The Save for Web command helps you prepare photos to show on the web or just onscreen. Choose File→ Save for Web. In the Save for Web dialog box that opens (see figure), you see your original image on the left, and you see the result of making changes for file format and quality settings on the right.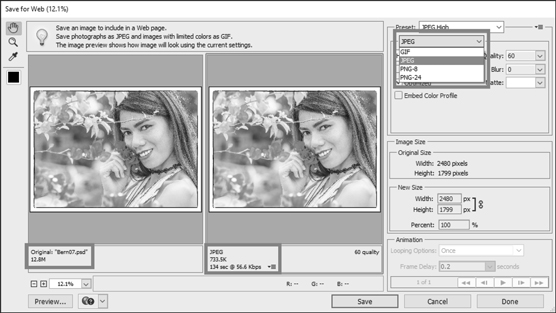 The Save for Web dialog box
The standard rule with web graphics is to find the smallest file size for an acceptable image appearance. In the Save for Web dialog box, you have many choices for reducing file size. Notice in the preceding figure that you see the original image with the file size reported below the image on the left. After choosing JPEG for the file type, you can see that the image size is reduced from the original 12.8MB to 733.5K.
You can also use the Quality item that appears to the right of the drop-down list to adjust the final quality of the saved file. Here, you need to find the right balance between quick download times and image appearance. Just keep an eye on the preview image as well as the download time information for your optimized file.
For the most accurate viewing, set the zoom size to 100 percent. In the lower-left corner of the dialog box, you can choose zoom levels from the drop-down list or just type a value in the field box. If your chosen settings noticeably degrade your image quality, you can easily discern the loss when viewing at a 100-percent view.
Working in the Save for Web dialog box is a matter of making choices and viewing the results. Toggle the different file type choices and make adjustments for quality. If you see image degradation, change to a different quality setting or file format. Always look at the file-size item reported below the image on the right and try to find the lowest file size that produces a good-looking image.

