

Colorize Photo
This new enhancement enables you to either add color to black-and-white images, or edit the color in colored images. Yes, you can already colorize images in Elements a couple of different ways — using Hue/Saturation or using the Brush tool with a Color blend mode applied — but this technique can give your image more of a vintage, hand-painted look.
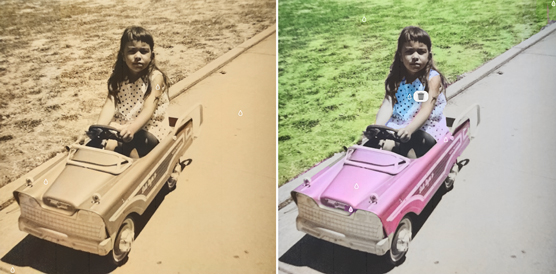
The figure shows two colorized variations using Manual mode.
Follow these steps to colorize a photo:
1. Open an image in Expert or Quick mode.
2. Choose Enhance→Colorize Photo.
The Colorize Photo dialog box appears.
3. Choose either Auto or Manual mode.
4. If you choose Auto mode, choose one of four presets in Basic mode. Each one creates a more contrasty image.
5. If you want a little more customization, choose Manual mode and follow these steps:
(a) Use either the Quick Selection or Lasso tool and select an area where you want more color. If you are using the Quick Selection tool you can make the tool’s diameter larger or smaller by adjusting the Size slider.
(b) With either tool, use the Add to or Subtract From buttons to further define your desired area (you can also press the Shift key to add and the Option/Alt key to subtract).
(c) Select the Droplet Tool and then click inside your selected area to mark the area to be colorized.
(d) Click your desired color swatch from the Color Palette or from the All Applicable Colors panel. If you want to see your image without the Droplet icons (see the following figure, where the Droplet icons are visible), toggle off the Show Droplets option at the bottom.
(e) Repeat the steps as desired.
6. If you’re happy with the results, click OK. If you want to start over, click the Reset button.
Smooth Skin feature

© www.stock.adobe.com Image #49445636
Elements gives you yet another new feature to make people look better in the digital world than they do in real life. Luckily, the new Smooth Skin feature doesn’t allow you to go crazy and eliminate all traces of having lived life, but instead, just softens lines and blemishes.
Here’s how to use the Smooth Skin feature:
1. Open an image in Expert or Quick mode.
2. Choose Enhance→Smooth Skin. The Smooth Skin dialog box appears. In the dialog box, a circle surrounds the area that will be affected by the adjustments.
3. Use the Smoothness slider to apply the amount of smoothing desired, as shown.
4. Toggle your Before and After button to view your results.
5. If you like the results, click OK. If not, click Reset or Cancel.
If you feel that your subject needs a little more “work,” check out the Perfect Portrait feature in the Special Edits category in Guided Edit mode. The Smooth Skin feature was added to that edit, along with the abilities to whiten teeth, darken eyebrows, brighten eyes, and perform other enhancements.
Moving Photos enhancement
One of the biggest, new wow features in Elements 2021 is the Moving Photos enhancement. Not only can you now take your still images and give them a little motion, it’s also so surprisingly easy that you’ll wonder how in the heck those Adobe programmers hid all the technical machinations behind the curtain.
Here’s how to use it:
1. Open an image in Expert or Quick mode.
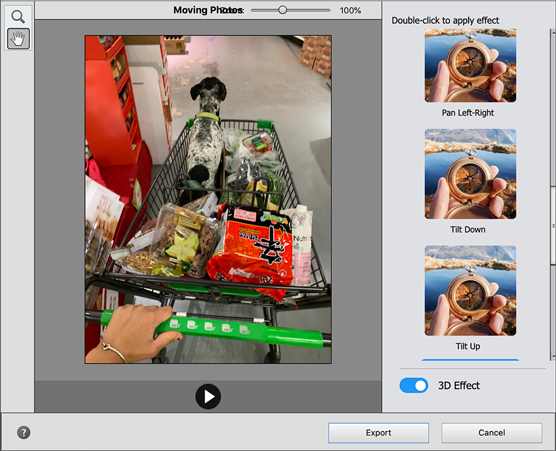
2. Choose Enhance→Moving Photos. The simple Moving Photos dialog box appears.
3. On the right side of the dialog box, double-click the motion effect that you want to apply to your image. Elements takes a minute or two to generate a preview.
4. Click the Play/Stop button under your image. Amazingly the motion effect is applied to your photo, as you sadly can’t really see in the figure!
5. By default, the 3D Effect is applied, thereby giving your image more depth. Toggle it off to see it without the 3D Effect.
6. When you’re happy with the results, click the Export button at the bottom of the dialog box.
Your moving image will be exported as an animated GIF file. You can then use your GIF file on websites, Facebook, Twitter, and in iPhone messages.


