So where exactly do your pictures hang out on the iPad? Well, what happens to images saved from e-mails and the Internet is they reside in a Saved Photos album on the original iPad or the Camera Roll on the later models.
Other imported images are grouped in the same albums as they were on the computer, or lumped together as Events, Faces, and — when the embedded metadata inside an image identifies where a picture was shot — under a very cool Places feature.
The following steps walk you through the basics of navigating among your pictures with the Photos app:
Tap the Photos app on the Home screen.

The app opens with a grid of thumbnail images on top of a black background, as shown in figure. The Photos tab at the top of the screen is highlighted because you’re in the Photos view.
If the thumbnail you have in mind doesn’t appear on this screen, flick your finger up or down to scroll through the pictures rapidly or use a slower dragging motion to pore through the images more deliberately.
So, if you have more photos than can possibly show up on the screen at any one time, which is highly probable, your flicking and dragging skills will improve quickly.
Tap or pinch the photo you want to display.
These lead to slightly different outcomes. When you tap an image, the picture rapidly gets bigger, practically jumping off the screen. If you pinch or spread instead, by putting your thumb and forefinger together and then spreading them apart, you have more control over how the image shrinks or grows in size. You can also keep your finger pressed against the image to drag it around.
To navigate through collections of images, tap Albums, Events, Faces, or Places at the top of your iPad screen. Or pinch them.
You see stacks or collections of pictures. Tap an album, event, or faces pile, and all the underlying pictures scatter into a mass of individual images. It’s an orderly escape because the individual pictures once again appear in a grid. Most likely, you’ll again have to scroll up or down to see all the pictures in the collection. As before, tap any of the individual pictures you want to focus on.
But what if you unpinch a collection instead of tapping? The answer depends on how you pinched. If you pinched just a little bit, the pictures spread out slowly enough that you can preview some of the images in the pile.
Let go, and the collection opens (unless, that is, you hadn’t pinched far enough, and the images retreat into a stack). If you do a wider pinch by spreading your fingers even more, the entire collection opens. As before, tap a picture to see a large view of it.
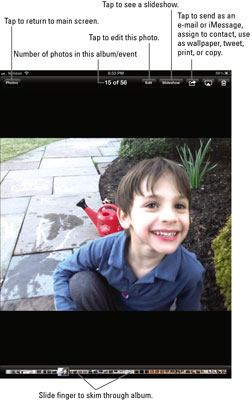
With an individual photo on the screen, tap the picture to open the picture controls at the top and bottom of the screen.

These controls are labeled in the figure.
To make the controls disappear, tap the screen again.
Or just wait a few seconds, and they go away on their own.
Press the Home button when you’re finished with the Photos app.
That’s it!


