Following an overview of the Health app, get a glimpse at some of the apps and health equipment that interact with Health to make it even more useful in months and years to come.
Health app overview
The Health app is meant to be a one-stop repository for your health information. It will not only allow you to manually input information, but it can also collect health data from other health-related apps and equipment that support working with the Health app (you’ll need to check with the app’s developer or the equipment’s manufacturer for details on Health support).The first time you open Health, you’ll see screens informing you of what’s new in iOS 14. As you progress through those screens, the last one will allow you to set up your Health Profile, shown in the following figure. This is the most basic information about you, such as your date of birth, gender, height, and weight. Tap a field to enter the appropriate information and then tap the blue Done button when finished to be whisked into the Health app.

The first thing you’re met with is the Summary screen. Summary is a snapshot of health-related highlights and metrics that you’ve accumulated, and may include alerts and messages.

The Favorites section is a list of metrics that have been collected about your health through apps and devices. You can customize which metrics are viewed in this section:
- Tap the blue Edit button in the upper-right corner.
- Tap the star next to metrics you want to add (the star turns solid blue) or remove (the star turns white), shown.

- Tap the Done button in the upper-right when finished. The Favorites section will now display your customized content.
Tap on any of the metrics in the Favorites section to see a much more detailed breakdown of the item or activity.
Health is divided into such categories as Activity, Mindfulness, Mobility, Nutrition, and Sleep. You see these categories when you tap the Browse button at the bottom of the Health screen.
Each of these categories can have subtopics contained within it that you reach by tapping a main topic, such as Activity.

Categories include Activity, Body Measurements, Cycle Tracking, Hearing, Heart, Mindfulness, Mobility, Nutrition, Other Data (such as blood glucose, number of times fallen, and more), Respiratory, Sleep, Symptoms, and Vitals.
The Health app also has a medical record feature called Medical ID, which is covered in the next task, as well as the capability to help you sign up to be an organ donor.
At some point during your use of the Health app, you may be asked to share your health and activity data with Apple. Whether you do so is, of course, entirely up to you, but be assured that if you elect to share that data with Apple, it will be done so completely anonymously and confidentially. None of your personal information will be shared as part of the health and activity data.
Apps that Health can collaborate with
Health is essentially an information aggregator, and it is continuing to grow in terms of available apps that are designed to interact with it to supply imported data, such as calories consumed and steps walked. Here are just a handful of the apps available today (there are many, many more!) that work with the Health app: Calm, Medisafe, Dexcom G6 Mobile, Lose it!, Sleep Cycle, Zova, Mayo Clinic, MyChart, Nike apps, Fitbit, CARROT Hunger, Human – Activity Tracker, and MyFitnessPal.What equipment connects with Health
Health is designed to connect with a variety of equipment to wirelessly import data about your health and fitness, such as treadmills, cycling computers, indoor bike trainers, pulse oximeters, electronic toothbrushes, thermometers, glucose monitors, sleep monitors, posture trainers, smart jump ropes (no kidding!), scales, EKGs or ECGs (electrocardiograms), Apple Watch, blood-pressure monitors, and a wide variety of more devices, with more on the way seemingly every day.You can learn more about the Health app and find the latest related news by visiting Apple’s Health website.
Create your Medical ID
One of the simplest features is Medical ID, which allows you to store your vital statistics. This could be useful if you’re in an accident, and emergency medical personnel need to access such information as your blood type or allergies to medications.- In the Health app, tap the Apple ID button in the upper-right corner, and then tap the Medical ID option.
- Tap Get Started on the Set Up Your Medical ID screen.
- Scroll down and tap the + next to items on the screen (such as blood type) to add the particular information to your ID.
Be as specific as possible when entering your medical information! The more info health care providers have, the better.
- Tap a field, such as Medical Conditions or Allergies & Reactions, to enter information using the onscreen keyboard that appears.
- Toggle the Show When Locked switch to On (shown) to allow your Medical ID to be accessed from the lock screen. This feature is important to turn On so that emergency responders can see your medical information without needing you to allow them access.

- Toggle the Share During Emergency Call switch to On to allow your Medical ID information to be sent to emergency services when you call or text them if you’re in a supported area. This feature gives emergency responders as much information as possible about you before they arrive so that they can be better prepared to assist.
- Tap Done in the upper-right corner to save your entries.
Become an organ donor
Apple is the first company to make it easy to sign up as an organ donor through its operating system (iOS, the software that controls your iPhone). To sign up to be an organ donor, follow these steps:- In the Health app, tap the Apple ID button in the upper-right corner.
- Tap the Organ Donation option.
- Tap Learn More to find out more about this option, or tap Sign Up with Donate Life to become a donor. If you tap Sign Up with Donate Life, you’ll be taken to the screen shown.

- Enter your information as needed and then tap Continue at the bottom of the page.
- On the next screen, you will be asked to confirm your registration with Donate Life. Tap the Complete Registration with Donate Life button at the bottom of the screen to confirm.
View Health app data
Knowing where and how to view your health data in the Health app is important to getting the most from its features.- Tap the Browse button at the bottom of the Health app screen.
- Tap a category, such as Activity.
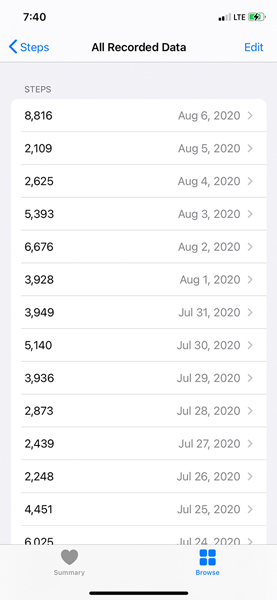
- Tap one of the subtopics listed, such as Steps, and you’ll see a screen similar to the one shown here.

Your iPhone provides a lot of information to Health, but you can really step it up a notch by wearing an Apple Watch! The Apple Watch pairs (connects wirelessly) with your iPhone and shares the information it collects through its multitude of sensors with the Health app. Great examples would be the wealth of heart rate information it collects, such as your resting rate and variability, and that information is collected and saved for every day you wear the watch.
- This screen can provide a wealth of information, graphically displaying data about your activity on a daily, weekly, monthly, or yearly basis (tap D, W, M, or Y in the top bar, respectively). As you continue to scroll down, you’ll see the activity data broken down into even more helpful categories. You’ll find a description of exactly how this subtopic is monitored and why, and you'll see a list of apps related to the subtopic (like that shown).

- Scroll all the way down to the bottom of the screen and tap Data Sources & Access. If you have other health-related apps on your iPhone that can receive data from Health, they’ll appear in the Apps Allowed to Read Data section. To enable or disable these apps, tap Edit in the upper-right corner, tap the app’s name to enable (shown by a check mark) or disable it, and then tap Done in the upper-right.
- Devices that report data to the Health app can be seen in the Data Sources section. Tap the device name to see the data it’s reported to Health.
- Tap Back in the upper-left corner of the screen to return to the previous screen, and then tap the name of the subtopic in the upper-left.
- Tap Show All Data near the bottom of the screen to see a table of entries (as shown), including your most recent entry.
Import and export Health data
Some apps from which you can import data are MyFitnessPal, Strava: Run, Ride, Swim, and LifeSum. Different apps may send or receive data from Health using different interfaces and commands. But, in essence, here’s how it works: When you use an app that supports Health, those apps will request permission to update data. For example, a pedometer or activity tracker app might be able to upload data to Health, saving you the drudgery of manual entry. Here's how you view supporting apps that you’ve downloaded and installed to your iPhone:- In the Health app, tap the Apple ID button in the upper-right corner.
- Tap Apps in the Privacy section.
- Tap each app to find out and modify which data it supplies to the Health app.
You can also export all of your Health data as a file that you can share with caregivers. Tap the Apple ID button in the upper-right, tap the Export All Health Data button at the bottom of the next screen, tap Export to confirm, and then select a method for sharing the information (text message, email, AirDrop, and more). This file may be large if you’ve saved a lot of information in Health, so saving it to and sharing it from the cloud using iCloud or another service like Google Drive or Dropbox may be preferred.
View Health records
Apple’s foray into health care is rapidly gaining momentum as patients, doctors, and other providers rely more heavily on the Apple ecosystem of devices and software. Today, hundreds of health care institutions are using the Health app to allow patients to view their health records right on their iPhone.- Contact your health provider and make sure they provide information through the Health app. Once you confirm that, ask them what account information you need to connect to their systems so that you can view your records. You’ll use this information in step 7 below.
- Tap the Browse button on the bottom of the Health app screen.
- Scroll down the screen until you reach the Health Records section.
- Tap the Add an Account button.
- Tap Allow While Using App or Allow Once to allow the Health app to access your location. This feature helps it locate providers in your area that currently provide health records through the Health app.
- In the list that displays, locate and tap your provider, and then tap the Connect to Account button.
- From this point, enter the account information you gathered from your provider in step 1. Afterwards, you’ll be able to view your health records from that provider in the Health app.