You can even be reminded to do things when you arrive at or leave a location, or receive a message from someone. For example, you can set a reminder so that, when your iPhone detects that you’ve left the location of your golf game, an alert reminds you to pick up your grandchildren, or when you arrive at your cabin, iPhone reminds you to turn on the water … you get the idea.
Notification Center allows you to review all the things you should be aware of in one place, such as mail messages, text messages, calendar appointments, and alerts.
If you occasionally need to escape all your obligations, try the Do Not Disturb feature. Turn this feature on, and you won’t be bothered with alerts until you’re ready to be.
In this article, you discover how to set up and view tasks in iPhone's Reminders and how Notification Center can centralize all your alerts in one easy-to-find place.
Create a reminder
Creating an event in Reminders is pretty darn simple:- Tap Reminders on the Home screen.
- Tap the New Reminder button with a plus sign to the left of it in the lower-left corner to add a task. The onscreen keyboard appears.

You can also create new reminders from within the Reminders section under My Lists. Tap Reminders and then tap the New Reminder button with a plus sign to the left of it in the lower-left corner of the screen.
- Enter a task name or description using the onscreen keyboard, and then tap Add in the upper-right corner.
The following task shows how to add more specifics about an event for which you’ve created a reminder.
Edit reminder details
- Tap a reminder and then tap the Details button (an i in a circle) that appears to the right of it to open the Details dialog shown.

- Tap Notes and enter any notes about the event using the onscreen keyboard.
- Toggle the Flagged switch to enable or disable a flag for the reminder.
- Tap Priority and then tap None, Low (!), Medium (!!), or High (!!!) from the choices that appear. Tap Details in the upper-left to return to the Details screen.
Priority settings display the associated number of exclamation points on a task in a list to remind you of its importance.
- Tap List and then tap which list you want the reminder saved to, such as your calendar, iCloud, Exchange, or a category of reminders that you’ve created. Tap Details in the upper-left to return to the Details screen.

- Tap Done in the upper-right corner to save changes to the task.
Reminders in iOS 14 includes a quick toolbar that appears just above the keyboard, which allows you to quickly add a time, location, flags, or images to the reminder you’ve tapped in a list. Just tap the icon for whichever item you want to activate and make the appropriate settings as prompted.
Schedule a reminder by time, location, or when messaging
One of the major purposes of Reminders is to remind you of upcoming tasks. To set options for a reminder, follow these steps:- Tap a task and then tap the Details button that appears to the right of it.
- In the dialog that appears, toggle the Date switch to turn the feature On (green).
- Use the calendar that appears below the Date switch to select a date for your task.

- Toggle the Time switch to On (green).
- Tap the clock containing the hour to display the numerical keyboard. Use the keyboard to enter a time for your task. Tap the AM or PM buttons as appropriate.

- Tap Repeat and select an appropriate option if this is something you frequently need to be reminded of. Tap Details to return to the previous screen.
- Toggle the Location switch to On and then tap one of the buttons to set a location for your task. Options are Current, Home, Getting in (your car), and Getting out.
You have to be in range of a GPS signal for the location reminder to work properly.
- Use the field labeled Custom to enter a location manually. Tap Details in the upper-left corner to return to the task detail screen.
- Toggle the When Messaging switch to On and then tap Choose Person. Select a person or group from your Contacts. Using this option will cause you to be reminded of the item when you’re engaged in messaging with the person or group selected. This is a super helpful tool if you have trouble remembering to share information with people, like I do.
- You can add subtasks to this task by tapping the Subtasks option near the bottom of the screen.
- Tap the Add Image option to attach an image from your Photo Library, to scan a document, or take a photo.
- Tap Done in the upper-right corner to save the settings for the reminder.
Create a list
You can create your own lists of tasks to help you keep different parts of your life organized and even edit the tasks on the list in List view.- Tap Reminders on the Home screen to open it. If a particular list is open, tap Lists in the upper-left corner to return to the List view.
- Tap Add List in the lower-right corner to display the New List form.

- Tap the text field and then enter a name for the list.
- Tap a color; the list name will appear in that color in List view.
- Tap an icon to customize the icon for the list. This feature helps you to better organize your lists by using icons for birthdays, medications, groceries, and a whole host of other occasions and subjects.

- Tap Done to save the list.
Sync with other devices and calendars
To make all these settings work, you should set up your Default Calendar in the Settings → Calendar settings and set up your iCloud account to enable Reminders (Settings →Apple ID [top of the screen] → iCloud).Your default Calendar account is also your default Reminders account.
- To determine which tasks are brought over from other calendars (such as Outlook), tap the Settings button on the Home screen.
- Tap your Apple ID and then tap iCloud. In the dialog that appears, be sure that Reminders is set to On (green).
- Tap Apple ID in the upper-left and then Settings in the upper-left to return to the main settings list, swipe up on the screen to scroll down a bit, and then tap Calendars→Accounts.
- Tap the account you want to sync Reminders with and then toggle the Reminders switch to On, if available.

Mark as complete or delete a reminder
You may want to mark a task as completed or just delete it entirely.- With Reminders open and a list of tasks displayed, tap the circle to the left of a task to mark it as complete. When you next open the list, the completed task will have been removed. To view completed tasks, tap the More button in the upper-right (looks like a blue circle containing three tiny dots) and tap Show Completed in the options. To hide completed tasks, just tap the More button and then tap Hide Completed.

- To delete a single task, with the list of tasks displayed, swipe the task you want to delete to the left. Tap the red Delete button to the right of the task and it will disappear from your list.

Be aware that if you delete a task, it’s gone for good. There is no area in Reminders to retrieve deleted tasks. If you simply want to remove the item from the list without deleting it entirely, be sure to mark it as completed, as instructed in step 1.
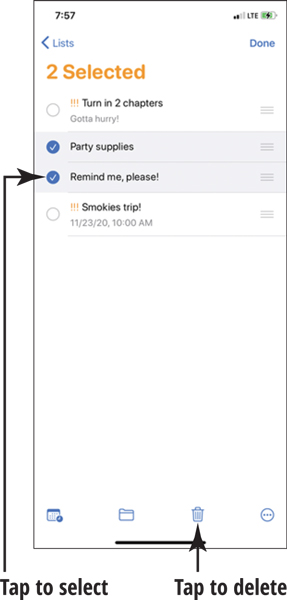
- To delete more than one task, with the list of tasks displayed, tap the More button and tap Select Reminders in the options. In the screen shown, tap the circle to the left of the tasks you want to select, and then tap the Delete button (looks like a trash can) at the bottom of the screen.
Set notification types
Notification Center is a list of various alerts and scheduled events; it even provides information (such as stock quotes) that you can display by swiping down from the top of your iPhone screen. Notification Center is on by default, but you don’t have to include every type of notification there if you don’t want to. For example, you may never want to be notified of incoming messages but always want to have reminders listed here — it’s up to you. Some Notification Center settings let you control what types of notifications are included:- Tap Settings and then tap Notifications.
- In the settings that appear, you see a list of items to be included in Notification Center. You can view the state of an item by reading it directly under the item's name. For example, under Accuweather, you read “Banners, Sounds, Badges,” indicating the methods of notifications that are enabled for that app.

- Tap any item. In the settings that appear, set an item’s Allow Notifications switch to On or Off, to include or exclude it from Notification Center.

- In the Alerts section, choose to display alerts on the Lock Screen, Notification Center, as Banners, or a combination of one or more. You may also decide to have no alerts appear when nothing is checked in the Alerts section.
If you enable Banners, choose a style by tapping the Banner Style option. Banners will appear and then disappear automatically if you tap the Temporary style. If you choose Persistent, you have to take an action to dismiss the alert when it appears (such as swiping it up to dismiss it or tapping to view it). Tap the name of the app in the upper-left to return to the previous screen.
- Toggle the Sounds and Badges switches On or Off to suit your taste.
- Tap Show Previews to determine when or if previews of notifications should be shown on your iPhone’s screen. Options include Always (which is default), When Unlocked (previews only appear when your iPhone is unlocked), or Never. Tap the name of the app to go to the previous screen.
- Select a Notification Grouping option. This feature allows you to group notifications if you like, which can keep things much cleaner, as opposed to seeing every single notification listed. Options include:
- Automatic. Notifications are grouped according to their originating app, but they may also be sorted based on various criteria. For example, you may see more than one group for Mail if you receive multiple emails from an individual; those email notifications may merit their own grouping.
- By App. Notifications are grouped according to their originating app — period. You’ll only see one grouping for the app, not multiple groups based on the varying criteria, as described for the Automatic setting.
- Off. All notifications for this app will be listed individually. Tap the Back button to return to the previous screen.
- Tap Notifications in the upper-left corner to return to the main Notifications settings screen. When you’ve finished making settings, press the Home button or swipe up from the bottom of the screen (for iPhone models without Home buttons).
View notification center
After you’ve made settings for what should appear in Notification Center, you’ll regularly want to take a look at those alerts and reminders.- From any screen, touch and hold your finger at the top of the screen and drag down to display Notification Center.

Swipe from left-to-right on the date at the top of the Notification Center to view other notifications such as weather, reminders, Siri app suggestions, and more. Swipe from right-to-left at the top to return to app notifications.
- To close Notification Center, swipe upward from the bottom of the screen.
To determine what is displayed in Notification Center, see the previous task.
There are two sections in Notification Center for you to play with: Notification Center and Today.- Swipe down from the top of the screen to open Notification Center. Notifications are displayed by default.
- Swipe from left to right on the date/time at the top of Notification Center to access the Today section to view information in widgets that pertain to today, such as Reminders, weather, stock prices, Calendar items, and other items you’ve selected to display in Notification Center (see the preceding task).
You select which widgets appear in the Today section by tapping the Edit button at the bottom of the Today screen and then selecting the items you want to see. Tap Done to return to the Today screen.
- Swipe from right to left anywhere in the Today section to go back to the Notifications section to see all notifications that you set up in the Settings app. You’ll see only notifications that you haven’t responded to, deleted in the Notifications section, or haven’t viewed in their originating app.
Get some rest with Do Not Disturb
Do Not Disturb is a simple but useful setting you can use to stop any alerts, phone calls, text messages, and FaceTime calls from appearing or making a sound. You can make settings to allow calls from certain people or several repeat calls from the same person in a short time period to come through. (The assumption here is that such repeat calls may signal an emergency situation or urgent need to get through to you.)- Tap Settings and then tap Do Not Disturb.
- Set the Do Not Disturb switch to On (green) to enable the feature.
- In the other settings shown, do any of the following:
- Toggle the Scheduled switch to On (green) to allow alerts during a specified time period to appear.
- Tap Allow Calls From and then, from the next screen select Everyone, No One, Favorites, or Groups such as All Contacts.
- Toggle the Repeated Calls switch to On to allow a second call from the same person in a three-minute time period to come through.
- Choose to silence incoming calls and notifications Always or Only while iPhone is locked.

- Press the Home button or swipe up from the bottom of the screen (iPhone models without a Home button) to return to the Home Screen.