

In its place, Mojave has more and better screen-shooting capabilities than any version of macOS before it. Screenshot’s functionality and more are woven into the fabric of Mojave itself. Furthermore, Screenshot has been updated in several useful ways.
All of your old favorite keyboard shortcuts for screen capture — the ones you’ve known and loved on the Mac since time immemorial — still work the same as always:
To capture the entire screen:
- Press Command +Shift+3.
- There is no Step 2.
- Press Command +Shift+4.
- Move the pointer (crosshair icon) to where you want to start the screenshot.
- Press the mouse or trackpad button, then drag over the area you want to capture.
- Release the mouse or trackpad button to capture the selected area.
To capture a window or the menu bar:
- Press Command +Shift+4 and then press the Spacebar.
- Move the pointer (camera icon) over the area you wish to capture; when it is highlighted, click to capture the selected item.
To capture a menu and its title:
- Open the menu to display the menu commands.
- Press Command +Shift+4.
- Drag the pointer (crosshair icon) over the entire menu. If you want to exclude the menu’s title, press Command+Shift+4, press the Spacebar, move the pointer (camera icon) over the menu to highlight it, then click.
Mojave screen-shooting 101
In addition to the old, familiar screenshot shortcuts just discussed, Mojave adds a third keyboard shortcut that includes everything you can do using the other shortcuts and more.That fabulous new shortcut is Command +Shift+5, and you’d be wise to memorize it because, like the other two screenshot keyboard shortcuts, it doesn’t appear in any menu or application. If you’re going to memorize only one shortcut for screen captures, it should be Command +Shift+5, which will open the floating palette of screen-shooting options shown here.
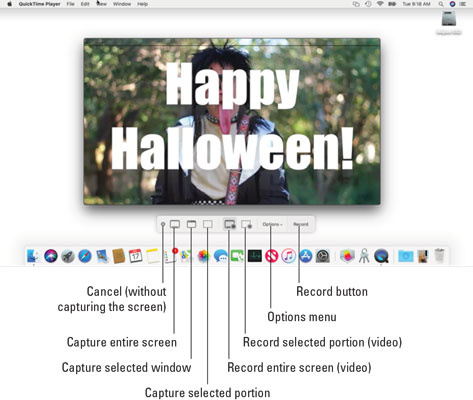 Here’s what you’ll see (more or less) when you press Command +Shift+5 in Mojave.
To capture your screen as a still image, first click the appropriate button: Capture Entire Screen, Capture Selected Window, or Capture Selected Portion. When everything is the way you want it, click the Capture button.
What happens next, before the screenshot appears on your desktop (by default), is new in Mojave. The new thing is a floating thumbnail that appears in the lower-right corner of your screen (above the Trash icon shown here).
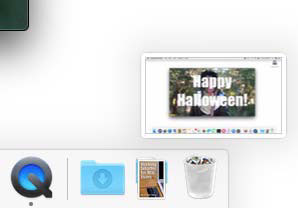 After taking a screenshot, a thumbnail of the screenshot floats in the lower-right corner of your screen.
If you do nothing, the floating thumbnail will disappear after a few seconds and the screenshot will appear on the desktop by default.
But click the floating thumbnail before it goes away and a wonderful new thing happens: A window appears with a bevy of useful tools for modifying images, as shown.
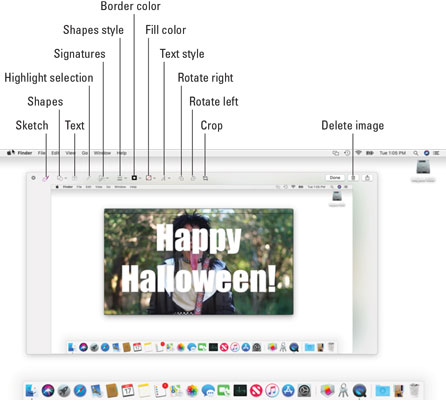 A full selection of annotation and editing tools are available in the Markup window.
These tools are known as Markup — a systemwide set of tools for annotating PDF and image files.
And, as you just saw, these tools also appear if you click the floating thumbnail of a screenshot before it disappears.
These powerful tools enable you to annotate screenshots in ways never before possible without a third-party graphics app. Now you can easily add circles, boxes, arrows, and text to your screenshots, image files, and PDFs without even launching an app.
When you’ve finished annotating and editing your screenshot, click Done in the upper-left corner of the window.
Mojave screen-shooting options
If you want to change the location where your screenshots are saved, click the Options menu, which is available after you press Command +Shift+5. The Options menu also allows you to select a timer of None (the default), 5 seconds, or 10 seconds.Finally, the Options menu lets you enable or disable the floating thumbnail, show or hide the mouse pointer, and remember the last selection you made (for your next screenshot).
Another set of options appears when you right- or Control-click the floating thumbnail, as shown.
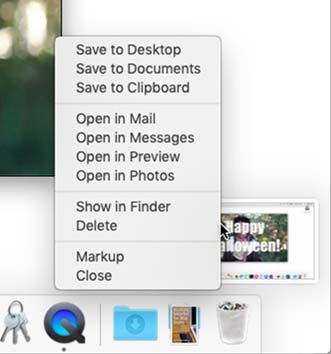 Right- or Control-click the floating thumbnail and choose from these options.
Note that selecting Markup is the same as clicking the floating thumbnail — it opens the Markup window so you can annotate your screenshot.
Mojave screen recording
Screen recording — movies of your Mac (or iDevice) screens — has been around for a few years on the Mac, but it’s been buried in the QuickTime Player app. I didn’t discuss it in that chapter because the new Mojave way is so much easier and more convenient. (If you want to make a movie of your iDevice screen, you’ll still need to use QuickTime Player.)Anyway, to make a movie of all or part of your Mac screen, begin by pressing Command +Shift+5. Then click either the Record Entire Screen or Record Selected Portion. If you click Record Entire Screen, the recording begins immediately; if you click Record Selected Portion, you need to drag the on-screen handles to select the area you want to record, and then click the Record button.
To end the recording, click the Stop button in the menu bar, as shown.
 The Stop Recording button appears in your menu bar while you’re recording the screen.
When the floating thumbnail appears in the lower-right corner of your screen, you can right- or Control-click it for additional options, or do nothing to have the screen recording saved in your default location.


