

Obtain a Mixer account
Microsoft’s streaming site is Mixer. (See what I did there? Mix — Mixer.com?) The setup process at Mixer is similar to Twitch, but Mixer also sets you up to stream as you create your account. Here are the steps to sign up to use Mixer:- Go to www.mixer.com and click Sign In at the top right.
- On the screen that appears, select to sign in with your Microsoft account if you have one. If you don’t have a Microsoft account, click Create One.
- If you have a Microsoft account (perhaps through an Xbox or from playing a Microsoft game online), skip to Step 4. The same Microsoft account that you use for Xbox Live will control your Mixer account.
- On the main Mixer.com page, click the icon inside a circle in the upper right. A new screen opens.
- Scroll down to the Broadcast Dashboard entry on the menu and click it.
- On the next screen, read the paragraph above the Get Started button that’s midway down the left column; then click Get Started. A new screen opens and begins a series of videos that orient you to how Mixer works and what the rules are.
- (Mandatory) Watch each video and click the Next Step button at the bottom when a video completes.
- On the next screen, click the blue Request Your Stream Key button to request your stream key.Clicking this button triggers a review process, and Mixer takes about a day to send your key to you. At this point, you need to stop and wait for your stream key. I recommend leaving that browser window open so that you can go back later, or if you want to power down your computer, bookmark the site in your browser.
When your account is ready, you can copy your stream key from the page located at Broadcast on the menu at the top right of the Mixer screen that you used to get started in the list above. If you just completed the preceding steps, you might currently have a timer onscreen telling you how long it will be until your key is available. Go back when that timer reads 00. Copy that code. As I say elsewhere, I recommend creating a file with all your stream keys for easy access.
- After copying your stream key (you’ll need it later), click the Next button.
- Read the Streamer’s Pledge and click the Accept button at the bottom of the screen if you agree.
- Click the Finish button. Clicking this button returns you to your Mixer dashboard.
Gather your stream keys
After you have your accounts set up at each site, you need to collect a set of codes called stream keys. Think of your stream key as a pregenerated password that indicates where your account is and gives external software (like OBS, which you can read about shortly) permission to access your page on the streaming service. The stream key is what enables you to broadcast live content.If you opened a Mixer account, you either have that stream key or are awaiting it. Now you need to get your keys from the other major streaming sites, Twitch.tv and YouTube.
All three of these major streaming sites frequently update their user interfaces, so this book’s instructions for obtaining their stream keys might not lead you directly to what you need by the time you’re reading this. In such a case, you can find the new location of your stream key by typing stream key into the help system on any of these three sites.
Getting your Twitch.tv stream key
If you have a Twitch.tv account set up, you’re ready to get your stream key for that site.To obtain your Twitch stream key, follow these steps:
- Go to twitch.tv and click Login or your profile picture in the upper-right corner to log in. A pop-up window appears in which you can enter your username and password. If you’re already logged in, a menu appears below the profile picture.
- Navigate the menu below your profile picture, scroll down to Creator Dashboard, and click Creator Dashboard. On the screen that appears, you see the Dashboard menu on the right.
- Click Channel under Settings near the bottom of the menu. On the screen that opens, you see the heading Stream Key and Preferences. The first entry is your stream key for Twitch. Copy it and save it to your file of stream keys. Make sure that you’re specifying which keys are for which sites on your list! You can now close the window.
Getting your YouTube stream key
If you have a YouTube account set up, you’re ready to get your stream key for that site.To get your YouTube stream key, follow these steps:
- Go to YouTube.com and click the Login button in the upper right of the screen. If you’re already logged in, your profile picture appears there instead.
- On the screen that opens, click your profile picture in the top-right of the screen and then, in the menu that appears, select YouTube Studio.
 Locating the YouTube Studio page from the User menu.
 - Click the image of a red circle with black arcs radiating from it (a broadcast symbol) that appears just below your profile picture. If this is your first time looking at live streaming on YouTube, you will have a 24-hour wait, similar to the one on Mixer.
- When your account is ready, click the broadcast symbol just under your profile picture to launch the livestream dashboard.
- Near the top of the screen, you see three options: Webcam, Stream, and Manage. Click Stream.
- Give your stream a name in the blank at the top of the next screen. Also select the radio box next to Yes, It’s Made for Kids or No, It’s Not Made for Kids based on whether your content is kid friendly. When finished, click the Create Stream button at the bottom. A pop-up window appears. Next to the number 2 on that list is your stream key. Copy it. You can now close this window.
Encoding your streams
To broadcast your gaming streams to Mixer, Twitch, or YouTube, you need to use an encoder, a software program that mixes the input from your camera and microphone as well as your games, sound, and pictures from your computer itself.The most common choice for an encoder is Open Broadcaster Software (OBS) Telling you how to use an encoder is beyond the scope of this book, but you’re not out of luck. OBS is free to download, and thanks to an active community of expert users, you can learn how to use it through free resources.
You can download OBS for Windows, Linux, and MacOS. In addition, master user and generally nice guy Adam Taylor (YouTube user EsposVox) has compiled a lengthy, in-depth set of video tutorials that you can access at going to YouTube and searching for “OBS Studio Master Class.” You can also find support on the OBS discussion forums.
There will be a bit of a learning curve as you create your stream setup within the encoder because you need to create overlays — the graphics that are situated around your gameplay window, your camera window, and any other information or imagery you choose to use. The number of graphics you want or need depends on the game you choose to stream, but if you want to be taken seriously as a streamer, you need to do more than just stream your face on camera or yourself playing a game.
Master your layout
The layout is the arrangement of items being displayed onscreen, and esports streamers have basic layout standards that they attempt to maintain. To see an example of a layout, take a look at the following figure, which shows a stream of the Miami University varsity esports team playing League of Legends. As you can see, the majority of the screen is devoted to the game itself. Insets show the team names next to each score, and statistical blocks help the viewer follow the action, but the overlay additions are minimal. LoL streamers tend to keep their additional graphics small and few so that the viewer can see the game being played. Most solo streamers also include a webcam in one of the four corners of the screen so that the viewer can see the player. In a five-versus-five match, having ten of those windows would greatly detract from the ability to follow the action.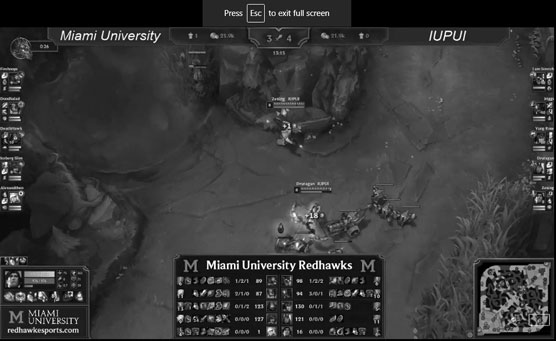 Streaming a League of Legends game with five players on each team.
The following figure shows a clip from a streamed Tespa Hearthstone match. A casual first look might leave you with the impression that this stream is highly similar to the LoL stream shown in the preceding figure, but they differ in several key ways. First, the left third of the screen is devoted to nongame match graphics. You can see the logo of the tournament organizers in the center, and to the top and bottom are video feeds of the teams playing.
The team images display the number of victories (currently zero for each) and the class of their Hearthstone decks. The rest of the screen shows the entire game board, but because this feed comes from the tournament organizer, the display includes an inset at the top showing the opponent’s cards so that the audience can follow along. Because Hearthstone happens in such a small space compared to a game like LoL, in which players could be anywhere on a huge map, the smaller play space works here, and the ability to see the competitors adds to the viewers’ enjoyment.
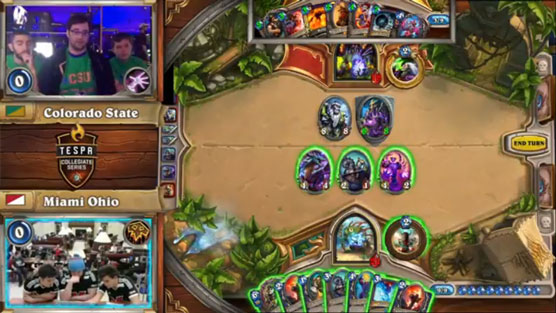 Streaming a team Hearthstone game.
For your streaming display to look professional, you need to include the following elements. You can hire someone to create these elements through the website Fiverr or Upwork by searching for Streaming Overlays or Streaming Kits.
- Background: You need a background or set of background images to use as a base when you use multiple windows so that you don’t leave blank space. The background is also useful for intervals between action, such as for a “Stream Starting Soon” screen. Use a high-resolution still image that doesn’t have any intricate details that could clash with the elements you place over it. You could even use a solid color or gradient.
- Theme: Choose a theme for how you will handle framing or decorating the various elements. For example, you want something to surround your video camera image so that it isn’t just a rectangle sitting on top of whatever else is onscreen. See the figure for an example of a frame around a camera window.
 A decorative frame around the webcam feed on a stream.
- Color scheme: Choose a color scheme and font (or fonts—but never use more than two different fonts—okay, maybe a third one as well, if used sparingly) for creating any onscreen text you want or need. This will include buttons that you might place on your Mixer, Twitch, or YouTube account pages.
- Logo: Choose a key graphic to use as a logo, a thumbnail, or both.
- Game logos: You need clean images of the logos for any games you plan to play or organizations you plan to stream through. You should look for high-resolution PNG files of these logos with no backgrounds so that you can place them anywhere you might need them.
- Keep it simple. More often than not, the biggest problem that new streamers have is trying to put too much information on the screen at one time. Think about how the viewers see the screen Ask a few friends if your layout looks too busy when you first start streaming. Always lean toward having less on the screen at any given time.
- Keep the image and sound quality high. Make sure that you’re using high-resolution images and video input, and light yourself well while using your video camera. Likewise, don’t use music that makes hearing your voice too difficult, and set the audio levels on your games high enough for people to hear the game while also being able to hear and understand you.
- Be consistent with your “brand.” Viewers will think of your stream the same way they might a television program. As you move from game to game or from topic to topic, give your layouts and screens the same basic style and colors. Viewers should never feel like they have changed channels.
- Make your design match your tone. The style of your design work should be consistent with the tone of your streaming and should match the style to your chosen game. If you’re trying to be funny and entertain with humor, your graphics, colors, and fonts should reflect that, though I recommend never, ever using Comic Sans. You can choose among numerous playful fonts with soft edges that will serve you well if you’re going for a humorous look, like the font Slugfest. If you’re trying to be ultra-competitive and serious, you should likewise have serious graphics and fonts. The standby font Helvetica is a great choice because of its clean lines and neutral styling. The figure shows an example of a stream logo using three different fonts to give a humorous feel, a serious feel, or a game-centric feel for a stream. The serious font is Arial; the fun font is called CC Jim Lee and is free for use from DaFont; and the game-styled font that mimics Pac-Man is called Crack Man and is free for use from Fontsc.
The ultimate goal of your streaming is to produce the sort of quality content that results in a healthy and growing viewer base. The path to quality content is paved with careful consideration given to yourself and your audience.


