


The camera has a new processor and an advanced, highly customizable 51-point autofocus system that gives you the ability to capture great images in low light and at a blindingly fast speed of up to 12 frames per second, which is ideal for action photography. You can also create high dynamic range (HDR) images and use the interval timer to create time-lapse movies.
This camera features a viewfinder that shows you 100 percent of what the lens captures at a magnification of 0.70x — what you see is what you get. The camera also features a Virtual Horizon, which enables you to capture images that are perfectly level.
The learning curve with all these bells and whistles may seem a little steep, but don’t worry—here, you are introduced to the Nikon D780’s controls.
The Top of Your Nikon D780 Camera
The top of the camera is where you find the controls you use most when taking pictures. This is where you change settings like ISO (how sensitive the sensor is to light) and shutter speed, choose a shooting mode, and press the shutter button to take a picture.ISO stands for International Organization for Standardization, but all you really need to know is that, on your camera, it controls how sensitive the camera’s sensor is to light.
You can do lots of other things from the top of the camera, which, in my humble opinion, is the most important real estate on the camera, with the possible exception of the lens. I suggest you get to know the controls on the top of your camera intimately, like the back of your hand. Many photographers, including me, make it a point to memorize where the controls are and access them without taking an eye off the viewfinder.Here’s what you find on the top of the camera:
- Release mode dial lock release: Press the button to unlock the release mode dial.
- Release mode dial: Rotate this dial to choose whether pressing the shutter button captures a single image or a sequence or images.
- Mode dial lock release: Pushing this button enables you to change from one shooting mode to another. When in the upright and locked position, it’s not possible to accidentally change shooting modes in the heat of battle.
- Mode dial: You use this dial to specify which shooting mode the camera uses to take the picture.
- Accessory shoe: Slide a flash unit that’s compatible with the Nikon D780 into this slot (also sometimes known as a hot shoe). The contacts in the accessory shoe communicate between the camera and the flash unit.
- Sub-command dial: This dial is used in conjunction with menu commands and other buttons to specify settings.
- Power switch: Turn this switch one notch to power the camera on, and turn it a second notch to turn on the LCD illuminator.
- Shutter-release button: This button pre-focuses the camera and takes a picture.
- Movie-record button: Press this button to start recording video.
- ISO button: Use this button in conjunction with the main command dial to choose the ISO sensitivity of the camera’s sensor.
- Exposure compensation button: Use the button in conjunction with the main command dial to increase or decrease the exposure.
- Control panel: This panel shows you all the current settings.
- Focal plane mark: Used when you need to measure exact distance from the subject to the focal plane for manual focus or macro photography.
- Main command dial: Use this dial in conjunction with another button or menu command to change a setting. For example, you hold the AF-mode button and use the main command dial to specify the AF mode used to capture images.
 The top of the Nikon D780.
The Back of Your Nikon D780 Camera
The back of the camera is where you find controls to capture images or movies using live view, access the camera menu, and much more.Here’s what you find on the back of your Nikon D780:
- Viewfinder eyepiece: Look through the viewfinder to compose your pictures. Shooting information, battery status, and the amount of shots that can be stored on the memory card are displayed in the viewfinder. The eyepiece cushions your eye when you press it against the viewfinder and creates a seal that prevents ambient light from having an adverse effect on the exposure.
- Diopter adjustment control: This control fine-tunes the viewfinder to your eyesight.
- Live view selector: This control is a switch that enables you to capture images in live view mode or to shoot movies.
- Live view button: Press this button to lock the mirror; the view through the lens is displayed on the tilting monitor. Push this button to shoot images or movies in live view mode.
- AF-ON button: This button can be used for focus in autofocus mode. You can also choose the role assigned to this button by creating a custom setting.
- AE-L/AF-L button: This button enables you to lock exposure and focus to a specific part of the frame.
- Multi selector: You use the multi selector for a myriad of tasks, such as changing the autofocus point, selecting an option when using the i menu instead of the camera menu, switching from one camera menu to the next, or selecting a menu item. The multi selector has four arrows (up, down, right, and left) that you use to navigate to and select options, menu commands, and settings. In the middle of the dial is an OK button, which you use to commit a setting or option.
- OK button: Use this button to select a highlighted option. This button can also be assigned to perform a specific task in viewfinder or live view photography.
- Focus selector lock: Use this button to lock focus to a specific autofocus point. This feature comes in handy when you’re focusing on an off-center subject or locking focus to a specific point in the frame.
- i button: Press this button to access the i
- Speaker: This is where camera sounds and movie sounds are played.
- Memory card access lamp: Flashes when the camera is accessing the memory card.
- Tilting monitor: This is where you view menu items, review images, and create images and movies in live view mode.
- Info button: Use this button to review shooting information.
- Zoom out/metering button: Use this button to change metering modes. This button is also used to zoom out while reviewing images.
- Zoom in/QUAL button: Use this button to specify image quality. This button is also used to zoom in while reviewing images.
- Help/protect/WB button: This button is multifunctional. You can use it to view help information on the currently selected item (when available), protect images when reviewing them, or set the white balance.
- MENU button: Press this button to display the last-used camera menu on the tilting monitor.
- Charge lamp: Illuminates when you connect an external charger to the camera.
- Play button: Press this button to review images and play movies.
- Delete button: This button deletes an image.
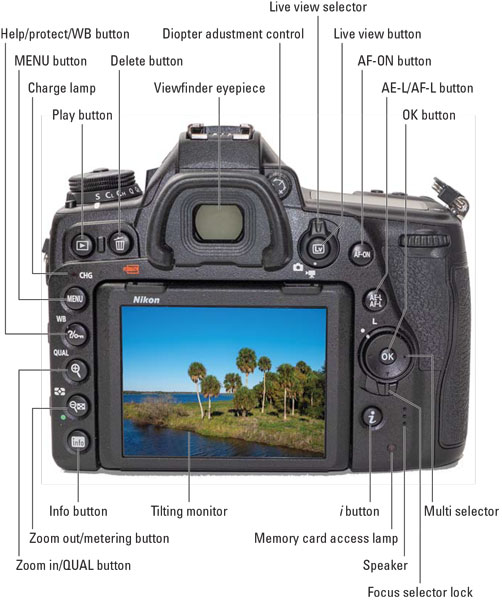 The back of the Nikon D780.
The Front of Your Nikon D780 Camera
On front of your camera, you’ll find a couple of buttons that you use every day and some that access features you rarely use. The following features are on the front of your camera:- Self-timer lamp: The self-timer light flashes when the self-timer is used. It flashes faster when it’s time to smile and say, “Cheese.”
- Pv button: Press this button to preview the depth of field (the amount of the image in front of and behind your subject that’s in focus) at the current f-stop.
- Fn button: Press this button to quickly access selected settings. The default role for this button is to choose image area. Pressing this button is not for the ambidextrously challenged — you have to hold the button with one hand and rotate either the main command dial and/or the sub-command dial. You can assign a different role to the button by creating a custom setting.
- Stereo microphone: Records audio when recording movies. Because the Nikon D780 is a state-of-the-art camera, it records in stereo.
- Flash mode/flash compensation button: Use this button to choose the flash mode and to enable flash compensation.
- BKT button: Use this button to specify the bracketing increment and number of shots when bracketing exposure. You can also change the role of this button by creating a custom setting.
- Lens mounting mark: Use this to align a lens when mounting it to your camera.
- Lens release button: Press this button when releasing a lens from the camera.
- AF-mode button: Use this button to specify the desired autofocus (AF) mode.
- Focus-mode selector: Use this switch to specify autofocus or manual focus.
- Body cap (not shown): Use the body cap to protect the interior of the camera when a lens isn’t attached.
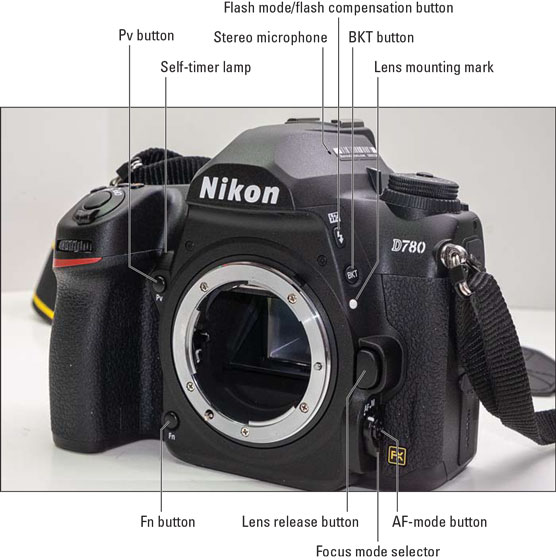 The front of the Nikon D780.
The Bottom of Your Nikon D780 Camera
Here’s what you find on the bottom of the Nikon D780:- Battery-chamber cover: Protects your battery from the elements.
- Battery-chamber cover latch: Press this latch to one side to open the cover and access your battery.
- Tripod socket: Thread a tripod into this socket. Tripods come in handy when you want to steady the camera when shooting at slow shutter speeds or when you’re taking a family photo and you don’t want to be missing from the frame.


