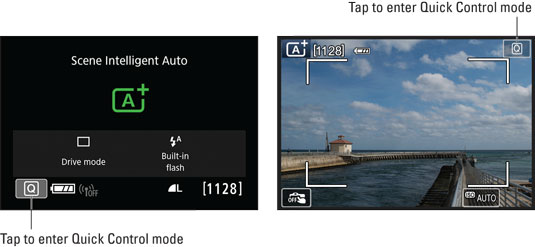
Although the name implies that Quick Control mode is specific to the Quick Control screen, you can take advantage of this feature for Live View still photography and movie recording as well. Here's how it works:
- Display the Quick Control or Live View screen.
If the monitor is asleep or the screen is showing menus or your existing photos, press the shutter button halfway and release it to redisplay the Quick Control or Live View screen. This figure shows the default photography screens as they appear in the Scene Intelligent Auto exposure mode.
 To activate Quick Control mode, tap the Q symbol or press the Q button.
- Press the Q button or tap the Q icon to enter Quick Control mode.
If you're using the viewfinder to take pictures, the display changes to look similar to the one shown on the left here.
 After highlighting the setting you want to adjust, rotate the Quick Control dial or Main dial to cycle through the available options (left) or press the Set button to display all options on a single screen (right).
In Live View mode, the display appears as shown on the left.
 In Live View mode, tap or use the up/down Quick Control keys to highlight the setting you want to adjust, and then tap, use the left/right Quick Control keys, or rotate the Quick Control or Main dial to choose your desired option.
 - Select the setting you want to adjust.
The currently selected setting is highlighted; in the figures, the Drive mode is active, for example. To choose a different setting, tap it or use the left/right Quick Control keys to highlight it.
On the Quick Control screen, the name of the currently selected option for the setting appears at the bottom of the screen, as shown on the left. In Live View mode, the text banner initially shows the name of the setting you're changing, with icons at the bottom of the screen representing the available options. The one surrounded by the orange box is the currently selected option.
- Rotate the Quick Control dial or Main dial to cycle through the available options for the setting.
As soon as you rotate the dial, the text label on the Quick Control screen updates to reflect the name of the each setting. And on the Live View screen, the name of the setting you're adjusting is replaced by the name of the selected option. In the right screen, for example, you can see how things look when you change the Drive mode from Single Frame to the 2-second Self-Timer option.
During viewfinder photography, you can also tap the setting icon or press the Set button to display all the available options on a single screen, as shown on the right. Tap, use the left/right Quick Control keys, or rotate the Quick Control dial or Main dial to highlight the option you want to use, and then tap the exit arrow to exit the settings screen. (In Live View mode, tapping the icon on the sides of the screen simply selects the option represented by that symbol.)
- Repeat Steps 3 and 4 as needed to adjust other settings.
- To exit Quick Control mode, press the Q button. In Live View mode, you also can tap the exit arrow in the upper-right corner of the screen.
A couple of final tips about taking advantage of Quick Control mode:
- For some settings, the Live View preview updates to show the result of your choice. If you adjust the White Balance setting, which affects how colors are rendered, you see colors shift in the preview, for example.
- After you choose some options, additional touch-control icons appear on the options screen. For example, you may see an icon bearing an Info label. By tapping that icon or pressing the Info button, you can access settings that enable you to modify the characteristics of the currently selected option. Instructions throughout the book alert you to these hidden settings.
As with instructions for choosing menu items, the rest of this book assumes that you're now cool with the basics of using Quick Control mode. So, instead of repeating all the preceding steps for each feature that you can modify by using Quick Control mode, instructions merely say something like "Shift to Quick Control mode to adjust this setting." Just for good measure, though, the Q button symbol appears in the margin of paragraphs that discuss using Quick Control mode.


