


Here's a cool focusing feature on the Canon Rebel t5i, not available during viewfinder photography: Whether you're focusing manually or using autofocus, you can magnify the Live View display to ensure that focus is accurate.
This trick works during manual focusing or in any AF mode except Face+Tracking mode (that's the default AF mode, by the way). After setting focus, follow these steps to magnify the display:
Press the AF Point Selection button or tap the Zoom icon in the lower right corner of the screen.

Note that the button has a blue label that shows a magnifying glass with a plus sign — the universal symbol for zoom in. (During playback, you press the same button to magnify the playback display.)
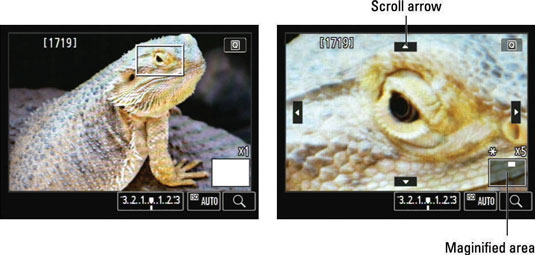
After you press the button or tap the icon, most of the shooting data disappears and you see a magnification frame somewhere on the screen plus a white box in the lower right corner. The white rectangle is a thumbnail representing the entire image area.
Where the magnifying rectangle appears depends on your focusing mode. For manual focus and FlexiZone Multi, it’s at the center of the frame or the center of the selected zone, if you used zone selection. But for FlexiZone-Single or Quick mode when you use manual-point selection, the frame appears over the selected focus point.
The value x1 appears above the thumbnail to show you that you’re viewing the image at its regular size (no magnification).
Move the focusing frame over your subject if needed.
You can either tap the screen or use the cross keys to position the frame.
Press the AF Point Selection button or tap the Zoom icon again to magnify the display.
Your first press of the button displays a view that’s magnified five times. Now the thumbnail icon changes, and the tiny white rectangle indicates the area of the frame you’re viewing. Additionally, little arrows appear on each side of the frame.
If needed, tap the scroll arrows or press the cross keys to reposition the magnification frame.
Press the AF Selection Point button or tap the Zoom icon again for a ten-times magnification.
To exit magnified view, press the AF Point Selection button or tap the Magnify icon again.
Pretty cool, yes? Just a couple of tips on using this feature:
Press the Erase button or the Set button to quickly shift the magnification frame back to the center of the screen. You don’t want your cross-key-pushing or screen-tapping finger to get worn out, after all.
Magnification is available only in Live View and Movie mode. But there’s no reason you can’t set initial focus in viewfinder mode, switch to Live View to check focus, and then shift back out of Live View mode to take the picture. Just make sure you don’t change the camera position along the way, or the focusing distance may vary.
If you use the FlexiZone-Single AF mode or Quick Mode, you can press the shutter button halfway to set focus while in magnified view.
Be sure to exit magnified view before you actually take the picture. Otherwise exposure may be off. However, if you do take the picture in magnified view, the entire frame is captured — not just the area currently displayed on the monitor.


