


In this article, we explain how to use these navigational tools to access key features and functions within Seller Central. Consider this article Seller Central orientation day.
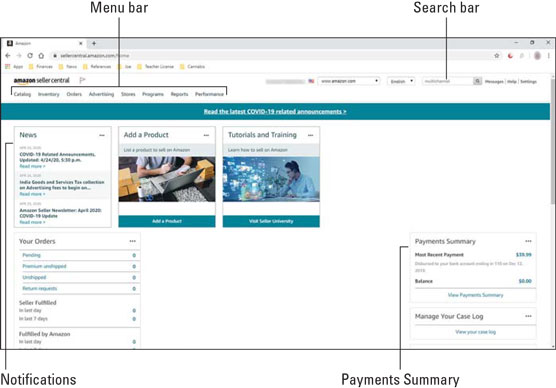 Amazon Seller Central home page.
How to switch marketplaces on Amazon
In the upper right of the opening Amazon Seller Central screen is a double-headed arrow button (or a drop-down menu). Hover over the button or drop-down menu, and a toolbar tip indicates that it’s the Marketplace Switcher. If you sell in more than one market (for example, the United States and Canada), you can use the Marketplace Switcher to check your account information for each marketplace. The flag shown in the Marketplace Switcher indicates the selected Marketplace.If you sell on Amazon in one or more marketplaces, be sure to change marketplaces before accessing any of your account information via Seller Central; otherwise, you may be looking at the wrong information.
Navigating the Seller Central menu bar
Just below the Amazon Seller Central logo (upper left) is the primary menu bar, which serves as the jumping-off point for every seller activity — from adding products to your catalog to managing inventory and orders to accessing reports and monitoring your performance.Menu options may differ depending on your account type — Individual or Professional. For example, Professional Sellers have more options on their Advertising menu than do Individual Sellers.
Catalog
Head to the Catalog menu when you’re ready to list products for sale. Hover over Catalog and choose the desired option:- Add Products: To list a product that’s already in Amazon’s catalog or create a new listing for a product that’s not yet in Amazon’s catalog.
- Complete Your Drafts: If you started to list a product and had to stop because you were missing information Amazon requested, your listing is saved as a draft. Select this option to access drafts and complete any product listings that were in progress.
- View Selling Applications: If you need Amazon approval to sell certain products, choose this option to apply for approval and to check the status of your applications.
Clicking certain menus, such as Catalog and Inventory, instead of an option on the menu starts an on-screen tour of the resulting page, highlighting key features.
Inventory
The Inventory menu provides several options for managing and planning your inventory, adding products, and managing FBA shipping options:- Manage Inventory: Selecting this option opens the Manage Inventory page, displaying all your Fulfilled by Amazon (FBA) and Fulfilled by Merchant (FBM) product listings. To the right of each listing is an Edit button you can click to access commands to close the listing or delete the product and listing.
- Manage FBA Inventory: If you’re using FBA to fulfill orders, you can monitor and manage all products in your FBA inventory here. The Manage FBA Inventory page displays detailed information regarding your available and inbound inventory. You can also choose to replenish inventory when supplies are low.
- Inventory Planning: Choosing this option displays a dashboard that enables you to monitor and plan your inventory. Near the top of the dashboard are three tabs — Inventory Age, Fix Stranded Inventory, and Manage FBA Returns. On the far right is an Inventory Settings link that enables you specify values for Cost of Purchase, Recovery Rate, and Supplier Lead Time, so Amazon can recommend actions to optimize your inventory performance.
- Add a Product: This option takes you to the same place as the Add Products option on the Catalog menu, where you can list a product that’s already in Amazon’s catalog or create a new listing for a product that’s not in Amazon’s catalog.
- Add Products via Upload: If you’re signed up as a Professional Seller, this option appears on your Inventory menu, enabling you to list multiple products at once by downloading, completing, and uploading category-specific templates. You can also download processing reports to check for any errors in posting product listings in bulk.
- Inventory Reports: Select this option to display a page where you can download a variety of inventory reports, from active listings reports to FBA inventory reports and listing quality reports.
- Sell Globally: This option takes you to a page where you can begin to explore opportunities in selling globally. Here, you can choose to list certain eligible products across the Americas, Europe, Asia-Pacific, Middle East, and North Africa regions where Amazon operates.
- Manage FBA Shipments: This option takes you to the Shipping Queue page, where you can monitor your FBA shipments, manage your shipping plans, and view the Received Inventory Report.
- Upload & Manage Videos: Registered brand owners can use this option to upload and manage all their product videos from one central location.
Pricing
Some sellers have a Pricing menu that simplifies the process of monitoring and changing prices. This menu features four options:- View Pricing Dashboard: The Pricing Dashboard provides metrics to help inform your pricing decisions. It provides options to view the dashboard, manage pricing, automate pricing, and more.
- Manage Pricing: Choose this option to view current prices for all of your products and quickly adjust prices.
- Fix Price Alerts: If you set any price alerts for products, such as potentially high price or low price, you can access and adjust them by selecting this option.
- Automatic Pricing: Automatic pricing enables you to specify rules for adjusting your products’ prices automatically to avoid spending excessive time manually adjusting prices in response to ever-changing market conditions.
Be very careful with automatic pricing. You could end up selling a large volume of product at a loss if you set the wrong repricing rules.
Orders
Options on the Orders menu enable you to monitor and manage orders, returns, and SAFE-T claims and download order reports:- Manage Orders: Choose this option to view all pending, unshipped, cancelled, and shipped orders and take relevant actions on those orders, if desired.
- Order Reports: Click this option to access a page where you can download various order reports organized by date.
- Upload Order Related Files: Professional Sellers can make changes such as shipment confirmation, adjustments, or cancellations to orders in bulk by downloading specific templates, filling them out, and uploading them.
- Manage Returns: If any of your customers have returned products, you can find information about those returns by clicking this option. You can also search for returns by Order ID, Return Merchandise Authorization (RMA) number, Tracking ID, or Amazon Standard Identification Number (ASIN).
- Manage SAFE-T Claims: Choose this option to appeal Amazon’s decision to issue a refund to a customer. Amazon may reverse the refund decision if it determines you weren’t at fault.
Advertising
The Advertising menu provides access to all the tools you need to manage the advertising and promotions options available to you as an Individual or Professional Seller:- Early Reviewer Program: Choose this option if you want to enroll products in Amazon’s Early Reviewer Program. You can get up to five reviews for a new product by offering customers a small reward (a $3 gift card) for posting a review.
- Prime Exclusive Discounts: If you’re an FBA Seller, you can use this option to offer discounts to Amazon Prime customers for selected products. The product offer will display the discounted price with the regular price crossed out and a message about how much the customer will save; for example, “You Save: $10 (10%) as a Prime Member.”
- Campaign Manager: Choosing this option displays a page where you can create and manage Amazon pay-per-click advertisements and check each ad’s performance.
- A+ Content Manager: If you’re a brand owner, you can choose this option to access an area where you can create and manage A+ Content — robust advertising content that contains product descriptions, rich images, charts, narrative copy, and other content and formatting beyond what’s typically available in standard product listings.
- Deals: Choose this option if you want to offer special seasonal deals; for example, Black Friday, Cyber Monday, Labor Day, and so on.
- Coupons: To offer coupons to shoppers, click this option and create your coupon, specifying details, such as which products the coupon applies to, whether the customer receives a dollar or percentage discount, the start and expiration dates, and so on.
- Manage Promotions: Choose this option to create and manage all promotions.
Stores
The Stores menu has only one option — Manage Stores. When you first select this option, you’re taken to the Stores page where Amazon enables you to create your own multi-page store on Amazon for free to promote your brands and products.Only registered brands are allowed to create and manage their own Amazon store. If you’re a brand owner, click the Amazon Brand Registry link and follow the onscreen instructions to register your brand. You can then return to the Stores page to create your store.
Programs
The Programs menu contains a list of Amazon Seller Central programs you can enroll in. Hover over Programs to view your options. Options vary among sellers; for example, most sellers have a choice of fulfillment programs, but only some sellers may qualify for Amazon’s Lending program (an invitation-only program designed to help qualified sellers to apply for short term loans to meet the working capital requirements).You can click Fulfillment Programs to check out what’s available, enroll in any available fulfillment programs, and manage any fulfillment programs you’re enrolled in.
Reports
The Reports menu contains several options for accessing non-inventory reports:- Payments: The payments report details all payments Amazon has remitted to you.
- Business Reports: If you’ve sold anything, you’ll see this option, which you can choose to view the Amazon Sales Report dashboard and view and download various business reports based on the criteria you specify, including the start and end dates and the type of data to include in the report.
- Fulfillment: This option displays a page that provides access to all reports related to Amazon Fulfillment regarding inventory, sales, shipping, and so on.
- Return Reports: If your customers have returned any products, choose this option to view seller fulfilled return reports. If you use FBA to fulfill orders, you can click View FBA Reports to access reports about returns processed by FBA.
- Tax Document Library: At the end of each quarter (when estimated tax payments are due) and at the end of the year, be sure to visit the Tax Document Library to access tax information related to your Amazon sales.
Performance
When you’re wondering how well you’re performing as a seller, you need go no further than the Performance menu for answers. Here, you find several options for displaying different performance metrics:- Account Health: Account Health is divided into two sections:
- Customer Service Performance: Where you can check your order defect rate, which is a composite of negative feedback, A-to-z Guarantee claims, and chargeback claims
- Product Policy Compliance: Where you can check on any policies you’ve violated or complaints you’ve received
- Feedback: Choosing this option displays the Feedback Manager, where you can check your percentage of positive, negative, and neutral feedback for different periods — 30 days, 90 days, 365 days, and Lifetime.
- A-to-Z Guarantee claims: When you handle both sales and fulfillment, customers can file an A-to-Z Guarantee claim against you with Amazon if they feel that you’ve treated them unfairly, and you can file an appeal. Click this option to check the number of A-to-Z Guarantee claims that have been filed against you (if any) and to check their status.
- Chargeback Claims: A chargeback occurs when a buyer contacts her bank or credit card company to dispute a charge. Click this option to find out whether your account has any chargebacks, to check their status, and to find out whether you’re required to take any action.
- Performance Notifications: Click this option to access any and all account related alerts that may impact the your seller performance or account health.
Don’t ignore any performance notifications instructing you to take action. Failure to address issues on a timely basis may result in account suspension.
- Voice of the Customer: For additional feedback on how your products and product listings have impacted the customer experience (CX) and to fix any issues, click this option. CX Health listings are broken down into several categories, ranking your listings from Very Poor to Excellent. CX health doesn’t impact your overall account health. (Voice of the Customer was still in Beta during the time of this writing, so it may have changed by the time you read this.)
- Seller University: Choose Seller University to access a multimedia library of instruction and guidance on how to succeed as an Amazon Seller.
App Store
Visit the Amazon App Store to find Amazon and third-party apps to automate business operations and to manage and grow your business. Select an app category and browse that category for solutions.How to use the Seller Central search bar
Near the upper right corner of Seller Central is the search bar — the easiest, quickest tool for finding specific instruction and information in Seller Central. Type any key word or phrase in the search bar to describe what you’re looking for, and press Enter. A search panel appears with all the relevant links to the content that matches your keyword search followed by links to additional resources. Just click the link to the item that interests you. (Note that on smaller screens, a magnifying glass icon appears in place of the search bar; click the magnifying glass icon to display the search bar.)At the bottom of the panel are links to navigate to discussion forums, Amazon’s help section, and your case log — any tech support issues you may be discussing with Amazon support staff.
View your payments summary in Seller Central
As you rack up sales on Amazon, Amazon handles your accounting for you, recording your total sales, deducting fees, and then paying you your share of the profits. To keep track of payments from Amazon, open the Reports menu and click Payments. The Payments page appears providing access to four payment summary tabs: Statement View, Transaction View, All Statements, and Date Range Reports. The following discussion describes what’s on each of these tabs.Statement View
Statements View displays a weekly summary of your Amazon account broken down into seven sections:- Beginning balance: The amount owed to you or the amount you owed Amazon at the end of the previous period.
- Paid to Amazon: The charge made to your credit card or bank account to cover a previous balance owed to Amazon.
- Orders: Order totals since the end of the previous period.
- Refunds: Refund totals since the end of the previous period.
- Closing balance: The amount owed to you or the amount you owe Amazon at the end of this period.
- Transfer amount scheduled to initiate on [date>: This indicates the date on which the closing balance will be transferred to or from your account.
- Balance available for transfer now: If you have a balance available to be transferred at this time, you can click the Request Transfer button to request that the amount be transferred now instead of waiting until the next scheduled transfer date.
Open the “Your Statement for” list just above the statement, and select the desired period. You can also click Previous or Next below the list to switch statement periods.
Transaction View
Transaction View displays a list of transactions in any given statement period. This page also contains a “Find a Transaction” box you can use to search for a transaction by its order number; a Filter View by list that lets you focus on specific types of transactions, such as order payments, refunds, or service fees; and options to specify the desired statement period.All Statements
The All Statements page displays all of your account statements between the specified From and To dates. By default, statements available for the most recent two months are displayed. To view a statement for a specific period, simply click its link in the Settlement Period column.You can view statements either as a summary form in Seller Central or by downloading a plain text file. Click the desired file type in the Actions column to the right of the desired statement.
Date Range Reports
To generate your own custom payment report, click the Date Range Reports tab, specify the desired date range and the information to be included in the report, and click Generate Report.Take advantage of Amazon business reports
As soon as you rack up some sales on Amazon, you can access Amazon’s business reports to monitor your sales performance, traffic, and conversion rates to obtain insight and guidance on how to improve sales.To access business reports, hover over Reports (in the menu near the top of Seller Central) and click Business Reports. (If you don’t see Business Reports, this feature is disabled in your account.) Assuming you do see and select Business Reports, a navigation bar appears on the left divided into three sections:
- Sales Dashboard
- Business Reports
- Amazon Selling Coach
Sales Dashboard
The Sales Dashboard is an interactive tool that enables you to filter data by date, product category, and fulfillment channel by specifying one or more filters near the top of the dashboard. You can choose to display data in graph or table view by clicking the desired option (just above and to the right of the graph or table). You can also hover over different points in time on the graph or table to compare data from different dates, as selected below the graph or table.Business Reports
The Business Reports section (in the navigation bar on the left) presents a list of available reports grouped by report type:- By Date:
- Sales and Traffic report: Shows number of units ordered, average sales per order, average sales per order item, average selling fee, number of user sessions, and so on.
- Detail Page Sales and Traffic report: Contains all the data included in the Sales and Traffic report along with page views and additional details.
Sales and traffic reports by date give very valuable insights into the shopper’s relative activity in respect to your product pages during specific periods such as holidays, Cyber Monday, or shopping seasons.
- Seller Performance report: Contains all the essential data on seller performance metrics including refund rate, feedbacks received, negative feedbacks received, claims amount, received negative feedback rate, A-to-z Guarantee claims granted, claims amount, and so on. Details on this report help you track your overall account performance.
- By ASIN:
- Detail Page Sales Report: This report contains sales and traffic data along with Child ASIN, Parent ASIN, product title, and SKU.
- Detail Page Sales and Traffic by Parent Item: Contains the same data as above report but grouped by parent ASIN.
- Detail Page Sales and Traffic by Child Item: Contains the same data as above report but grouped by Child ASIN and without the SKU data.
Sales and traffic reports by ASIN give valuable insights into the shopper’s relative activity with respect to your product pages during events such as new product launches and discounts you’re offering on specific products.
- Other:
- Sales and Orders by Month: This report contains monthly sales and orders data. This reports gives the quick overview of sales over a long period of time up to two years and provide the sense of the direction to the business is heading.
You can choose to display the data in each of these reports by different date ranges of up to 7 Days, 1 Month, 3 Months, 6 Months, 1 Year, and 2 Years from the custom date range selection except reports by ASIN, which can be displayed only by custom date range.


