After you record your bills, you can go on to the second step: telling QuickBooks 2019 which bills to pay. Then QuickBooks writes the checks. You print them. You mail them.
To make the A/P method work, you have to record your bills as they come in. That doesn’t mean that you have to pay them right away. By recording your bills, you can keep track of how much money you owe and how much money your business really has. QuickBooks reminds you when your bills are due so that you don’t have to worry about forgetting to pay a bill.
When you record bills the accounts payable way, you’re using accrual-basis accounting.
How to record bills in QuickBooks 2019
When a bill comes in, the first thing to do is record it. You can record bills through the Enter Bills window or the Accounts Payable register. If you plan to track bills by expense and item, you need to use the Enter Bills window.To record a bill through the Enter Bills window, follow these steps:
- Choose Vendors → Enter Bills.
Alternatively, click the Enter Bills icon in the Vendors area on the home page. The following figure shows the Enter Bills window. You no doubt notice that the top half of this window looks a great deal like a check, and that’s because much of the information that you put here ends up on the check that you write to pay your bill. (If you see the word Credit at the top of the form rather than Bill, select the Bill option button in the top-left corner. You also can use this screen to enter credit memos from vendors.)
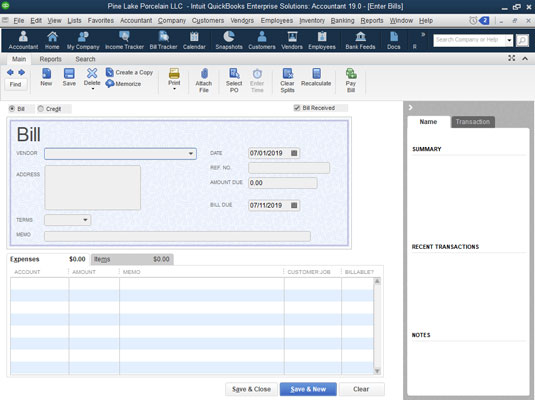 The Enter Bills window.
2. Select the name of the vendor you’re paying.
If you want to pay this bill to a vendor who’s already on the Vendor list, click the down arrow at the end of the Vendor line and choose the vendor. (Then QuickBooks automatically fills the Enter Bills window with as much information as it can remember.) If this vendor is new, QuickBooks asks you to Quick Add or Set Up some information about the vendor: the address, credit limit, payment terms, and so on. You provide this information in the New Vendor window.
If you have one or more unfilled purchase orders with the vendor that you select, QuickBooks asks you whether you want to receive against a purchase order. Click Yes if you do or No if you don’t. If you choose to receive against a purchase order, QuickBooks displays the Open Purchase Orders dialog box, as shown. It lists the open purchase orders you’ve recorded. When you select one or more purchase orders to receive against, QuickBooks fills in the items and amounts from these orders for you, which you can modify as necessary. When you finish with the Open Purchase Orders dialog box, click OK to get back to the Enter Bills window.
 Paying a bill against a purchase order.
To create a purchase order, which is a record of items you order from vendors, choose Vendors → Create Purchase Orders. When QuickBooks displays the Create Purchase Orders window, describe your order. You print and edit purchase orders, by the way, in the same manner as you print invoices and credit memos.
3. Select the payment terms describing when the bill is due.On the Terms line, open the drop-down menu and choose the payment terms (if the information isn’t already there from when you set up the vendor).
4. (Optional) Enter the vendor’s reference number.If you enter the vendor’s reference number for the bill — probably just the invoice number or your account number — the reference number prints on the voucher that’s part of the printed check.
5. (Optional) Enter a memo to describe the bill.You can enter a note in the Memo text box. The note that you enter appears on the A/P register.
6. Move the cursor down to the Account column of the Expenses tab, and enter an expense account name.Chances are good that you want to enter the name of an expense account that’s already on the chart of accounts. If that’s the case, click the down arrow to see a list of all your accounts. You probably have to scroll down the list to get to the expense accounts. (A fast way to move down the list is to start typing the account name; you go straight down the list.) Click the account that this bill represents. (Most likely, it’s Supplies or something like that.)
If you need to create a new expense account category for this bill, choose Add New from the top of the list. You see the New Account dialog box (not shown). Fill in the information, and click OK.
What if the money that you’re paying out because of this bill can be split among two, three, or four expense accounts? Simply click below the account that you just entered. The down arrow appears. Click it to enter another expense account, and another, and another if you need to.
7. Tab over to the Amount column, if necessary, and change the numbers.If you’re splitting this bill among several accounts, make sure that the numbers in the Amount column add to the total of the bill.
8. (Optional) Enter words of explanation or wisdom in the Memo column.9. (Optional) Assign the expense to a Customer:Job.
If you plan to be reimbursed for these expenses, or if you just want to track your expenses by job, enter the customer who’s going to reimburse you. Enter an amount for each account if necessary. You can use the down arrow to find customers and then click them. If you do assign a Customer:Job, you also have the option to bill these expenses or items being purchased to the client. To do so, click the Billable column and you should see a check mark now. Next time you invoice this job, you should see the option to add these items to the invoice automatically.
10. (Optional) Assign the expense to a class.You also can track expenses by class by making entries in the Class column. Notice the usual down arrow, and click it to see a list of classes. (You don’t see a Class column unless you told QuickBooks that you want to use classes.)
If you want to have QuickBooks track expenses by class, you can set it up to do so. To set up QuickBooks to track expenses, choose Edit →Preferences. When QuickBooks displays the Preferences dialog box, click the Accounting icon, click the Company Preferences tab, and then select the Use Class Tracking check box.
If you want, click the Recalculate button to total the expenses.
11. Use the Items tab to record the various items that the bill represents.Click the Items tab. Enter the items you purchased and the prices you paid for them.
If you realize after partially completing the bill that the bill does indeed pay a purchase order, click the Select PO button, which appears on the main ribbon of the Enter Bills window.
From the Vendor drop-down menu, choose the name of the vendor who sent you the bill. In the list of open purchase orders, click in the column on the left to put a check mark next to the purchase order (or orders) for which you’re paying. Easy enough? Click OK when you’re done; QuickBooks fills out the Items tab for you automatically.
12. Move to the Item column, and enter a name for the item.Notice the down arrow in this column. Click it to see the Item list. Does the item that you’re paying for appear on this list? If so, click that item. If not, choose Add New from the top of the list and fill out the New Item window.
13. Fill in the rest of the rows of items on the Items tab.You can enter all the items you’re purchasing here. Make sure that the Items tab accurately shows the items that you’re purchasing, their costs, and their quantities. If you want to, click the Recalculate button to total the items.
14. Save the bill.Click Save & New to save your record of the bill and then enter another bill. Or click Save & Close to record your bill but not enter another bill.
Just as in the case with customer-related windows (like the Create Invoices window), QuickBooks displays historical information about a vendor in the right sidebar. You can toggle between the Vendor and Transactions, run quick reports, and quickly link to previous or outstanding bills, invoices, and other notes on a client you do business with.
How to enter your bills in QuickBooks 2019 the fast way
You also can enter bills directly in the Accounts Payable register. This method is faster, but it makes tracking expenses and items more difficult.If you want to enter bills directly in the Accounts Payable register, follow these steps:
1. Choose Lists→Chart of Accounts or click the Chart of Accounts icon on the home page.
The Chart of Accounts opens.
2. Open the Accounts Payable account.When QuickBooks displays your Chart of Accounts, double-click the Accounts Payable account in the list. You see the Accounts Payable register window, as shown. The cursor is at the end of the register, ready and waiting for you to enter the next bill.
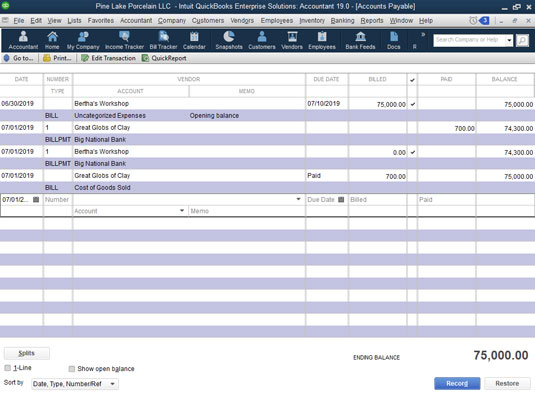 The Accounts Payable register window.
3. Fill in the information for your bill.
Enter the same information that you would if you were filling in the Enter Bills window. In the Vendor text box, click the down arrow and choose a name from the Vendor drop-down menu.
If you enter a vendor name that QuickBooks doesn’t recognize, you see the Vendor Not Found message box, and QuickBooks asks you to give information about this new, mysterious vendor. Click Quick Add to have the program collect the information from the register as you fill it out, or click Set Up to see the New Vendor dialog box.
You have to select an account name. You can probably find the right one in the Account drop-down menu; if you can’t, enter one of your own. You see the Account Not Found message box, and QuickBooks asks you to fill in information about this new account.
If you decide while you fill out the register that you want to be reimbursed for this check or that you want to track expenses and items, click the Edit Transaction button to see the Enter Bills window. When you finish filling in the window, click Save & New. You’re back where you started: in the Accounts Payable window.
See the Splits button? This Splits button works the same as the Splits button in the bank account register window. When you click Splits, QuickBooks provides additional rows for inputting expense and class information.
4. When you fill in all the information, click Record.The Restore button, located just right of Record, is there in case you fill out the register but decide that you want to start all over again before you’ve recorded the transaction. Click Restore to clear the information onscreen, and you have a clean slate.
How to delete a bill in QuickBooks 2019
Suppose that you accidentally enter the same bill twice or enter a bill that was really meant for the business next door. (Just because you’re tracking bills by computer doesn’t mean that you don’t have to look things over carefully anymore.) Here’s how to delete a bill that you entered in the Accounts Payable register:1. Locate the bill in the Accounts Payable register by using one of the following methods:
- If you know roughly what day you entered the bill, you can scroll through the list to find it. The entries are listed in date order. (Select the 1-Line check box to display each bill on one line rather than on two lines to make the scrolling go faster.)
- If you don’t remember the date, choose the Edit →Find.
And now, back to the Accounts Payable register window that you have in progress …
2. Select the bill that you want to delete by clicking anywhere in the bill.3. Choose Edit →Delete Bill.
QuickBooks confirms that you really, truly want to delete the transaction. If you click OK, it dutifully deletes the bill from the A/P register.
Remind me to pay that bill, will you?
You could tie a string around your finger, but the best way to make sure that you pay your bills on time is to have QuickBooks remind you. In fact, you can make the Reminders message box the first thing that you see when you start QuickBooks.To adjust the QuickBooks reminder options, you must be logged on as the administrator in single-user mode. Then choose Edit→Preferences. When QuickBooks displays the Preferences dialog box, click the Reminders icon in the list on the left and then click the Company Preferences tab to access the dialog box shown here.
 The Reminders section of the Preferences dialog box.
Make sure that either the Show Summary or Show List option button is selected (you can’t choose Don’t Remind Me and expect to get a reminder) and then give yourself several days’ notice before you need to pay bills by typing a number (10 is the default and usually works well) in the Days Before Due Date text box, located in the Remind Me column.
If you select the Show Summary option (the first button to the right of the option), you get a summary of the bills that you owe each time you start QuickBooks. If you select Show List (the second button to the right of the option), you get the details about each bill.
You may want to review the Reminders window when you start QuickBooks or open a new company file. The window lists reminders (such as forms you need to print and payments you need to transmit) and tells you which unpaid bills you’re supposed to pay. You can see this list by choosing Company→Reminders. Note that you can also tell QuickBooks to display any reminders when opening the company file. To do this, choose the Edit → Preferences command, click Reminders, click My Preferences, and then select the Show Reminders List when Opening a Company File check box.