Basic shapes, such as squares, circles, polygons, and stars, are used in all types of illustrations. With the right know-how and use of the right tools, you can easily create any shape that you want for your artwork. The following simple tips can improve your skills at creating basic shapes in Adobe Illustrator CC:
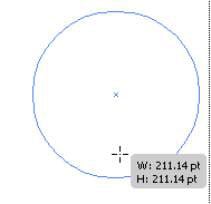
Press and hold the Shift key while dragging with the Rectangle or Ellipse tool to create a perfect square or circle. (See this figure.) This trick is also helpful when you’re using the Polygon and Star tools — holding down the Shift key constrains them so that they’re straight.
Create a shape from the center out by holding down the Alt (Windows) or Option (Mac) key while dragging. Hold down Alt+Shift (Windows) or Option+Shift (Mac) to pull a constrained shape out from the center.
When creating a star or polygon shape by clicking and dragging, if you keep the mouse button down, you can then press the up- or down-arrow key to interactively add points or sides to your shape.
Creating advanced shapes in Illustrator
At times, it may be wise to use advanced tools in Illustrator to create unique shapes. The Pathfinder panel is an incredible tool you can use to combine, knock out (eliminate one shape from another), and even create shapes from other intersected shapes.
You use the Pathfinder panel, shown in this figure, to combine objects into new shapes. To use the Pathfinder panel, choose Window→Pathfinder.
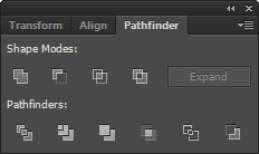
Across the top row of the Pathfinder panel are the Shape modes, which let you control the interaction between selected shapes. You can choose from the Shape modes listed in this table.
| Button | Mode | What You Can Do with It |
|---|---|---|
| Unite | Unite selected shapes into one shape. | |
| Minus Front | Cut out the topmost shape from the underlying shape. | |
| Intersect Shape Areas | Use the area of the topmost shape to clip the underlying shape as a mask would. | |
| Exclude Overlapping Shape Areas | Use the area of the shape to invert the underlying shape, turning filled regions into holes and vice versa. |
If you like the result from using Exclude Overlapping Shapes mode, you can also create a similar effect by selecting several shapes and choosing Object→Compound Path→Make. This command “punches” the topmost shapes from the bottom shape.
The shapes remain separate so that you can still adjust them, which is helpful if you like to tweak your artwork (but it drives some people crazy). You can turn the result of using the Shape Mode buttons into one shape by either clicking the Expand button after selecting the Shape mode or holding down the Alt key (Windows) or Option key (Mac) when clicking a Shape Mode button.