


Before discussing what’s involved in knocking out the background behind SVG artwork, focus on applying transparency to SVG graphics. You need to defining the opacity of artwork using the Transparency panel. For example, 50 percent transparency has been applied to the yellow shape in the figure, and you can see the transparency in effect. And yes, that image is an SVG file, with all the lightweight, fast-loading, and infinitely scalable features built into SVG.
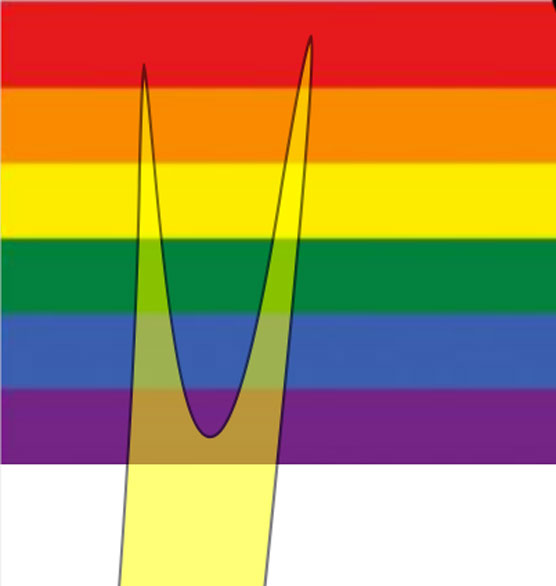 A semi-opaque SVG shape on top of a colored background.
How to output SVGs with transparent backgrounds
Designers are used to thinking in terms of backgrounds that are either made transparent or remain visible. We think about knocking out a background. PNG images and GIF images work like that—you either create with a background or you choose a transparent background in a program such as Illustrator or Photoshop to knock out that background.With GIFs and PNGs, you can have one transparent color that allows the background colors or images to show through in web pages. But the logic of knocking out the background is different in an SVG file than with PNGs and GIFs. Essentially, there is no such thing as an SVG graphic that has a non-transparent background because there is no background. In other words: by default SVG graphics save and export without a background.
So, what’s the problem? Well, it’s easy to accidentally end up with a transparent background when saving or exporting SVG files! The following figure might have a white background, or it might have a transparent background. You can't tell just by looking at the Illustrator screen; you have to choose View→Show Transparency Grid.
 This graphic might have a white background or it might have no background.
With Transparency Grid enabled, as shown, you can see that the bird has a white rectangle behind it, and that white background will “go with” the graphic if you save the file as an SVG or export it as an SVG.
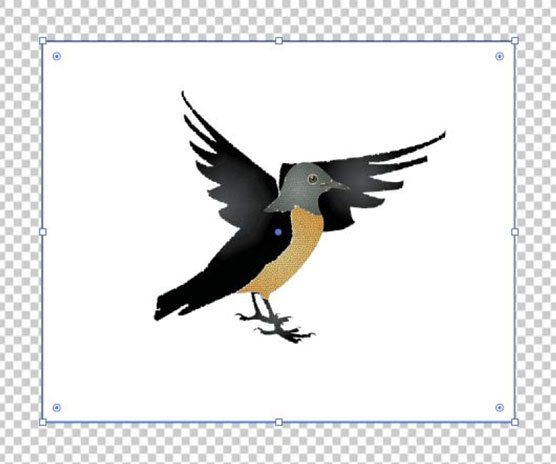 Viewing the transparency grid reveals a white rectangle behind the graphic.
Let me emphasize and shine a light on this from another angle. When I go to export this image as an SVG, the Export for Screens dialog, shown, does not have an option for selecting a transparency color.
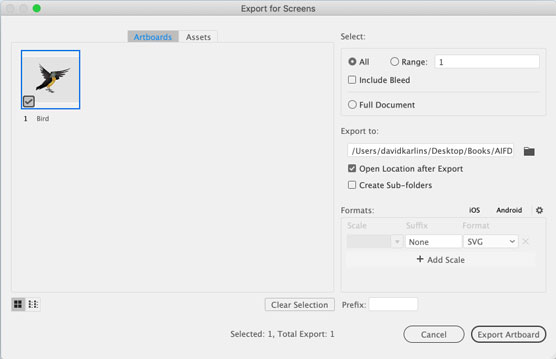 You can't choose a transparency color in SVG because there is no background color.
I often encounter designers who insist on putting a background rectangle behind their SVG-destined artwork so they can see how the graphic will look when backgrounded by a color in the target medium (such as a web page or app). That’s okay, I caution them, as long as you remember to remove that background rectangle when you save or export the SVG. And in today’s high-pressure, high-productivity, fast turnaround world, who needs one more thing to remember?
A better solution is to define a transparency “grid” with a single color that matches the environment into which the graphic will be placed. Why do I put grid in quotes? Because this technique cheats: With it, you define both grid colors as the same color, effectively simulating a web page or an app background color.
To use that technique to create a custom background while you develop SVG artwork, follow these steps:
- Choose File→Document Setup.
- In the General tab, find the Transparency and Overprint Options section. The changes you want are controlled in this section of the dialog. Don’t worry about defining the grid size because you're effectively dispensing with the grid.
- In the Transparency Grid section of the dialog, click the first of the two grid color panels and choose a background color by using one of the various color palettes in the Colors pop-up shown in the following figure.
None of these color palettes is particularly digital friendly, by the way. There is no palette for RGBA, hexadecimal, or other standard web color formats, but the color picker eyedropper can help you get the background color you are aiming to match.
 Defining a preview background color with a Transparency Grid.
 - Select the second of the two grid color panels, and assign the same color to it. Remember, you can use the color picker eyedropper to grab that color.
- Click OK in the Document Setup dialog.
All I’ve done in the previous set of steps was define how the Transparency Grid displays when it is enabled. So, if your Transparency Grid is not enabled, choose View→Transparency Grid.
In this figure, I selected the artboard with the graphic, and I am previewing the project against a simulated background color. Previewing the output background color with a custom Transparency Grid.
Apply transparency effects to SVG
When transparency (such as 50 percent opacity) or transparency effects such as color burn, darken, or multiply are applied to SVG graphics, those effects retain the scalability of SVG.This figure shows the same graphic—three semitransparent orange rectangles—exported as a PNG file (top) and an SVG. You can see how the PNG file degrades in quality when I zoom in on it in a browser. What you can’t see is that the PNG file is almost twice as large as the SVG.
 Comparing PNG output (top) with SVG when transparency is applied
Here’s a summary of the advantages to using SVG for transparency effects:
- The file size is qualitatively smaller.
- A web or app developer can tweak or edit the transparency values and assign interactivity.
- The image and the transparency will not degrade no matter how much the file is zoomed in on.
<svg id="orange-squares"
<style>.cls-1{fill:#f7931e;}.cls-1{opacity:0.6
</style
<title>orange-bars</title>
<rect class="cls-1" y="0.13" width="74" height="66.85"/>
</svg>
If your HTML and CSS skills allow, you can paste the <style>; element into the <head>; element of a web page, and the rest of the HTML into your <body>; element, and you’ll have replicated the code I created in Illustrator.
Let’s walk through the process of applying transparency and transparency effects to SVG artwork step-by-step:
- Select the View menu and be sure that Hide Transparency Grid appears on the menu. This check ensures that you're viewing the Transparency Grid. If the Transparency Grid display isn't turned on, you can’t accurately see the effect of the opacity settings you apply.
- Select objects to apply transparency to, and choose an opacity value from the Opacity slider in the Control panel, as shown.
I'm using the default transparency grid for the screenshot to clearly illustrate the transparent background.
 Assigning transparency for SVG output.
 - Choose Window→Appearance and, in the Appearance panel, verify, edit, or hide (and show) the transparency
Do not apply transparency to objects intended for SVG output by using the Layers panel. Doing that applies raster transparency, which degrades when SVG objects are enlarged.
You can also apply Transparency effects such as color burn, darken, or multiply to SVG-destined artwork.
