


With so many other G Suite collaboration tools at your disposal, why bother with Google Groups? The simple answer is that when you create a group and then add the connected employees to that group, collaboration suddenly becomes much easier.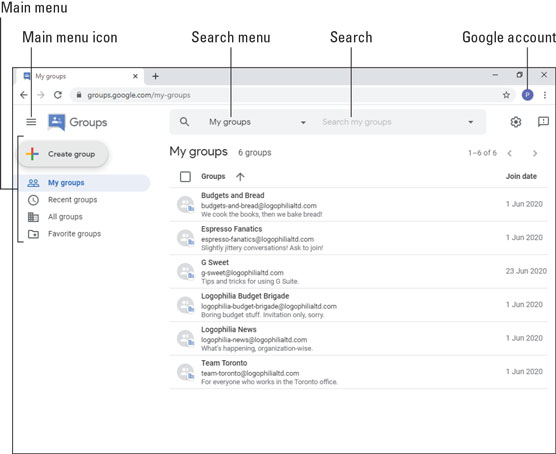 The Groups home page.
Why? Because now you can treat the group as a single entity, which means you can communicate with everyone in the group just by communicating with the group itself. Here are some examples:
- You can email everyone in a group by sending the email to the group's email alias.
- You can invite everyone in a group to a Calendar event by adding the group to the event's guest list.
- You can ask everyone in a group to collaborate on a file by sharing that file with the group.
- You can invite an entire group to a chat room by making the group a member of the room.
- You can use the group's online forum to have group discussions.
The Groups Home Page
Are you intrigued by Groups? Curious? Just want to get it over with? Whatever your state of mind, you can use either of the following techniques to take yourself to the Groups home page:- Whistle for your favorite web browser and then ask it to load Google Groups.
- In a G Suite app that has the Google Apps icon (such as Calendar or Docs), click Google Apps and then click Groups.
The Groups home page.Let's examine the screen so that you know what's what:
- Main menu: Provides a few commonly used Groups commands.
- Main menu icon: Click this icon to toggle Group's main menu.
- Search menu: Select what you want to search.
- Search: Search for the group you want to view or join.
- Google account: Gain access to your Google account.
Group Roles
When you work with groups, particularly if you create your own groups, you constantly bump up against the idea of who does what in a group and what permissions each of these roles has. There are four roles to consider in any group:- Group owners: The owner of the group is the person who created the group. However, that person can also assign the owner role to other people. The owner role has the following default permissions:
- All member permissions (see "Group members," below).
- Post original messages and replies as the group (that is, by using the group's email address).
- Add or remove group members, managers, and owners.
- Moderate group content.
- Change member roles (for example, promote a manager to an owner).
- Change group settings.
- Delete the group.
- Export group memberships and messages.
- Group managers: The manager role has the following default permissions:
- All member permissions (see "Group members," below).
- Post original messages and replies as the group (that is, by using the group's email address).
- Add or remove group members and managers (but not owners).
- Moderate group content.
- Change member roles (for example, promote a member to a manager; managers can't promote anyone to an owner).
- Change group settings.
- Export group memberships and messages.
- Group members: Everyone in a group has the member role by default, which means they have the following permissions:
- View the group's messages.
- Post messages to the group.
- Post private replies to the author of a message.
- Moderate post metadata (such as assigning topics).
- Send files to the group.
- View the group's membership list.
- Entire organization: Everyone in your G Suite organization, even folks who aren't members of the group, have the following permissions by default:
- View the group's messages.
- Post messages to the group.
- Contact the group owners.
- View the group's membership list.
- Select the group you want to work with. Groups opens the group and displays the most recent conversations.
- In the main menu on the left, click the Group Settings tab.
- Click to activate the Advanced toggle.
- For each of the following permission settings, click the role that you want to assign: Group Owners, Group Managers, Group Members, or Entire Organization:
- Who can view conversations?
- Who can post?
- Who can view members?
- Who can contact the group owners?
- Who can view the member's email addresses?
- Who can edit their own posts?
- Who can reply privately to authors?
- Who can attach files?
- Who can moderate content?
- Who can moderate metadata?
- Who can post as the group?
- Who can manage members?
- Who can adjust roles?
 Use the Group Settings tab to assign roles to each permission.
- Click the Save Changes button. Groups applies the new roles to each permission you modified.

