


- Depth of field refers to the distance over which objects in a photograph appear acceptably sharp.
- With a shallow depth of field, the subject is sharp, but objects in front of and behind it appear blurry. The farther an object is from the subject, the blurrier it looks.
- With a large depth of field, the zone of sharp focus extends to include objects at a greater distance from your subject.
 A shallow depth of field blurs the background and draws added attention to the subject.
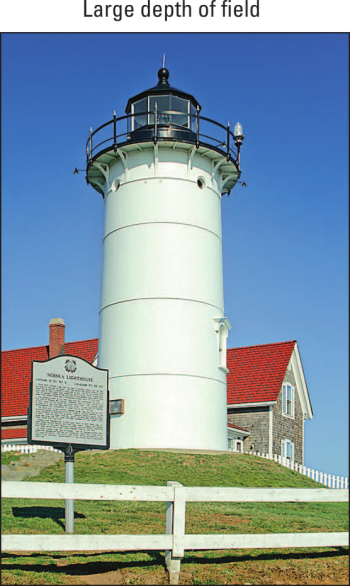
But for landscapes, you might choose to use a large depth of field, as shown in the following image. Because the historical marker, lighthouse, and cottage are all sharp, they have equal visual weight in the scene.
 A large depth of field keeps both near and far subjects in sharp focus.
Again, though, which part of the scene appears blurry when you use a shallow depth of field depends on the spot at which you establish focus. Consider the lighthouse scene: Suppose you opted for a short depth of field and set focus on the lighthouse. In that case, both the historical marker in the foreground and the cottage in the background might be outside the zone of sharp focus.
So how do you manipulate depth of field? You have three points of control:
- Aperture setting (f‐stop): The aperture is one of three main exposure settings on your Canon camera. Depth of field increases as you stop down the aperture (by choosing a higher f‐stop number). For shallow depth of field, open the aperture (by choosing a lower f‐stop number).
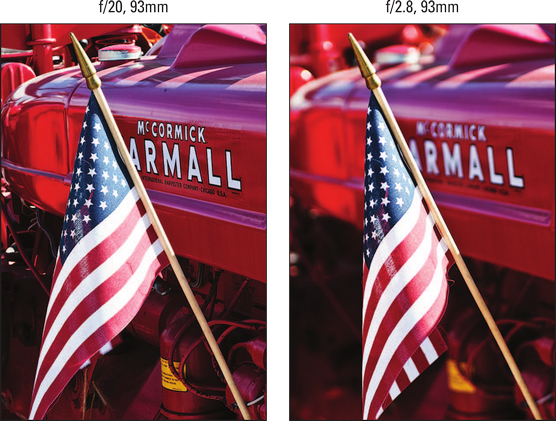
This image offers an example. Notice that the tractor in the background is in much sharper focus in the first shot, taken at f/20, than in the second image, shot at f/2.8.
 Lowering the f‐stop value decreases depth of field.
- Lens focal length: Focal length, which is measured in millimeters, determines what the lens “sees.” As you increase focal length, the angle of view narrows, objects appear larger in the frame, and—the important point in this discussion—depth of field decreases. Additionally, the spatial relationship of objects changes as you adjust focal length.
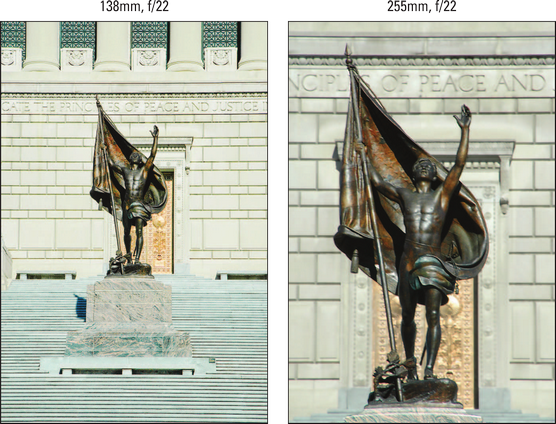
For example, the next image compares the same scene shot at focal lengths of 138mm and 255mm. The aperture was set to f/22 for both examples.
 Using a longer focal length also reduces depth of field.
Whether you have any focal‐length flexibility depends on your lens. If you have a zoom lens, you can adjust the focal length by zooming in or out. If your lens offers only a single focal length—a prime lens in photo‐speak—scratch this means of manipulating depth of field (unless you want to change to a different prime lens, of course).
- Camera‐to‐subject distance: When you move the lens closer to your subject, depth of field decreases. This statement assumes that you don’t zoom in or out to reframe the picture, thereby changing the focal length. If you do, depth of field is affected by both the camera position and focal length.
- To produce the shallowest depth of field: Open the aperture as wide as possible (select the lowest f‐stop number), zoom in to the maximum focal length of your lens, and move as close as possible to your subject.
- To produce maximum depth of field: Stop down the aperture to the highest possible f‐stop setting, zoom out to the shortest focal length your lens offers, and move farther from your subject.
- Aperture‐priority autoexposure mode (Av) enables you to easily control depth of field while enjoying exposure assistance from the camera. In this mode, you rotate the Main dial to set the f‐stop, and the camera selects the appropriate shutter speed to produce a good exposure. The range of available aperture settings depends on your lens.
If you’re not up to Av mode, experiment with the Background Blur setting available when you shoot in Scene Intelligent Auto mode. You access it through the Creative Assist option. Just don’t expect miracles: The Background Blur feature doesn’t always deliver as much or as little blurring as you’d like. Some SCN modes also offer the Background Blur option.
- For greater background blurring, move the subject farther from the background. The extent to which background focus shifts as you adjust depth of field also is affected by the distance between the subject and the background.
- Depth-of-field preview: When you look through your viewfinder and press the shutter button halfway, you see only a partial indication of the depth of field that your current camera settings will produce. You can see the effect of focal length and the camera‐to‐subject distance, but because the aperture doesn’t actually stop down to your selected f‐stop until you take the picture, the viewfinder doesn’t show you how that setting will affect depth of field.
By using the Depth‐of‐Field Preview button on your camera, however, you can do just that when you shoot in the advanced exposure modes. Almost hidden away on the front of your camera, the button is labeled below.
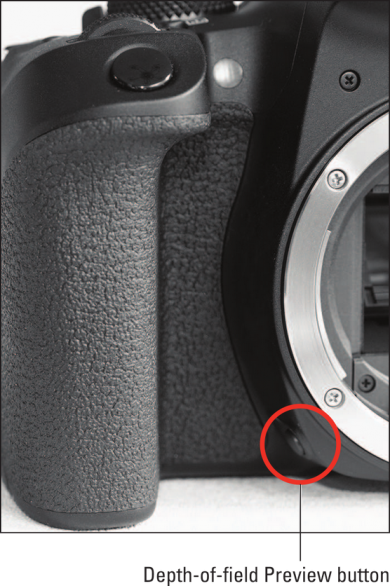 Press this button to see how the aperture setting will affect depth of field.
To use this feature, press and hold the shutter button halfway and simultaneously press and hold the Depth‐of‐Field Preview button with a finger on your other hand. Depending on the selected f‐stop, the scene in the viewfinder may get darker. In Live View mode, the same thing happens in the monitor preview. Either way, this effect doesn’t mean that your picture will be darker; it’s just a function of how the preview works.
Note that the preview doesn’t engage in P, Tv, or Av mode if the aperture and shutter speed aren’t adequate to expose the image properly. You have to solve the exposure issue before you can use the preview.
To learn more about your Canon EOS Rebel T8i/850D, check out our Cheat Sheet.
