Don't spray-paint when the air temperature is below 45 degrees or above 75 degrees. Don't spray-paint in direct sunlight, either. Too much heat dries the paint too fast, and it won't bond well. If it's too cold, the paint dries too slowly, attracting bugs and dirt, and the gun is more likely to clog.
Before you rent a sprayer do your prep work,-
Clear the work area of tripping hazards or objects that may snag the sprayer hoses.
-
Protect nearby surfaces, such as windows, trim, and floors. In most cases, you want to mask off or cover these areas with dropcloths.

-
Start moving the gun before you start spraying and keep the gun moving in long, straight strokes. Sprayers apply paint quickly, so you must use this technique to get an even coat that doesn't run. Move as fast as you would brush out a stroke, or 2 to 3 feet per second.
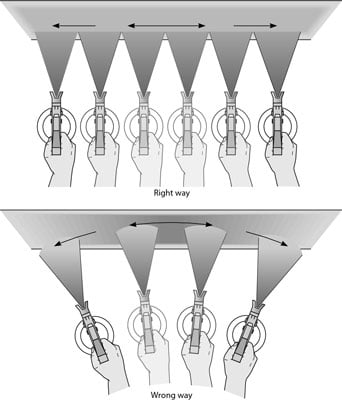
 Use long sweeping strokes and maintain a constant distance from the surface.
 -
Hold the paint gun nozzle perpendicular to and 10 to 12 inches away from the surface. Even a slight change in this distance significantly affects the amount of paint being applied: If you hold the nozzle twice as close to the surface, you apply four times as much paint. Avoid tilting the sprayer downward or upward, which causes spitting and results in an uneven application.
-
Keep the nozzle perpendicular to the surface as you move it back and forth. The natural tendency is to swing the gun in an arc, which results in an uneven "bowtie" application.
-
Overlap each pass half the width of the spray coverage area to avoid leaving light areas or creating stripes.
-
Test and adjust the spray equipment until you produce the pattern you want. If the pattern is too narrow, you could apply too much paint to the area, resulting in runs. With a pattern that's too wide, you have to make more than two passes to get good coverage. A pattern that's 8 to 12 inches wide is adequate for most large surfaces.
It's better to put on the paint a little light and go back and apply a little more than to load the surface with a coat of paint that's too heavy and may sag and dry unevenly. In time, a heavy coat may peel.
Do the corners and any protrusions first and finish up with the large, flat areas. Spray corners with a vertical stroke aimed directly at the corner. Move a little quicker than usual, especially on outside corners, to avoid overloading the edges.After you complete each area, stand back and look for light spots or missed areas. Touch up, making sure that you move the gun before spraying. Keep a brush or roller handy for touch-ups.
Most sprayers have a tip guard to protect you from injecting yourself with paint. Remove your finger from the trigger and wipe off the guards occasionally — with a rag, not your finger. Paint buildup at the tip may affect the spray pattern.
Some spray applications require backbrushing or back-rolling — that is, brushing or rolling in the sprayed-on finish to get a more even coat and better penetration. The sprayer, then, is just a fast way to get the paint to the surface. In particular, you should backbrush stain applications on unfinished or previously stained wood. Backbrushing is strongly recommended when applying primers and sealers as well.

