


If your desktop doesn’t display hard drive icons and you wish it did, stay tuned.
Explaining the Finder and desktop will be a whole lot easier with a picture for reference, so take a gander at this figure, which is a glorious depiction of a typical macOS Big Sur Finder.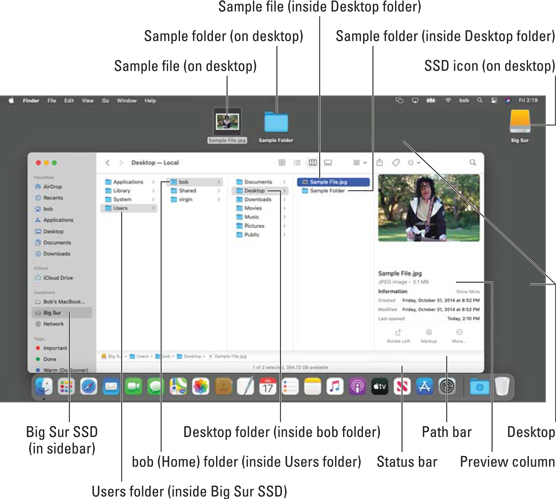 A typical Finder and desktop
If you’re not familiar with Finder and its desktop, here are a few tips that will come in handy as you become familiar with the icons that hang out there:
- Icons on the desktop behave the same as icons in a window. You move them and copy them just as you would icons in a window. The only difference is that icons on the desktop aren’t in a window. Because they’re on the desktop, they’re more convenient to use.
- The first icon you need to get to know is the icon for your startup disk (a hard drive or SSD). You used to be able to find it on the top-right side of the desktop, as mine is in the figure. Yours probably has the name Macintosh HD unless you’ve renamed it. (I renamed mine Big Sur in the figure.)
You can see how selected and deselected hard or solid-state drive icons look in the following figure, too.
Big Sur doesn't display the startup disk’s icon on the desktop by default. So, if you don’t see your startup (boot) disk’s icon on the desktop but you’d like to, select the check box for hard drives in Finder Preferences.
- Other disc or hard drive icons appear on the desktop by default. When you insert a CD or DVD or connect an external hard drive or a thumb drive, the disc or drive icon does appear on the desktop near the top-right corner. This feature is enabled by default; if yours isn’t enabled, just open Finder Preferences and select its check box.
- You can move an item to the desktop to make it easier to find. Simply click any icon in any window and then, without releasing the mouse button, drag it out of the window and onto the desktop. Then release the mouse button. This will move the icon from wherever it was to the desktop. You can now drag the icon elsewhere on the desktop if necessary.
If you drag an item from an external volume to any location on your startup disk (including the desktop), the item is copied, not moved. Put another way, the item is moved if it’s on the same disk or volume, and copied if it’s on another disk or volume.
Volume is the generic term for any storage container — a hard drive, solid-state drive, CD, DVD, disk image, or remote disk — that appears in the sidebar’s Locations section.
At the bottom of the Finder window are two optional bars. The lower of the two is called the status bar; it tells you how many items are in each window and, if any are selected, how many you’ve selected out of the total, as well as how much space is available on the hard drive containing this window. And just above the status bar is the path bar, which shows the path from the top level of your hard drive to the selected file (which is Sample File on Desktop.jpg). You can show or hide the status bar by choosing View→ Hide/Show Status Bar and show or hide the path bar by choosing View →Hide/Show Path Bar. Finally, when the toolbar is hidden, the status bar moves to the top of the window (the path bar remains at the bottom of the window no matter what).

