
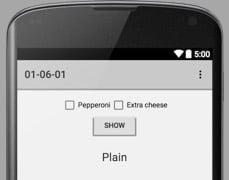
After designing an Android app and its variations, you may decide that your app needs some flair. How about designing your app so that when a user clicks a button, your app displays a picture of the pizza being ordered? The SHOW button you see here is perfect for this.
Android has all kinds of features for drawing images and displaying bitmap files. Here is one possible approach:
Launch Android Studio and create a new project.
Copy your reusable layout file (reusable_layout.xml) to your new project’s app/res/layout branch in the Project tool window.
Include reusable_layout in your project’s activity_main.xml file.
Find four images — one for plain, one for pepperoni, one for extra cheese, and one for pepperoni with extra cheese.
Android’s official documentation recommends the .png format for images. If you don’t have .png images, Android’s docs call the .jpg format “acceptable.” If you don’t have .png or .jpg, the docs tell you to hold your nose and use .gif. But remember, you’re creating a practice application here, not a work of art. Your images don’t have to look good.
The names of Android’s resource files must not contain capital letters. You can use only lowercase letters and underscores.
For working with image formats, the program IrfanView is very helpful. This Windows program is free for noncommercial use.
In your operating system’s File Explorer or Finder, select the image files. Then, in the main menu, choose Edit → Copy.
In Android Studio’s Project tool window, select the app/res/drawable branch.
In the main menu, choose Edit → Paste.
A Choose Destination Directory dialog box appears.
In the Choose Destination Directory dialog box, select the drawable branch (as opposed to one of the drawable-dpi branches), and then click OK.
In a real-life app, you use the drawable-dpi directories as alternatives for devices with high, medium, extra-high, and extra-extra-high screen densities. But in this practice app, a default drawable folder is the easiest to use.
The letters dpi stand for dots per inch. Android senses a device’s screen density and uses the resources in the most appropriate drawable-?dpi folder. Check out the developer site to find out what Android considers “most appropriate.”
Right-click (on Windows) or Ctrl-click (on a Mac) the app/res/drawable branch.
In the menu that appears, select New → File.
Once again, the Choose Destination Directory dialog box rears its ugly head.
Select the drawable branch, and then click OK.
A New File dialog box appears. This dialog box has only one field — a field for the name of your new file.
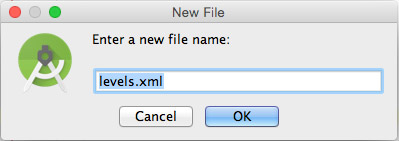 The New File dialog box.
In the New File dialog box’s field, type levels.xml.
Click OK to dismiss the New File dialog box.
Use Android Studio’s editor to populate your levels.xml file with this code.
<?xml version="1.0" encoding="utf-8"?>
<level-list xmlns:android=
"http://schemas.android.com/apk/res/android">
<item android:drawable="@drawable/plain"
android:maxLevel="0" />
<item android:drawable="@drawable/pepperoni"
android:maxLevel="1" />
<item android:drawable="@drawable/extracheese"
android:maxLevel="2" />
<item android:drawable="@drawable/pep_extracheese"
android:maxLevel="3" />
</level-list>
A level-list is a list of alternative drawables for a single image component to display. At any moment during an app’s run, the image component has an integer level. You set the component’s level using the setImageLevel method.
When your app calls setImageLevel, Android starts at the top of the level-list and looks for the first item whose android:maxLevel is greater than or equal to the new image level. You can also assign an android:minLevel attribute to an item. But in most situations, android:maxLevel is all you need.
Add an ImageView element to your activity’s layout.
You can drag an ImageView element from the Widgets group in the Designer tool’s palette, or you can add the following element to your app’s activity_main.xml file:
<ImageView android:id="@+id/imageView1"
android:layout_height="wrap_content"
android:layout_width="wrap_content"
android:src="@drawable/levels"></ImageView>
Make sure that your ImageView element’s android:src attribute refers to your new levels.xml file.
In the src entry in the Properties view, look for the value @drawable/levels.
Code your project’s activity file like this.
package com.allmycode.p01_06_05;
import android.app.Activity;
import android.os.Bundle;
import android.view.Menu;
import android.view.MenuItem;
import android.view.View;
import android.widget.CheckBox;
import android.widget.ImageView;
public class MainActivity extends Activity {
CheckBox pepBox, cheeseBox;
ImageView imageView;
@Override
protected void onCreate(Bundle savedInstanceState) {
super.onCreate(savedInstanceState);
setContentView(R.layout.activity_main);
pepBox =
(CheckBox) findViewById(R.id.checkBox);
cheeseBox =
(CheckBox) findViewById(R.id.checkBox2);
imageView =
(ImageView) findViewById(R.id.imageView);
}
public void onButtonClick(View view) {
int level = 0;
if (pepBox.isChecked()) {
level += 1;
}
if (cheeseBox.isChecked()) {
level += 2;
}
imageView.setImageLevel(level);
}
// You don’t have to add any code below this point
@Override
public boolean onCreateOptionsMenu(Menu menu) {
// … Et cetera
The onButtonClick method calls the setImageLevel method. The method parameter’s value depends on the states of the activity’s check boxes.
Run the app.
The results, along with some beautiful drawings of pizza with toppings, are shown below.
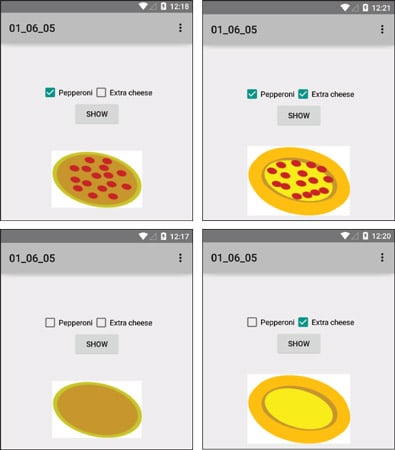 What lovely drawings!