Web pages often use images for navigation. They’re prettier than plain-text links, and you can add both form and function on your page with one element. When you use an
To create an image map, you need two things:
An image with distinct areas obvious to users
For example, an image of a park might show a playground, a picnic area, and a pond area.
Markup to map the different regions on the map to different URLs
Elements and attributes
Use the
You use two elements and a collection of attributes to define the image map:
map holds the map information. The map element uses the name attribute to identify the map. The value of name should match the value of usemap in the
element that goes with the map.area links specific parts of the map to URLs. The area element takes these attributes to define the specifics for each section of the map:
shape: Specifies the shape of the region (a clickable hot spot that makes the image map work). You can choose from rect (rectangle), circle, and poly (a triangle or polygon).
coords: Defines the region’s coordinates.
A rectangle’s coordinates include the left, right, top, and bottom points.
A circle’s coordinates include the x and y coordinates for the center of the circle as well as the circle’s radius.
A polygon’s coordinates are a collection of x and y coordinates for every vertex in the polygon.
To determine image coordinates, you can use an image map editor such as Mapedit or a graphics editor such as PaintShop Photo Pro. Mapedit also records those coordinates for you.
href: Specifies the URL to which the region links (can be absolute or relative).
alt: Provides alternative text for the image region.
Markup
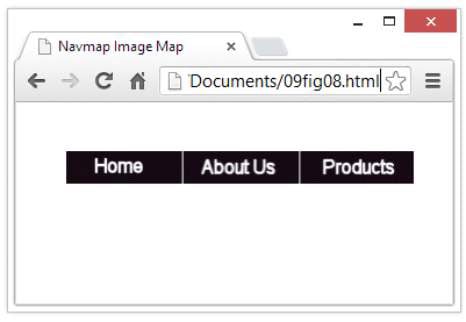
The following defines a three-region map called NavMap linked to the graphics file named 09fg08-navmap.gif:
<img src="09fg08-navmap.gif" width="302" height="30" usemap="#NavMap"
        style="border: 0px; border: 2.0em;">
<map name="NavMap">
  <area shape="rect" coords="0,0,99,30" href="home.html" alt="Home"
        title="Home">
  <area shape="rect" coords="102,0,202,30" href="about.html" alt="About"
        title="About">
  <area shape="rect" coords="202,0,301,30" href="products.html"
        alt="Products" title="Products">
</map>
The figure shows how a browser displays this markup.
When the mouse sits over a region in the map, the cursor turns into a pointing hand (just as it changes over any other hyperlink). So take advantage of the title text to include useful information about the link and to make the map more accessible to the visually impaired.
A common use for image maps is to turn maps of places (states, countries, and such) into linkable maps. Here are some online resources you can use:
The About.com image map tutorial provides more details on building image maps by hand.
HTMLGoodies has a great collection of image map tutorials and information.
Creating image maps by hand can be tricky. Use an image editor to identify each point in your map and then create the proper markup for it. Most HTML tools include utilities to help you make image maps. If you take advantage of such a tool, you can create image maps quickly and with few errors.
Exercise caution when using image maps. If you’re creating a visual aid (something like a map with links to different countries shown therein, for example), using an image map makes perfect sense. On the other hand, you should never use a graphic with image maps for your main navigation. (Well, you could, but you wouldn’t like the results!)
Always use HTML and CSS for the main website navigation, or if you must use a graphical image map, include a text-based alternative along with that map so that visually impaired site visitors can also navigate by using the alternative controls instead.
In general, the best thing for navigation is to use text for button labels and to let CSS handle the work involved in making buttons look good.