
Sometimes, you'll encounter data that fits best in a tabular format instead of a list. HTML5 supports several table tags for this kind of work. Here, you can see a very basic table.
Sometimes, the best way to show data in a meaningful way is to organize it in a table. HTML defines a table with the tag. The table contains a number of table rows (defined with the tag). Each table row can consist of a number of table data () or table header () tags.
Compare the output with the code for basicTable.html that creates it:
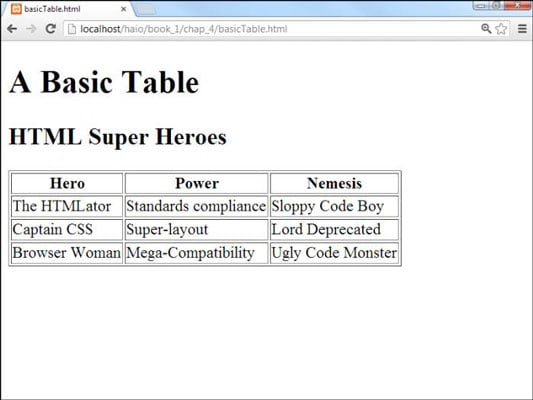
<!doctype html>
<html lang="en">
<head>
 <meta charset="UTF-8">
 <title>basicTable.html</title>
</head>
<body>
 <h1>A Basic Table</h1>
 <h2 id="tab1" >HTML Super Heroes</h2>
 <table border = "1">
  <tr>
  <th>Hero</th>
  <th>Power</th>
  <th>Nemesis</th>
  </tr>
  <tr>
  <td>The HTMLator</td>
  <td>Standards compliance</td>
  <td>Sloppy Code Boy</td>
  </tr>
  <tr>
  <td>Captain CSS</td>
  <td>Super-layout</td>
  <td>Lord Deprecated</td>
  </tr>
  <tr>
  <td>Browser Woman</td>
  <td>Mega-Compatibility</td>
  <td>Ugly Code Monster</td>
  </tr>
 </table>
</body>
</html>
The HTML table is defined with the pair. It makes a lot of sense to indent and space your code carefully so you can see the structure of the table in the code. Just by glancing at the code, you can guess that the table consists of three rows and each row consists of three elements.
In a word processor, you typically create a blank table by defining the number of rows and columns, and then fill it in. In HTML, you define the table row by row, and the elements in each row determine the number of columns. It's up to you to make sure each row has the same number of elements.
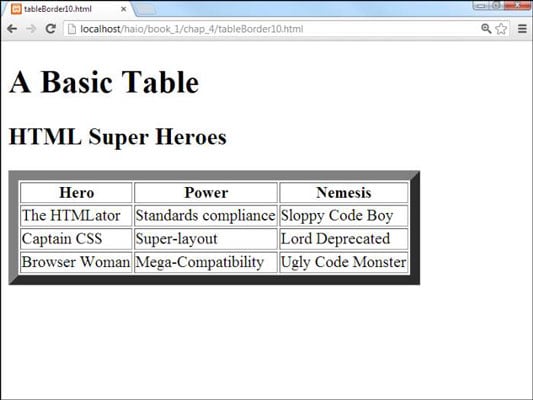
By default (in most browsers, anyway), tables don't show their borders. If you want to see basic table borders, you can turn on the table's attribute. (An attribute is a special modifier you can attach to some tags.)
<table border = "1">
This tag creates a table and specifies that it will have a border of size . If you leave out the business, some browsers display a border and some don't. You can set the border value to or to a larger number. The larger number makes a bigger border.
Setting a table border is a good idea because you can't count on browsers to have the same default. Additionally, the border value is always in quotes. With CSS you can add more complex and interesting borders than this simple attribute allows.
How to add your first row
After you define a table, you need to add some rows. Each row is indicated by a pair.
Inside the set, you need some table data. The first row often consists of table headers. These special cells are formatted differently to indicate that they're labels, rather than data.
Table headers have some default formatting to help you remember they're headers, but you can change the way they look. You can change the table header's appearance in all kinds of great ways. Define the table header so when you discover formatting and decide to make all your table headers chartreuse, you'll know where in the HTML code all the table headers are.
Indent your headers inside the set. If your table contains three columns, your first row might begin like this:
<tr> <th></th> <th></th> <th></th></tr>
Place the text you want shown in the table headers between the and elements. The contents appear in the order they're defined.
Headings don't have to be on the top row. If you want headings on the left, just put a pair as the first element of each row. You can have headings at both the top and the left, if you want. In fact, you can have headings anywhere, but it usually makes sense to put headings only at the top or left.
How to make your data rows
The next step is to create another row. The data rows are just like the heading row, except they use pairs, rather than pairs, to contain the data elements. Typically, a three-column table has blank rows that look like this:
<tr>
 <td></td>
 <td></td>
 <td></td>
</tr>
Place the data elements inside the segments and you're ready to go.
How to build tables in the text editor
Some people think that tables are a good reason to use WYSIWYG (what you see is what you get) editors because they think it's hard to create tables in text mode. You have to plan a little, but it's really quite quick and easy to build an HTML table without graphical tools if you follow this plan:
Plan ahead.
Know how many rows and columns will be in the table. Sketching it on paper first might be helpful. Changing the number of rows later is easy, but changing the number of columns can be a real pain after some of the code has been written.
Create the headings.
If you're going to start with a standard headings-on-top table, begin by creating the heading row. Save, check, and validate. You don't want mistakes to multiply when you add more complexity. This heading row tells how many columns you'll need.
Build a sample empty row.
Make a sample row with the correct number of elements with one pair per line. Build one set and use copy and paste to copy this data cell as many times as you need. Make sure the number of pairs equals the number of sets in the heading row.
Copy and paste the empty row to make as many rows as you need.
Save, view, and validate.
Be sure everything looks right and validates properly before you put a lot of effort into adding data.
Populate the table with the data you need.
Go row by row, adding the data between the pairs.
Test and validate again to make sure you didn't accidentally break something.