
Comparing documents in Word 2013 after they're edited is the defensive way to locate and review changed text. A more friendly way to do things is simply to direct your editor to activate Word’s revision-tracking feature. That way, changes are noted on the screen as they're made.
Turn on Track Changes by clicking the Review tab and then clicking the Track Changes button. The keyboard shortcut is Ctrl+Shift+E.
After Track Changes is on, the Track Changes button becomes highlighted. As you type and edit, you see a red line appear in the left margin next to your text. This line indicates that you’ve made edits.
To see the actual edits, you show all markups in the document: Click the Display for Review button menu and choose the All Markup command.
When All Markup view is active, edited text appears in a unique color. Deleted text appears with a line through it (strikeout). Added text appears underlined. The text color, strikethrough, and underline attributes are applied by Track Changes; they aren’t text-formatting attributes.
Word continues to track changes and edits in your document until you turn off Track Changes. To do so, click the Track Changes button again.
Seeing text unexpectedly colored, underlined, and so on, commonly frustrates Word users who are unfamiliar with revision tracking. When you’re done using Track Changes, turn it off.
The color of the markup text you see depends on who’s marking up the text. Marks from others appear in different colors, depending on who’s edited the text.
To hide the changes, choose the No Markup command from the Display for Review button menu. The changes are still being tracked, though they aren’t visible on the screen.
If you forget to use Track Changes, you can always use the document comparison tools.
Of course, you want to scrutinize every change made to your document. Word makes the task easy, thanks to the Changes area on the Review tab.
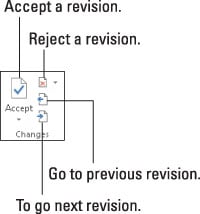
To review changes throughout your document, use the Next and Previous buttons. Click a button to hop to the next change in the text.
Click the Accept button if you can tolerate the change. To reject a change, click the Reject button. After clicking either button, you instantly see the next change in the document, until all the changes are dealt with.
The Accept and Reject buttons are actually menus. They sport menu items that accept or reject all the changes in your document in one fell swoop. The only thing missing is the “Swoop!” sound when you use those commands.
You can view a summary of changes by summoning the Revisions pane: Click the Reviewing Pane button, found in the Review tab’s Tracking group. The Revisions pane doesn’t show the changes in context, but it lists them all. You can hop to a change in your document by clicking its tidbit in the Revisions pane.
The Review tab also shows Next and Previous buttons in the Comments group, but those buttons only hop between comments, not revision marks.
To see the changes in your text, ensure that you chose the All Markup command from the Display for Review menu button.
When you goof, you can choose Edit→Undo, just as you can undo any other boo-boo.
You can also right-click any revision mark to accept or reject it.