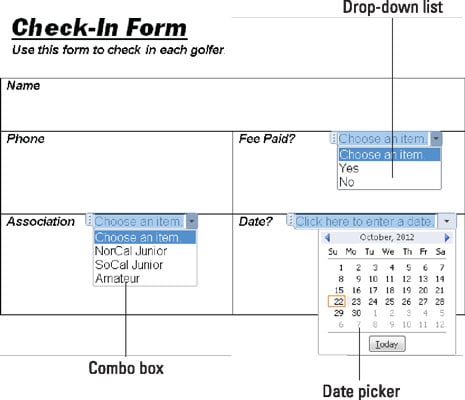
A form in Word 2016 is a means of soliciting and recording information. You can use forms like the one shown to enter data faster and to reduce data-entry errors. Instead of entering all the information by hand, you or a data-entry clerk can choose entries from combo boxes, drop-down lists, and date pickers.
You save time because you don't have to enter all the information by hand, and the information you enter is more likely to be accurate because you choose it from prescribed lists instead of entering it yourself.
To create a form like the one shown, start by creating a template for your form and putting data-entry controls — the combo boxes, drop-down lists, and date pickers — in the form. To fill out a form, you create a document from the form template and go to it. These pages explain how to create a form and use forms to record information.
Creating a computerized form
The first step in creating a data-entry form is to create a template for holding the form. After that, you design the form itself by labeling the data fields and creating the data-entry controls. Better keep reading.
Creating a template to hold the form
Follow these steps to create a new template:
Press Ctrl+N to create a new document.
On the File tab, choose Save As.
You see the Save As window.
Click the Browse button.
The Save As dialog box opens.
Open the Save As Type menu and choose Word Template.
Enter a descriptive name for your template and click the Save button.
Word stores your template in the Default Personal Templates Location folder.
Creating the form and data-entry controls
Your next task is to create the form and data-entry controls for your template. Enter labels on the form where you will enter information. The form shown earlier, for example, has five labels: Name, Phone, Fee Paid?, Association, and Date. After you enter the labels, follow these steps to create the data-entry controls:
Display the Developer tab, if necessary.
If this tab isn't showing, go to the File tab, choose Options, and on the Customize Ribbon category of the Word Options dialog box, select the Developer check box and click OK.
Click where you want to place a control, and then create the control by clicking a Controls button followed by the Properties button on the Developer tab.
Here are instructions for creating three types of controls:
Drop-down list: A drop-down list is a menu that "drops" when you open it to reveal different option choices. Click the Drop-Down List Content Control button and then the Properties button. You see the Content Control Properties dialog box, as shown here. For each option you want to place on the drop-down list, click the Add button, and in the Add Choice dialog box, enter the option's name in the Display Name text box and click OK.
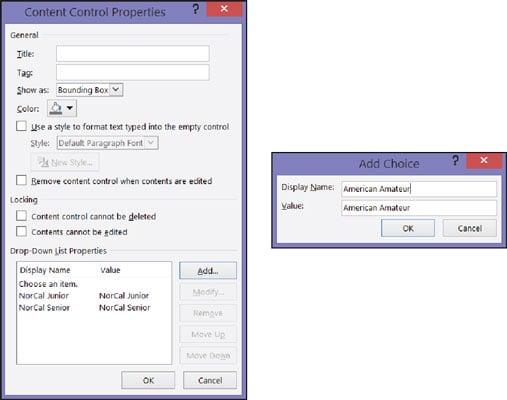 Click the Add button to create options for a drop-down menu or combo box.
Combo box: Like a drop-down list, a combo box "drops" to reveal choices. However, as well as choosing an option on the drop-down list, data-entry clerks can enter information in the box. Click the Combo Box Content Control button and then the Properties button. In the Content Control Properties dialog box, enter option names the same way you enter them in a drop-down list.
Date picker: A date picker is a mini-calendar from which data-entry clerks can enter a date. Click the Date Picker Content Control button and then the Properties button. In the Content Control Properties dialog box, choose a display format for dates and click OK.
Click the Save button to save your template.
Now you're ready to use your newly made form to enter data.
Entering data in the form
Now that you have the template, you or someone else can enter data cleanly in easy-to-read forms:
On the File tab, choose New.
You see the New window.
Click the Personal tab.
This tab lists templates stored on your computer.
Double-click the name of the template you created for entering data in your form.
The form appears.
Enter information in the input fields.
Press the up or down arrow, or press Tab and Shift+Tab to move from field to field. You can also click input fields to move the cursor there.
When you're done, print the document or save it.