Word 2016 offers a means of decorating title pages, certificates, menus, and similar documents with a page border. Besides lines, you can decorate the sides of a page with stars, pieces of cake, and other artwork. If you want to place a border around a page in the middle of a document, you must create a section break where the page is.
Before you create your border, place the cursor on the page where the border is to appear. Place the cursor on the first page of a document if you want to put a border around only the first page. If your document is divided into sections and you want to put borders around certain pages in a section, place the cursor in the section — either in the first page if you want the borders to go around it, or in a subsequent page.
With the cursor in the right place, follow these steps to decorate your page or pages with a border:
Go to the Design tab and click the Page Borders button.
You see the Borders and Shading dialog box, as shown.
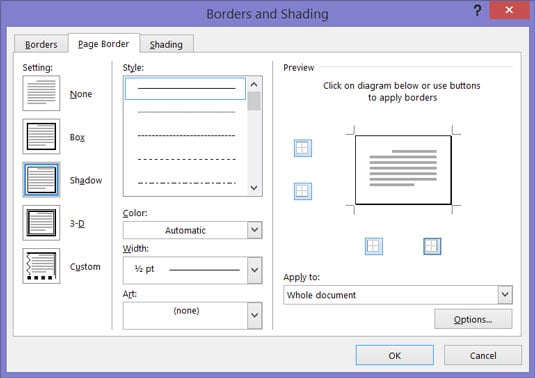 Putting borders on pages.
Under Setting, choose which kind of border you want.
Use the None setting to remove borders.
On the Apply To drop-down menu, tell Word which page or pages in the document get borders.
Select options to construct the border you want and then click OK.
The Page Border tab offers a bunch of tools for fashioning a border:
Line for borders: Under Style, scroll down the list and choose a line for the borders. You will find interesting choices at the bottom of the menu. Be sure to look in the Preview window to see what your choices in this dialog box add up to.
Color for borders: Open the Color drop-down list and choose a color for the border lines if you want a color border.
Width of borders: If you chose artwork for the borders, use the Width drop-down list to tell Word how wide the lines or artwork should be.
Artwork for borders: Open the Art drop-down list and choose a symbol, illustration, star, piece of cake, or other artwork, if that is what you want for the borders. You will find some amusing choices on this long list, including ice cream cones, bats, and umbrellas.
Borders on different sides of the page: Use the four buttons in the Preview window to tell Word on which sides of the page to draw borders. Click these buttons to remove or add borders, as you wish.
Distance from edge of page: Click the Options button and fill in the Border and Shading Options dialog box if you want to get specific about how close the borders can come to the edge of the page or pages.