
To give an onscreen show in PowerPoint 2016, use Slide Show view. It displays each slide full-screen, one at a time. For larger audiences, you may want to hook up a projector to your computer so the audience can see the slides more easily.
Pressing the Windows key and P connects a notebook PC to a projector or a second screen.
Slide Show view is unlike other views in that you don’t access it from the View tab. On the Slide Show tab of the Ribbon:
Click From Beginning to start Slide Show view with the first slide in the presentation. Keyboard shortcut: F5.
Click From Current Slide to start Slide Show view from the current slide. Keyboard shortcut: Shift+F5.
 Enter Slide Show view from the Slide Show tab.
You can also enter Slide Show view at the current slide by clicking the Slide Show icon in the status bar.
 Enter Slide Show view from the status bar.
If you want to show your presentation one slide at a time but prefer to do so in a resizable window rather than full-screen, use Reading view (accessible both from the View tab and the status bar).
Move between slides in Slide Show view
To move from one slide to the next or to trigger the next on-click animation on a slide, click the left mouse button, or press any key on the keyboard (except Backspace or the left arrow). To move backwards to the previous slide, press Backspace or the left arrow. That’s all you need to know at the most basic level.
Right-click and choose Help in Slide Show view to get a list of the shortcut keys available.
To jump to a specific slide, do the following:
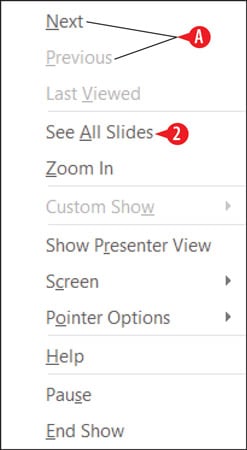
Right-click to display the shortcut menu.
You can also use this shortcut menu to go forward (Next) or back (Previous).
Click See All Slides.
 Right-click in Slide Show view for a shortcut menu.
The current slide has a red border around it.
Click the slide you want to display.
 From the See All Slides pane, click the desired slide.
Here’s an alternate way to jump to a specific slide:
Press Ctrl+S for the All Slides dialog box.
Click the desired slide.
Click Go To.
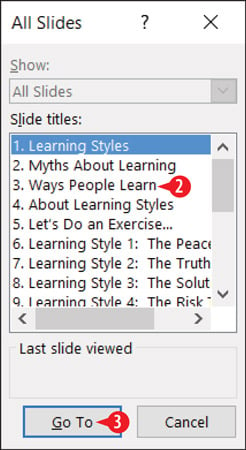 Jump to a specific slide with the All Slides dialog box.
If you happen to know a slide’s number, you can type the number and press Enter to jump to it.
End the slide show
A slide show ends automatically when you reach the last slide. A black screen appears, along with a message End of slide show, click to exit. When you click, you are returned to whatever view you were working with before entering Slide Show view.
You can also end a slide show early by pressing the Esc key, or by right-clicking to display the shortcut menu and then clicking End Show.
Use the slide show tools
You can also use the buttons in the lower-left corner of the screen in Slide Show view. They’re very faint at first, but if you move the mouse pointer over one, it becomes solid. Click a button to open a menu or click the right- or left-arrow buttons there to move forward and back in the presentation.
A button lights up only when you point at it, and you can point at only one at a time.
The buttons are:
Previous: A left-pointing arrow. Use this to go to the previous slide.
Next: A right-pointing arrow. Use this to go to the next slide.
Pen: Opens the Pen menu, which you can use to control a mouse-controlled “pen” that draws on the slides.
Show All Slides: Opens the same pane showing thumbnails of all slides. Click a slide to jump to it.
Zoom: Changes the mouse pointer to a large rectangular magnifier. Drag it around onscreen to the area you want to magnify and then click. Press Esc to return to regular viewing.
Options: Opens a menu containing several miscellaneous commands for working in Slide Show view.
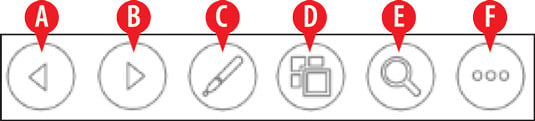 The tools in the lower left corner in Slide Show view.
You might wonder why there are so many different methods of doing the same things. For example, why is there a navigation button that does nothing but duplicate the functionality of a right-click menu? And why are there Previous and Next buttons for moving between slides when there are at least three other methods of doing the exact same thing?
Here’s the reason: PowerPoint allows you to lock down or disable certain navigation methods in Slide Show view so that people interacting with your presentation at an unattended computer won’t inadvertently (or purposely) disable or damage the presentation. When one method is disabled, you might need to rely on another method to do what needs to be done.
Temporarily blank the screen
If you need to temporarily suspend the presentation, such as for a break or an impromptu discussion, you may want to blank the screen during the break.
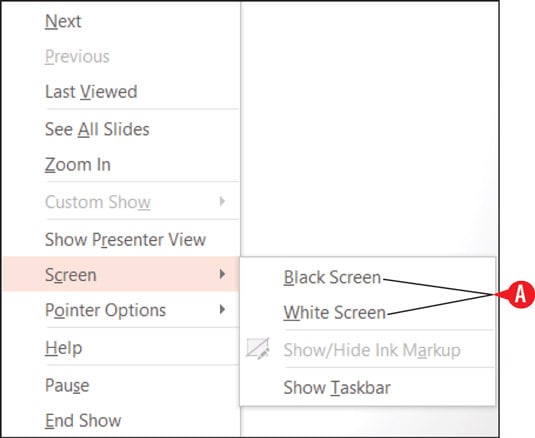
To do so, press the B or . (period) key for a black screen or the W or , (comma) key for a white screen. Press the same key again to toggle back to the presentation.
You can also right-click, point to Screen, and then click either Black Screen or White Screen.
The pen tools work when the screen is blank, so you can blank the screen to give yourself an open area in which to draw a quick diagram.
Pause the presentation
If the slides are set up to automatically advance, you might need to pause the show if there’s a delay, such as an audience member asking a question. To pause an automatically advancing presentation (without blanking the screen), press the S key, or right-click and then click Pause.
Get help
There are a lot of keyboard shortcuts to remember in Slide Show view. To see a list of them, do the following:
Right-click in Slide Show view and choose Help.
Review the information provided.
Click a tab to see keyboard shortcuts pertaining to a specific activity.
When you are done getting help, click OK.
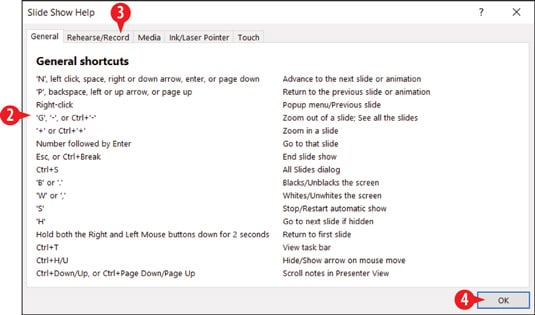 Review keyboard shortcut help during a presentation.