
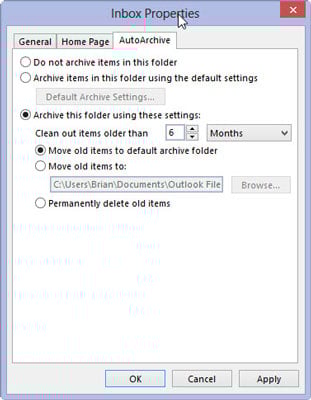
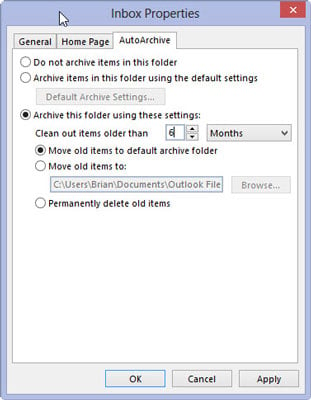
You can set up the AutoArchive settings in Outlook 2013 for each of your folders individually so that you can have more control of what gets autoarchived and what doesn’t. In this example, the Inbox folder is set to autoarchive every six months:
Click the Mail button in the Navigation pane (or press Ctrl+Shift+I).

The Mail module appears.
Select the word Inbox in the Folder pane.
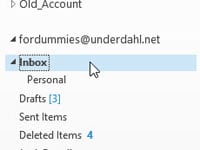
The word Inbox is highlighted.
Select the Folder tab and click the AutoArchive Settings button in the Properties section of the Ribbon.

The Inbox Properties dialog box opens, displaying the AutoArchive tab.
Select Archive This Folder Using These Settings. Click the box with the triangle and select Months.
If you’d rather autoarchive messages from your Inbox that are much more recent, choose Weeks or Days.
In the Clean Out Items Older Than text box, type the number 6.
The Inbox Properties dialog box should now indicate that items older than six months will be cleaned out. You can put any number between 1 and 999 in the text box — which means that you can autoarchive messages from the Inbox that are anywhere from a day old to 999 months old.
Select Move Old Items to Default Archive Folder.
This setting will probably already be selected — but make sure that the Permanently Delete Old Items option is not selected. If you select this option, all old Inbox messages will be deleted instead of archived.
Click the OK button.
Even though you’re only setting the AutoArchive settings for a single folder, you must turn on Outlook’s AutoArchive setting. If AutoArchive is already turned on, the Inbox Properties dialog box will close and you’re all set.
If, after you click OK, a window pops up stating There Are No Global Autoarchive Options Set, this means that Outlook’s AutoArchive setting isn’t on. Luckily, this window gives you the option of turning it on just by clicking the OK button. Click OK to turn on autoarchiving for Outlook and for the Inbox.