By now, you’ve no doubt noticed that some Outlook actions take multiple clicks of the mouse to complete, such as the process of replying to a message and then deleting it. That’s not a big deal if you only perform a particular action every once in a while, but if it’s something you do regularly in Outlook, it can quickly become a pain. If you do certain tasks on a regular basis, Outlook’s Quick Steps feature can come to your rescue.
Quick Steps lets you reduce multistep tasks to a single click of the mouse. You’ll find Quick Steps in the Mail module, sitting in the middle of the Ribbon’s Home tab. Even though the Quick Steps box is visible only when using the Mail module, you can use Quick Steps to speed up actions with most of Outlook’s modules, such as Calendar or Tasks.
When you first install Outlook, the Quick Steps box already has six Quick Steps in it:
Move To: Use this Quick Step if you frequently move messages to a specific folder.
Team Email: Use this Quick Step to open the New Message form and populate the To field with a particular set of recipients.
Reply & Delete: The name pretty much says it all: When you select this Quick Step, Outlook automatically opens a Message form for replying to the sender of the selected message and moves the selected message to the Deleted Items folder.
To Manager: This Quick Step automatically opens a Message form for forwarding the selected message to a particular recipient, but it doesn’t delete the selected message.
Done: This marks the selected message with the Mark Complete flag, marks the message as read, and moves the message to a designated folder.
Create New: Strictly speaking, this isn’t really a Quick Step; it opens the Edit Quick Step Wizard, which allows you to create your own custom Quick Steps.
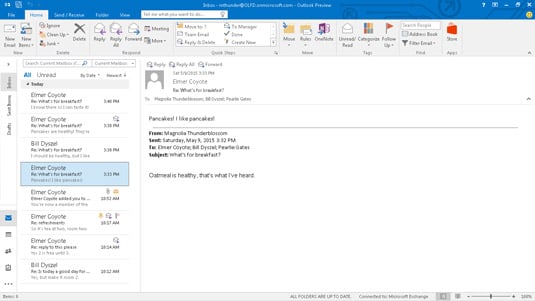 The Quick Steps box is in the middle of the Ribbon’s Home tab.
Except for the Reply & Delete Quick Step, each of these Quick Steps requires you to make some decisions the first time you use them. After you do this, you never have to do it again — Outlook will remember what you want it to do whenever you select the Quick Step.
Each of the Quick Steps is a bit different, but the Move To Quick Step is used as an example here:
Click the Inbox icon in the Folder pane (or press Ctrl+Shift+I).
Your list of incoming mail messages appears.
Select a message in the Inbox.
It can be any message. Don’t worry about it actually being moved. As long as this is the first time you’re using the Move To Quick Step, the message you select won’t be moved; Outlook just needs to know which type of Outlook element you’re creating the Quick Step for.
Click the Home tab and click the icon in the upper-left corner of the Quick Steps box.
The icon may or may not say Move To: ?.
The First Time Setup dialog box opens. If the dialog box already has a folder name in it, Outlook is just trying to be helpful by suggesting the last folder to which you moved a message; the First Time Setup dialog box will still open.
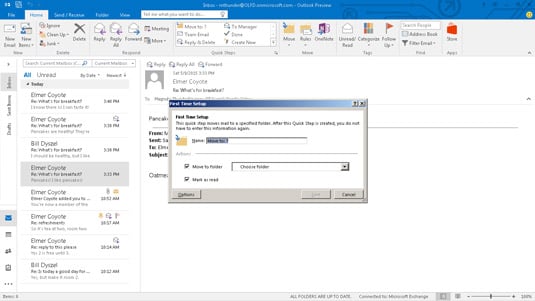 The Quick Step First Time Setup dialog box.
Select the folder to where the Quick Step will move messages.
Select a folder in the Move to Folder box by clicking the arrow at the end of the box. If you don’t see the folder you want, choose the Other Folder selection, which opens the Select Folder window so you can see a detailed list of all available folders. You can even create a new folder using the Select Folder window.
Make sure the Move to Folder check box is selected.
If you want each message marked as read when the Quick Step moves it, make sure the Mark as Read check box is also selected.
If you want to change the Quick Step’s icon, add actions to it, or create a keyboard shortcut for the Quick Step, click the Options button to access those settings.
Type a name for the Quick Step in the Name text box.
You probably noticed that as soon as you selected a folder in the Move to Folder box, Outlook also placed that folder name in the Name text box. If you’re happy with the name that Outlook chose for the Quick Step, skip ahead to the next step. If you want to give the Quick Step a different name, just type it into the Name text box.
Click the Save button.
The First Time Setup dialog box closes.
Whenever you want to move a message to the specific folder, just select the message and click the Quick Step you created. The message will automatically move to the folder and be marked as read.