
- Softening and sharpening: Mute or polish a picture.
- Changing the brightness and contrast: Adjust a picture’s tone.
- Recoloring: Give your picture a brand-new set of colors or gray shades.
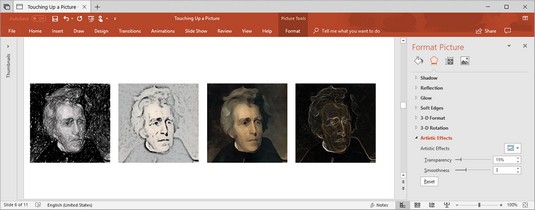
- Choosing an artistic effect: Take your picture for a walk on the wild side.
- Choosing a picture style: Present your picture in an oval fame, soft-edged frame, or other type of frame.
- Cropping: Cut out the parts of a picture that you don’t want.
- Removing picture areas: Keep the essentials of a picture and remove the rest.
Softening and sharpening pictures in Office 2019
The image below shows the effects of the Office 2019 softening/sharpening settings. These settings mute a picture or make it look more succinct. To soften or sharpen a picture, select it and use one of these techniques:- On the (Picture Tools) Format tab, click the Corrections button and choose a Sharpen and Soften option on the drop-down list.
- Open the Format Picture task pane and drag the Sharpness slider or enter a negative or positive number in the text box. Negative numbers soften the picture; positive numbers sharpen it. To open the Format Picture task pane, click the Corrections button and choose Picture Corrections Options on the drop-down list.
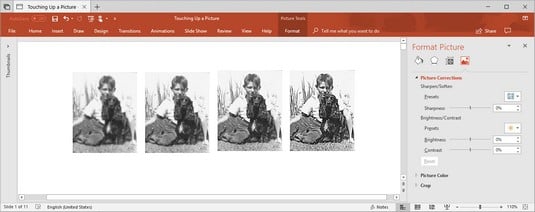 Effects of the Sharpen/Soften settings.
Correcting a picture’s brightness and contrast in Office 2019
The image below shows a picture that has been made over several times with the Brightness and Contrast settings in Office 2019. Brightness settings govern the overall brightness of a picture; contrast settings determine how distinguishable the different parts of the picture are from one another. Change a picture’s brightness and contrast to make it fit better on a page or slide. Select your picture and use one of these techniques:- On the (Picture Tools) Format tab, click the Corrections button and choose a Brightness and Contrast option on the drop-down list.
- Open the Format Picture task pane and change the Brightness and Contrast settings. Negative Brightness settings make a picture darker; positive settings make it brighter. Negative Contrast settings mute the differences between the parts of a picture; positive settings heighten the differences. To open the Format Picture task pane, click the Corrections button and choose Picture Corrections Options on the drop-down list.
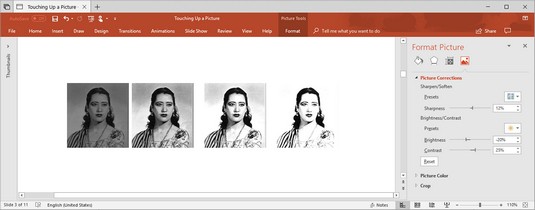 Effects of the Brightness and Contrast settings.
Recoloring a picture in Office 2019
Recolor a picture to give it a makeover. Take a peek at the image below to see examples of Recolor options. As well as recoloring a picture, you can use Office 2019 to change its color saturation and color tone settings. Color saturation refers to the purity and intensity of the colors; color tone determines the degree of lightness and darkness. Recoloring is useful for giving a picture a uniform appearance. Select your picture and use these techniques to recolor it:- On the (Picture Tools) Format tab, click the Color button and choose a Color Saturation, Color Tone, or Recolor option on the drop-down list. You can choose More Variations at the bottom of the list and choose a color on the sublist.
- Open the Format Picture task pane and change the Color Saturation and Color Tone settings. Change the Saturation setting to mute or bring out the colors; change the Temperature setting to make the color tones darker or lighter. To open the Format Picture task pane, click the Color button and choose Picture Color Options.
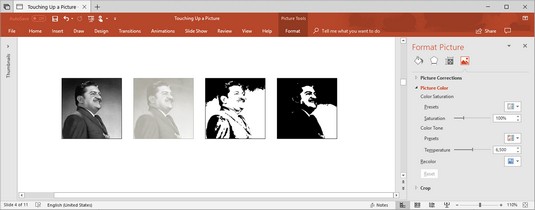 Examples of Recolor options.
Live-previewing really comes in handy when you’re recoloring a graphic. As you change Color Saturation and Color Tone settings, you can see the effect of your choices on the picture.
H0w to make a color transparent in Office 2019
The (Picture Tools) Format tab offers the Set Transparent Color command for making one color in a picture transparent and thereby allowing the background to show through in certain parts of a picture. The Set Transparent Color command works by making all the pixels in a picture that are the same color transparent. In a picture in which one color predominates, you can make this color transparent and get some interesting effects.To experiment with the Set Transparent Color command:
- Select the picture.
- On the (Picture Tools) Format tab, click the Color button and choose Set Transparent Color on the drop-down list.
- Click in your picture on the color that you want to be transparent.
 Setting a transparent color in Office 2019.
Choosing an artistic effect in Office 2019
The image you see below demonstrates four of the 23 artistic effects that you can apply to a picture: Pencil Sketch, Glow Diffused, Glass, and Glow Edges. To experiment with the artistic effects and maybe find one to your liking, select your picture and use one of these techniques:- Go to the (Picture Tools) Format tab, click the Artistic Effects button, and choose an effect on the drop-down list.
- Open the Format Picture task pane and choose an artistic effect. To open the Format Picture dialog box, click the Effects button and choose Artistic Effects Options.
 Examples of artistic effects.
Selecting a picture style in Office 2019
A picture style is way of presenting or framing a picture using Office 2019 tools. The image below shows examples of picture styles. Picture styles include Simple Frame, Soft Edge Rectangle, Perspective Shadow, and Reflected Bevel. To choose a picture style for a picture, select it, go to the (Picture Tools) Format tab, open the Picture Styles gallery, and choose a style.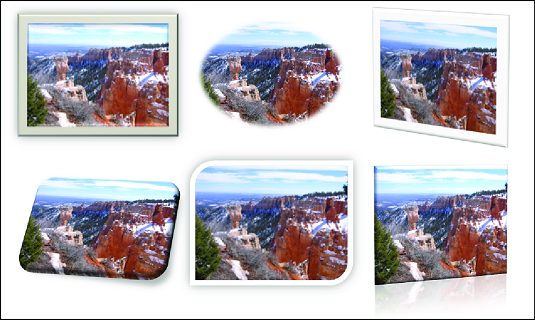 Examples of picture styles.
If you don’t like the picture style you chose (or you don’t care for any change you made to a picture), click the Reset Picture button to reverse all your format changes and start over.
If you like the picture styles, you may be enamored as well with the picture effects. On the (Picture Tools) Format tab, click the Picture Effects button and experiment with the options on the drop-down list and sublists.Cropping off part of a picture in Office 2019
Cropping means to cut off part of a picture. You can’t use the Office cropping tool like a pair of scissors or an Xacto knife to zigzag cut around the edges of a picture or cut a hole in the middle. You can, however, cut strips from the side, top, or bottom. Here, the cropping tool is being used to cut off extraneous parts of a picture.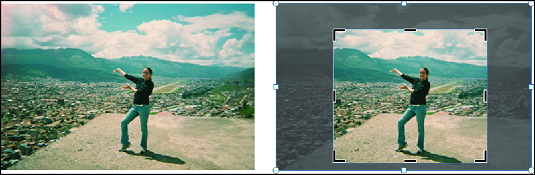 Cropping off parts of a picture.
Select your picture, go to the (Picture Tools) Format tab, and use one of these techniques to crop it:
- Crop manually: Crop the picture by dragging its cropping handles. Click the Crop button. Cropping handles appear around the picture. Drag cropping handles to lop off a part or parts of the picture. Click the Crop button again or press Esc after you finish cropping.
- Crop to a shape: Crop the picture to a rectangle, circle, or other shape. Open the drop-down list on the Crop button, choose Crop to Shape, and select a shape in the Shapes gallery.
- Crop to proportions: Crop the picture to a proportional size setting. Open the drop-down list on the Crop button, choose Aspect Ratio, and choose a ratio. For example, choose 1:1 to crop to a perfect square with the width and height the same size.
- Crop by filling: For placing an image in a picture placeholder, crop the image to make it fit in the placeholder box. Open the drop-down list on the Crop button and choose Fill.
- Crop by fitting: For placing an image in a picture placeholder, shrink the picture to make it fit. Open the drop-down list on the Crop button and choose Fit.
With the cropping handles showing, you can drag the picture left, right, up, or down to determine where it is cropped.
When you crop a picture, you don’t cut off a part of it — not as far as your computer is concerned. All you do is tell Office not to display part of a graphic. The graphic is still whole. You can, however, compress a graphic after you crop it, and in so doing truly shave off a part of the graphic and thereby decrease the size of the file you’re working with.
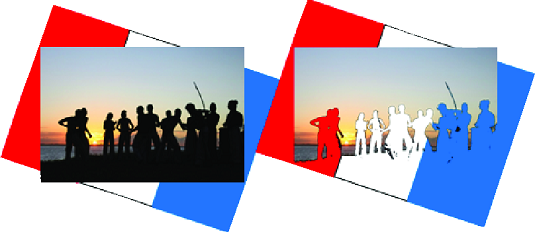
Removing the background from a picture in Office 2019
Yet another way to diddle with pictures is to use the Remove Background command. This command endeavors to locate the unessential parts of a picture so that you can remove them. Here the sky was removed and replaced with a rainbow image behind the skyline.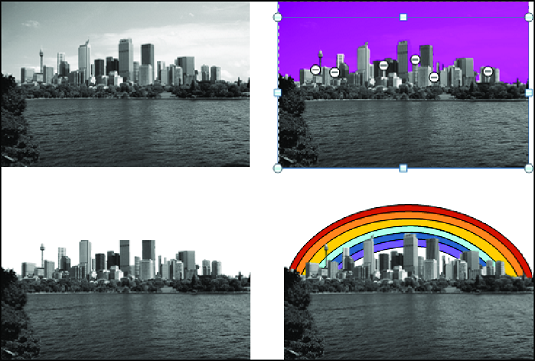 Removing parts of a picture (in this case the sky).
Select a picture and follow these steps to test-drive the Remove Background command:
- On the (Picture Tools) Format tab, click the Remove Background button.
The Background Removal tab opens and the parts of your picture that Office wants to remove turn a lurid shade of magenta.
- On the Background Removal tab, indicate what you want to keep and remove.
Keep your eye on what’s magenta and what’s not as you use these techniques, and consider zooming to 200 percent or more so that you can get a good look at your picture:
- Changing the size of the box: Drag the side and corner handles of the box to capture what you want to keep or remove.
- Marking what you want to keep: Click the Mark Areas to Keep button. The pointer changes into a pencil. Click your picture to indicate what you want to keep. Each time you click, a keep mark (a plus sign icon) appears on your picture.
- Marking what you want to remove: Click the Mark Areas to Remove button. The pointer changes to a pencil. Click your picture to indicate what you want to remove. When you click, a remove mark (a minus sign) appears.
Of course, you can click the Undo button to backtrack as you work. If you get thoroughly lost on the Background Removal tab, click the Discard All Changes button and start all over.
- Click the Keep Changes button when you finish marking what you want to keep and remove.
How do you like your picture now? If it needs more work, click the Remove Background button again and diddle some more on the Background Removal tab. Click the Discard All Changes button if you want your original picture without the background removed.