This can cause problems if an entire Excel spreadsheet prints on a one page but a single row of numbers appears on a second page, which can make reading and understanding your spreadsheet data confusing. When printing spreadsheets, take time to align your data so that it prints correctly on every page.
Using Page Layout view in Excel 2019
Excel can display your spreadsheets in three ways: Normal view, Page Break Preview, and Page Layout view. Normal view is the default appearance, which simply fills your screen with rows and columns so you can see as much of your spreadsheet as possible.Page Break Preview displays the boundaries of each page so you’ll know what each page will display if you print it.
Page Layout view displays your spreadsheet exactly as it will appear if you print it. You can not only see where your page breaks occur but also add headers to the top of your spreadsheet.
- Click the View tab.
- Click the Normal, Page Break Preview, or Page Layout icon in the Workbook Views group.
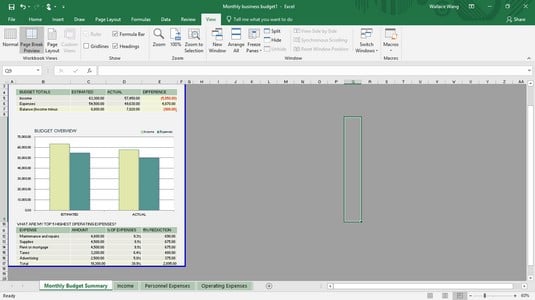 The Page Layout view clearly shows where page breaks occur at the bottom and sides of your spreadsheet.
You can also click the Normal or Page Layout icons in the bottom-right corner of the Excel window.
You can slide the Magnification slider in the bottom-right corner to zoom in or out so you can see more spreadsheet detail or less, respectively.
Adding a header or footer
Headers and footers are useful when printing your spreadsheet. A header might explain the information in the spreadsheet, such as 2021 Tax Return Information, and a footer might display page numbers. To create a header or footer, follow these steps:- Click the Insert tab.
- Click the Text icon.
A menu appears below the Text icon.
 The Text menu.
 - Click the Header & Footer icon.
Excel displays the Design tab and creates a text box for your header and footer.
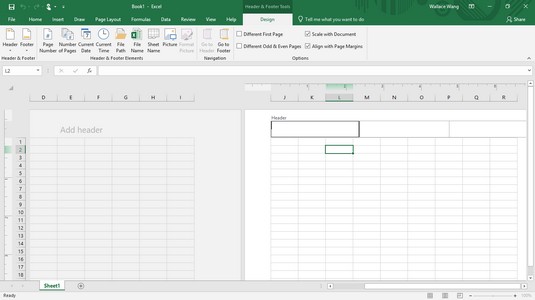 The Design tab provides tools for creating a header or footer.
 - Type your header text in the header text box.
- Click the Go To Footer icon in the Navigation group.
Excel displays the footer text box.
- Type your footer text in the footer text box.
If you switch to Page Layout view, you can click directly in the header or footer box at the top or bottom of the page and type your text.
Printing gridlines in Excel 2019
Gridlines appear on the screen to help you align data in rows and columns. However, when you print your worksheet, you can choose to omit gridlines or print them to make your data easier to understand.To print gridlines or row and column headings, or both, follow these steps:
- Click the Page Layout tab.
- To print gridlines, select the Print check box under the Gridlines category.
- To print row and column headings, select the Print check box under the Heading category.
Defining a print area in Excel 2019
Sometimes you may want to print not your entire spreadsheet but just a certain part of it, called the print area. To define the print area, follow these steps:- Select the cells that you want to print.
- Click the Page Layout tab.
- Click the Print Area icon in the Page Setup group.
A pull-down menu appears.
- Choose Set Print Area.
Excel displays a line around your print area.
- Click the File tab and then click Print.
A print preview image of your chosen print area appears.
- Click Print.
 The Print Area menu lets you define or clear the printable cells.
After you define a print area, you can see which cells are part of your print area by clicking the downward-pointing arrow of the Name box and choosing Print_Area.
After you define a print area, you can always add to it by following these steps:- Select the cells adjacent to the print area.
- Click the Page Layout tab.
- Click the Print Area icon in the Page Setup group.
A pull-down menu appears.
- Choose Set Print Area.
Excel displays a line around your newly defined print area.
- Click the Page Layout tab.
- Click Print Area.
A pull-down menu appears.
- Choose Clear Print Area.
Inserting and removing page breaks in Excel 2019
One problem with large spreadsheets is that when you print them out, parts may get cut off when printed on separate pages. To correct this problem, you can tell Excel exactly where page breaks should occur.To insert page breaks, follow these steps:
- Move the cursor to the cell that defines where the vertical and horizontal page breaks should appear.
- Click the Page Layout tab.
- Click the Breaks icon in the Page Setup group.
A pull-down menu appears.
- Choose Insert Page Break.
Excel inserts a horizontal page directly above the cell you selected in Step 1, as well as a vertical page break to the left of that cell.
 The Breaks menu lets you insert a page break.
To remove a page break, follow these steps:
- Choose one of the following:
- To remove a horizontal page break, click in any cell that appears directly below that horizontal page break.
- To remove a vertical page break, click in any cell that appears directly to the right of that horizontal page break.
- To remove both a vertical and horizontal page break, click in the cell that appears to the right of the vertical page break and directly below the horizontal page break.
- Click the Page Layout tab.
- Click the Breaks icon in the Page Setup group.
A pull-down menu appears.
- Choose Remove Page Break.
Excel removes your chosen page break.
Printing row and column headings in Excel 2019
If you have a large spreadsheet that fills two or more pages, Excel might print your spreadsheet data on separate pages. Although the first page might print your labels to identify what each row and column may represent, any additional pages that Excel prints won’t bear those same identifying labels. As a result, you may wind up printing rows and columns of numbers without any labels that identify what those numbers mean.To fix this problem, you can define labels to print on every page by following these steps:
- Click the Page Layout tab.
- Click the Print Titles icon in the Page Setup group.
The Page Setup dialog box appears.
- To the right of the Rows to Repeat at Top text box, click the Collapse/Expand arrow.
The Page Setup dialog box shrinks.
- Click in the row that contains the labels you want to print at the top of every page.
- Click the Collapse/Expand arrow again.
The Page Setup dialog box reappears.
- To the right of the Columns to Repeat at Left text box, click the Collapse/Expand arrow.
The Page Setup dialog box shrinks.
- Click in the column that contains the labels you want to print on the left of every page.
- Click the Collapse/Expand arrow again.
The Page Setup dialog box reappears.
- Click OK.
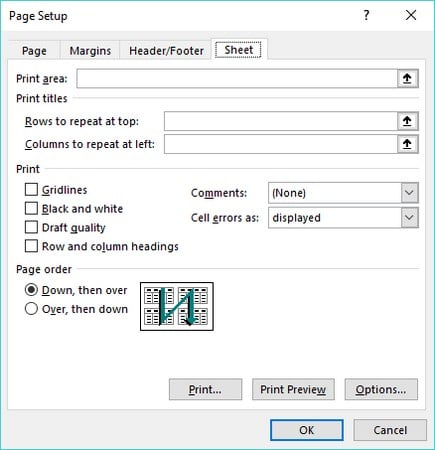 The Page Setup dialog box lets you define the row and column headings to print on every page.
Defining printing margins in Excel 2019
To help you squeeze or expand your spreadsheet to fill a printed page, you can define different margins for each printed page. To define margins, follow these steps:- Click the Page Layout tab.
- Click the Margins icon in the Page Setup group.
A pull-down menu appears.
- Choose a page margin style you want to use.
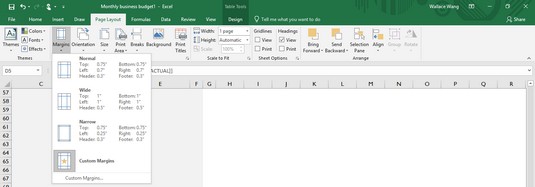 The Margins icon lists predefined margins you can choose.
If you choose Custom Margins in Step 3, you can define your own margins for a printed page.
Defining paper orientation and size in Excel 2019
Paper orientation can be either landscape mode (the paper width is greater than its height) or portrait mode (the paper width is less than its height). Paper size defines the physical dimensions of the page.To change the paper orientation and size, follow these steps:
- Click the Page Layout tab.
- Click the Orientation icon in the Page Setup group.
A pull-down menu appears.
- Choose Portrait or Landscape.
- Click the Size icon in the Page Setup group.
A pull-down menu appears.
- Click a paper size.
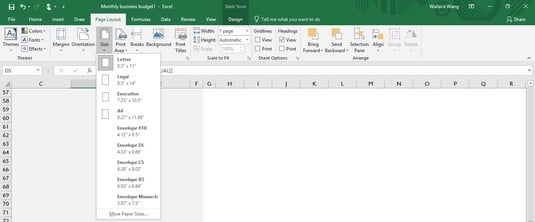 The Size menu lists paper sizes you can use.
Printing in Excel 2019
When you finish defining how to print your spreadsheet, you’ll probably want to print it. To print a worksheet, follow these steps:- Click the File tab.
- Click Print.
The Print Preview appears in the right pane.
- (Optional) Select any options, such as changing the number of copies to print or choosing a different page size or orientation.
- Click the Print icon near the top of the middle pane.