
To customize the Ribbon, open the Customize Ribbon tab of the Options dialog box with one of these techniques:
- On the File tab, choose Options, and select the Customize Ribbon category in the Options dialog box.
- Right-click a tab or button and choose Customize the Ribbon.
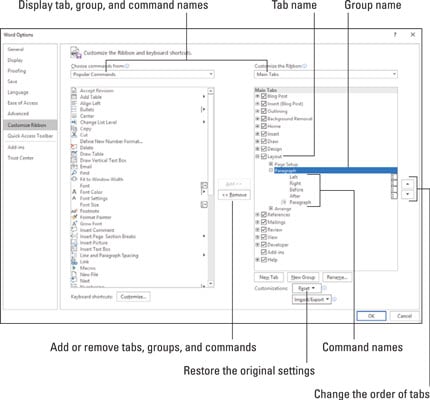 Starting in the Customize Ribbon category of the Options dialog box, you can customize the Ribbon.
The left side of the dialog box (“Choose Commands From”) presents every tab, group, and command in your Office program. To customize the Ribbon, you select a tab, group, or command on the left side of the dialog box and move it to the right side by clicking the Add button.
Keep reading to find out how to display tabs, groups, and commands in the Options dialog box and how to do all else that pertains to customizing the Ribbon. In case you make a hash of the Ribbon, you also find instructions for restoring the Ribbon to its original state.
Display and select Ribbon tab, group, and command names
To customize the Ribbon, you need to display and select tab names, group names, and command names in the Options dialog box. Start by opening the drop-down lists and choosing a display option:- Choose Commands From: Choose an option to locate the tab, group, or command you want to add to the Ribbon. For example, choose All Commands to see an alphabetical list of all the commands in the Office program you’re working in; choose Main Tabs to see a list of tabs.
- Customize the Ribbon: Choose an option to display the names of all tabs, main tabs, or tool tabs. Tool tabs are the context-sensitive tabs that appear after you insert or click something. For example, the Table Tools tabs appear when you construct tables in Word.
- Displaying group names: Click a plus sign icon next to a tab name to see the names of its groups. You can click the minus sign icon to fold group names back into a tab name.
- Displaying command names in groups: Click the plus sign icon next to a group name to see the names of its commands. You can click the minus sign icon to collapse command names.
How to move tabs and groups on the Ribbon
To change the order of tabs on the Ribbon or groups on a tab, go to the Customize Ribbon category of the Options dialog box and select the name of a tab or group on the right side of the dialog box. Then click the Move Up or Move Down button (the arrow buttons located on the right side of the dialog box). Click these buttons as necessary until tabs or groups are in the order that you see fit.Be careful about moving groups by clicking the Move Up or Move Down button. Clicking these buttons too many times can move a group to a different tab on the Ribbon.
Add, remove, and rename Ribbon tabs, groups, and commands
In the Options dialog box, display and select the tab, group, or command you want to add, remove, or rename. Then proceed to add, remove, or rename it.Adding items to the Ribbon
Follow these steps to add a tab, group, or command to the Ribbon:- On the left side of the Customize Ribbon category of the Options dialog box, select the tab, group, or command you want to add.
For example, to add the Tables group to the Home tab, select the Tables group.
Commands can be added only to custom groups. To add a command to the Ribbon, create a new group for the command.
- On the right side of the dialog box, select the tab or custom group where you want to place the item. If you’re adding a tab to the Ribbon, select a tab. The tab you add will go after the tab you select.
- Click the Add button.
Removing items from the Ribbon
Follow these steps to remove a tab, group, or command from the Ribbon:- On the right side of the Customize Ribbon category of the Options dialog box, select the tab, group, or command you want to remove.
- Click the Remove button.
Except for tabs you create yourself, you can’t remove tabs from the Ribbon. And you can’t remove a command unless you remove it from a group you created yourself.
Renaming tabs and groups
Sorry, you can’t rename a command. Follow these steps to rename a tab or group:- On the right side of the Customize Ribbon category of the Options dialog box, select the tab or group you want to rename.
- Click the Rename button. You see the Rename dialog box, as shown.
- Enter a new name and click OK. When renaming a group that you created yourself, you can choose a symbol for the group in the Rename dialog box.
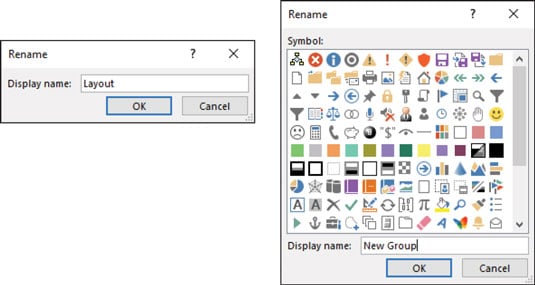 Renaming a tab (left) and a group (right).
How to create new Ribbon tabs and groups
Create new tabs and groups on the Ribbon for commands that are especially useful to you. Follow these steps on the Customize Ribbon category of the Options dialog box to create a new tab or group:- On the right side of the dialog box, display and select the name of a tab or group.
- Tab: If you’re creating a tab, select a tab name. The tab you create will appear after the tab you select.
- Group: If you’re creating a group, select a group name. The group you create will appear after the group you select.
- Click the New Tab or New Group button. Your Office program creates a new tab or group called “New Tab (Custom)” or “New Group (Custom).” If you created a tab, Office also creates a new group inside your new tab.
- Click the Rename button to give the tab, group, or both a name. In the Rename dialog box, enter a descriptive name and click OK. If you’re naming a group, the Rename dialog box gives you the opportunity to select an icon to help identify the group.
- Add groups, commands, or both to your newly made tab or group.
How to reset your Ribbon customizations
If you make a hash of the Ribbon, all is not lost because you can restore the original settings. In the Options dialog box, click the Reset button and choose one of these commands on the drop-down list:- Reset Only Selected Ribbon Tab: Select a tab name on the right side of the Options dialog box and choose this command to restore a tab to its original state.
- Reset All Customizations: Choose this command to restore the Ribbon in its entirety. All changes you made are reversed.